

This phase is devoted to creating a parking lot at the Menninkaisentie roadside (it is clearly seen on the layout).
However, we should start with improving our current model a bit. As you might have noticed the Menninkaisentie access road areas do not fully correspond to the actual roads on the layout. Let us adjust the intersection in our model to have more accurate matching.
Adjust the intersection’s layout
-
Increase the scale of the graphical editor to make it easier to edit the graphical elements (use the tool bar
 Zoom In button).
-
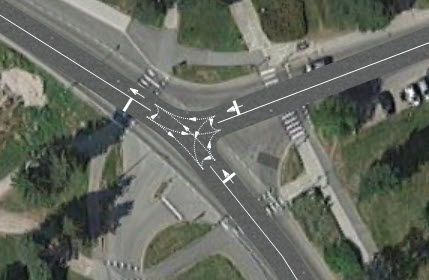
To increase the shape and the length of the access road turn areas you must increase the intersection’s area. This can be done by dragging away end points of the adjoined to the intersection roads. Select the
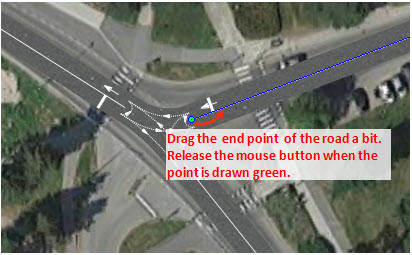
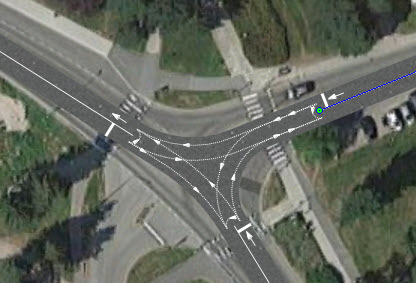
 roadEast road in the graphical editor. The road’s end point located at the intersection will be highlighted in green. Carefully drag the adjoined to the intersection end point away from it. Make sure that the end point is green on releasing the button (if it is green, it is connected). It turns white, if move the end point too far from the intersection. Press the
 Undo toolbar button if the end point turns white to cancel the previous step and repeat the dragging action.
-
Continue to carefully and step-by-step drag the end point away from the intersection until you locate it at the distance shown on the picture below.
-
In the similar way drag the end points of the other two roads. In the end, the road accesses to the main road must take shape of the actual roads on the layout.
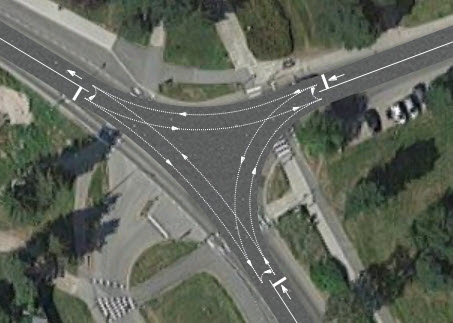
Run the model. The road traffic in our model will finally completely correspond to the actual intersection area that we are modeling.
Now that we are done with perfectionism, we can move on and model cars occasionally driving into our parking lot.
Draw a parking lot
-
Drag the
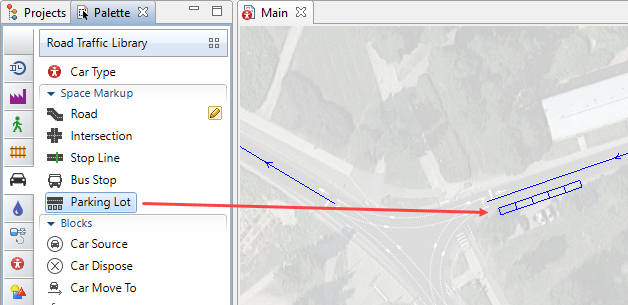
 Parking Lot element from the Space Markup section of the
 Road Traffic Library palette to the agent diagram. When moving the mouse over the agent diagram, you will see that all other elements but the roads are temporarily hidden.
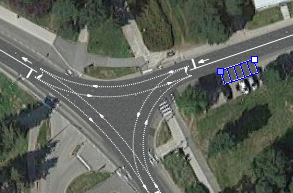
- Place your mouse cursor at the Menninkaisentie roadside just where the parked cars on the layout are. The parking lot will connect to the road. You can change the parking lot’s location if needed by dragging it with your mouse to the proper location.
-
Switch to the Properties view and set the Type of the parking lot: Parallel or Perpendicular. The parking lot should look like this now:
- By default the parking lot is created with five parking spaces. You can define the Number of parking spaces in the element’s properties. We shall not adjust the element’s properties since it is the five space parking lot that we need in our case.
- The length of the parking space can be modified in the Length of parking space property. Apart from the length, the width is defined in the Lane width property of the road network (and applies to all road network elements: roads, intersections, etc.).
Now we need to add blocks to the flowchart to model cars driving into the parking lot and staying there for a certain period of time. In order not to clutter up the flowchart with numerous identical blocks, we shall model the “drive in” action only for the cars moving from the North along the Tapiolavagen road and then turning to the Menninkaisentie road.
Modify the flowchart
- We want part of the cars coming from the North and turning to the Menninkaisentie road to drive into the parking lot located at the roadside. First of all we need to delete the connector between the selectNE and carMoveToE blocks as we will need to divide the car flow at this point one more time. Part of the cars will move to the parking lot, while the other part will move to the end of the Menninkaisentie road.
-
To perform the car flow division, add another
 SelectOutput block from the
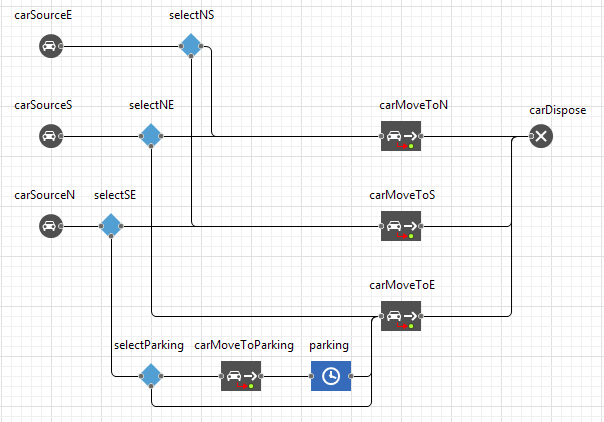
 Process Modeling Library. Name it selectParking and connect its ports to the ports of the other blocks as shown on the screenshot below.
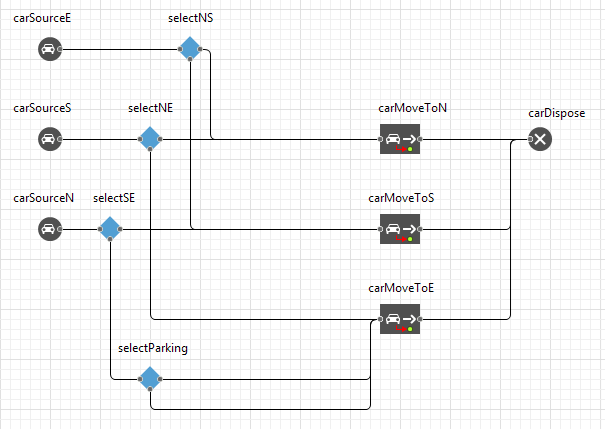
- Let us assume that we want to send a small amount of cars to the parking lot (around 10%). Type 0.1 into the Probability field. In such a way we define the amount of cars that will be sent to the upper output port of the block.
-
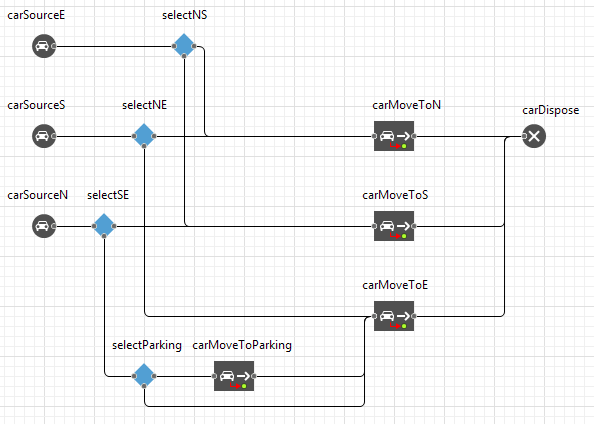
Add another CarMoveTo block to the process branch of the selectParking block’s upper output port (see the screenshot below). Name it carMoveToParking. This block will model car movement to the parking lot.
-
Choose Parking lot in the Moves to parameter, then choose the name of the previously created parking lot (
 parkingLot) in the Parking lot parameter.
-
The next step is to model the period of time the cars spend on the parking lot. To do that we need to add the
 Delay block to the flowchart from the
Process Modeling Library. Name it parking and make sure to connect it as shown on the screenshot below.
Delay block to the flowchart from the
Process Modeling Library. Name it parking and make sure to connect it as shown on the screenshot below.
- This block simulates time delay that occurs due to agent’s execution of a certain operation (it is the waiting time on the parking lot in our case). Open the block’s properties and change the Delay time to triangular( 5, 15, 45 ) minutes.
- Since up to five cars can be simultaneously parked in the parking lot, type 5 in the Capacity option. The option specifies the maximum quantity of agents (the agents are represented with cars in our case) that can fit in the block.
Run the model now and you will see that cars occasionally park into the parking lot. Try running model in the virtual time mode by clicking the  Run as fast as possible (virtual time mode) control. You will most probably see an error message. The source of the error is in the car that will be sent to the parking lot that has no vacant parking spaces.
We will take this case into account. It can be fixed by making minimum changes in our flowchart.
Adjust the flowchart
As you might have noticed, apart from the two standard ports on its left and right sides, the
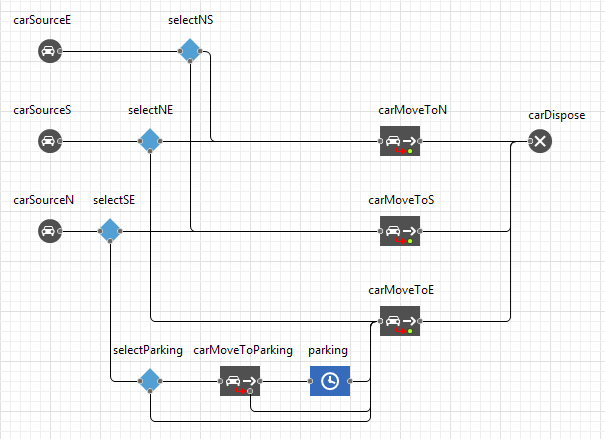
 CarMoveTo block has one more port in the lower part of the icon. The red arrow is pointing at it. This port is called outWayNotFound. It is the block’s output port for the cars that cannot find the route to the destination specified in this block.
-
Connect the lower output port of the carMoveToParking block with the input port of the carMoveToE block. The cars in our case will be directed to this port if the parking lot the cars are heading to has no vacant parking spaces at the moment when a car enters the carMoveToParking block. Thus, the cars will simply continue moving along the road if the parking lot is full.
Run the model and check if it works fine and no error messages pop-up.
Demo model: Road Traffic Tutorial - Phase 4 Open the model page in AnyLogic Cloud. There you can run the model or download it (by clicking Model source files). Demo model: Road Traffic Tutorial - Phase 4Open the model in your AnyLogic desktop installation.-
How can we improve this article?
-