

This video shows how to identify reusable pieces of logic in your model, and enclose them within custom flowchart blocks. Using custom blocks will make your flowchart simpler and more concise.
Since AnyLogic 8.3, the creation scenario has been significantly simplified.
To create a custom flowchart block
- Drag the selection over the flowchart blocks you want to enclose in your custom block.
- Right-click any of the selected blocks and select Create custom flowchart block from the context menu.
- The New agent dialog box will be shown. Specify the name of your block in the Agent type name field.
- Click OK.
-
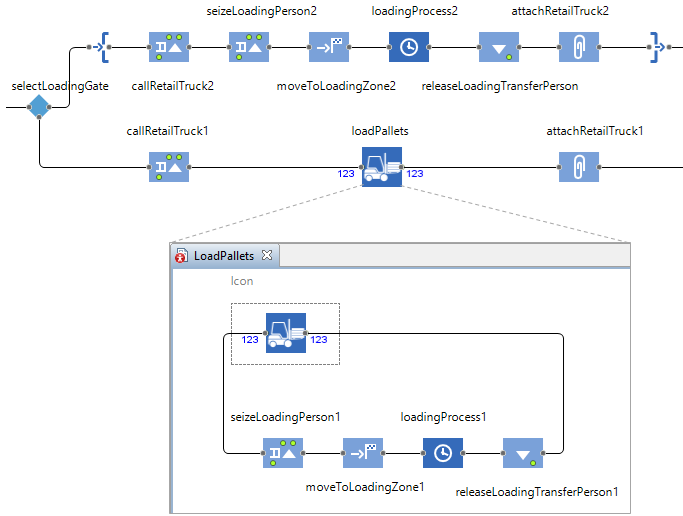
You will see one block appeared in the flowchart instead of the selected blocks. It is the instance of the new agent type that was created in your model. You can find this agent type in the model’s tree in the Projects view.
AnyLogic does not support the command performing the disassembly of the custom flowchart. However, if you realize that you need to revert your flowchart to its original state right upon creating your custom flowchart block, you can use the regular undo command.
- The created custom flowchart block will have the same number of input ports as the first (typically leftmost) block in the sequence of flowchart blocks, enclosed in this custom block. The output ports of the custom block will correspond to the output ports of the last block in the sequence.
- The default block icon is a regular rectangle. To customize the icon, open the graphical diagram of your block by double-clicking the corresponding agent type in the Projects view and draw other presentation shapes on the diagram. To make some presentation shape a part of an icon, select the shape's Icon property. We recommend to locate icon shapes between the block ports.
- If the blocks you have enclosed in your custom contain any parameters, these parameters will be exposed to the interface of the custom block also. To customize some parameter created in your custom block, select it and adjust the parameter’s Label and Control type in the Value editor section of the parameter’s properties. These settings define how the parameter will look like in the properties of your custom block — what will be its label and what control will be used for editing the parameter value.
-
How can we improve this article?
-