

In the previous phases we created a new model, populated it with facilities, bomber aircrafts, defined behavior of aircrafts and their mission, specified animation shapes, added bombs to our model and learned how to destroy facilities with them.
In this phase we will add radars and radar-guided missiles as agents to our model. The radar will scan the air within its coverage zone every second. Once it detects a bomber and is able to guide yet another missile, it will launch one. The missile will act similarly to the bomb by engaging with the bomber (the radar will pass the bomber to the missile constructor) and exploding once it has got as close as 10 meters to the bomber.
Alternative approach would be to analytically calculate the exact moments of time at which a bomber gets close enough to the target to drop a bomb, enters the radar coverage zone, or when a missile catches up with the bomber. With the given linear or piecewise-linear trajectories and constant velocities of bombers, this would be a task of a medium (high school level) mathematical complexity, which can be done as an exercise. The resulting model will be more accurate and the simulation will be much more efficient. However, the approach we chose (recalculation of the geometric conditions on each time step) is simpler with no analytical skills required at all. It is also more general. It will work regardless of the movement type.
Let us start creating our defense system.
Create the first radar
- Drag the
 Agent element from the
 Agent palette onto the
Main diagram. Place it beneath the
bombers population to the left of the model animation.
Agent palette onto the
Main diagram. Place it beneath the
bombers population to the left of the model animation. - Click A single agent, because we do not plan to have a population of radars. We will create two individual radars in the model and specify individual parameters to each of them.
- Specify Radar in the Agent type name field and radar1 in the Agent name field. Click Next.
- Choose the Patriot animation shape in the Military section. Click Next.
- Create a range parameter:
- Click add new.... A new parameter will be created.
- Type range into the Parameter field.
- Leave the Type set to double and specify 200 in the Expression field.
- Click Finish.
Our first radar is created. Proceed to creating the second one.
Create the second radar
- Drag the
Agent element from the
Agent palette onto the
Main diagram. Place it beneath the
radar1 agent.
- Click A single agent.
- Select the I want to use an existing agent type option. Click Next.
- Select Radar as the agent type that will be used. Specify radar2 in the Agent name field. Click Finish.
- Click the
radar2 agent on the
Main diagram to open its Properties.
- Specify the radar’s range by typing 200 in the range: field.
Both our radars are ready. Now drag their animations on the
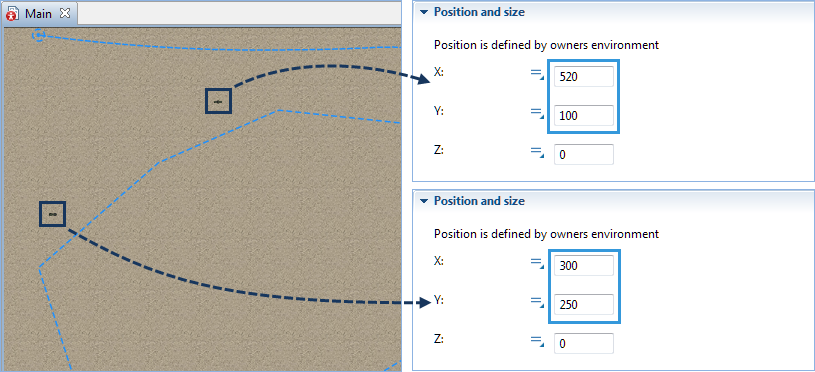
![]() Main diagram to the protected area and place them at (300, 350) and (520, 100) respectively as for instance. You may place your radars as you wish by either dragging them over the graphical diagram or specifying the positions in the Position and size section of the agent’s properties.
Main diagram to the protected area and place them at (300, 350) and (520, 100) respectively as for instance. You may place your radars as you wish by either dragging them over the graphical diagram or specifying the positions in the Position and size section of the agent’s properties.
Run the model and make sure the radars are located on the bomber’s route. You will see that the shapes are not headed towards the bombers.

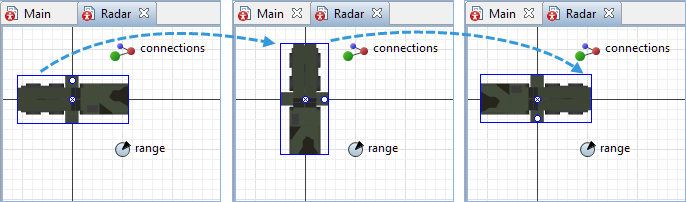
Turn the animation of the radars to make them face the bombers.
Adjust the radars direction
- Open
radar1 diagram by double-clicking it on the
Main.
- Click the patriot animation to select it.
- Hover your mouse over the top circle on the shape. The mouse cursor will change to a
 rotation icon.
 - Click and hold the mouse button. Drag it clockwise to rotate the shape 180 degrees to make the radar head the opposite way.
Now we will create the population of agents representing the missiles.
It will be very similar to the
![]() bombs with the limited lifetime from launch to explosion and it will contain two parameters:
bombs with the limited lifetime from launch to explosion and it will contain two parameters:
- the radar parameter of type Radar.
- the target parameter of type Bomber.
The missile will be periodically adjusting its trajectory to catch up the moving target.
Create the Missile agent type
- Drag the
Agent element from the
Agent palette onto the
Main diagram. Place it to the left of the two radars populations.
- Click Population of agents. You will be taken to the next step.
- Specify Missile in the Agent type name field. Click Next.
- Choose the Missile animation shape in the Military section. Click Next.
- Create two parameters:
- Click add new... to create a parameter.
- Type radar into the Parameter field.
- Set Type to Other (additional drop-down list will appear next to it).
- Select Radar from the additional drop-down list of the parameter’s type (This will be the target building in the bomber mission).
- In the same way create parameter target of type Bomber.
- Click Next.
- Select the Create initially empty population, I will add agents at the model runtime option.
- Finally, click Finish.
We have created the new population. Now we will define certain parameters of the agents within this population.
Specify the speed of the missiles
- Click the
missiles population on the
Main diagram to open its Properties.
- Navigate to the Dimensions and movement section and set the Initial speed parameter to 900. Make sure that the speed is expressed in kilometers per hour.
Now we should open the
![]() Missile agent diagram to adjust the animation scale and define the agent’s behavior.
Missile agent diagram to adjust the animation scale and define the agent’s behavior.
Adjust scale of the animation shape
- Open the
Missile agent diagram by double-clicking the
missiles population element.
- Click the 2D animation shape of the missile to open its Properties view.
- Set the Additional scale parameter to 400%. It will make the missile visible and easy to observe during model simulation in the 3D mode.
Define the behavior of the missiles
-
Drag the
 Statechart Entry Point element to the graphical editor of the
Missile agent. Navigate to its Properties view and type the following code into the Action field:
Statechart Entry Point element to the graphical editor of the
Missile agent. Navigate to its Properties view and type the following code into the Action field:
setXYZ(radar.getX(), radar.getY(), radar.getZ());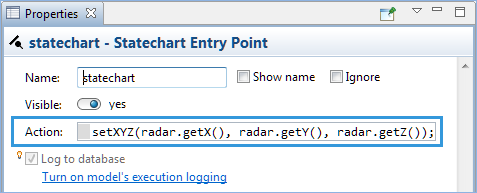
- Now click and drag the
 State element from the
Agent palette to the
Statechart Entry Point element on the
Bomb diagram. Name it Flying.
State element from the
Agent palette to the
Statechart Entry Point element on the
Bomb diagram. Name it Flying. -
Type the following code into the Entry action field:
moveTo( target.getX(), target.getY(), target.getZ() );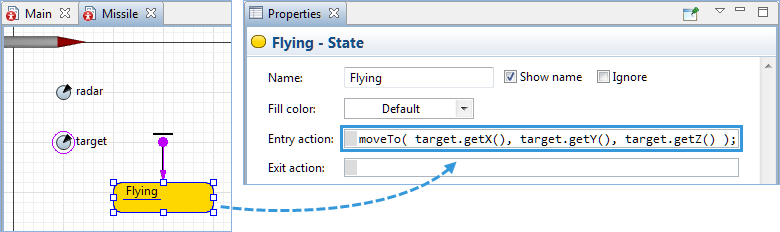
-
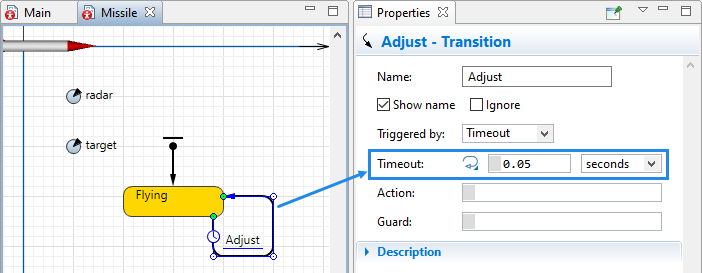
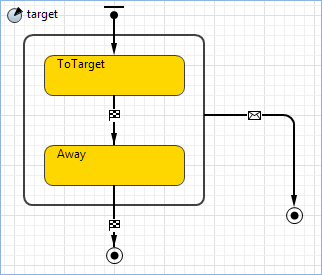
Now drag the
 Transition element to the diagram and connect it to the
Flying state as shown on the picture below. Name it Adjust and set its Timeout parameter to 0.05 seconds.
Transition element to the diagram and connect it to the
Flying state as shown on the picture below. Name it Adjust and set its Timeout parameter to 0.05 seconds.
It makes sense to discuss the missile trajectory adjustment. The Adjust transition is executed every 0.05 seconds. It has no action, but it makes the missile statechart re-enter the
Flying state. Therefore, the entry action of the
Flying state is also executed every 0.05 seconds, making the missile head to the current position of the bomber.
This kind of navigation is far from being ideal, but it will give us a nice curved trajectory of the missile. The condition of the AtTarget transition will also be re-evaluated each 0.05 seconds. The same is true for the OutOfRange transition, which is responsible for checking if the missile leaves the radar coverage area and can no longer be guided.
-
Now drag the
Transition element to the
Flying element on the
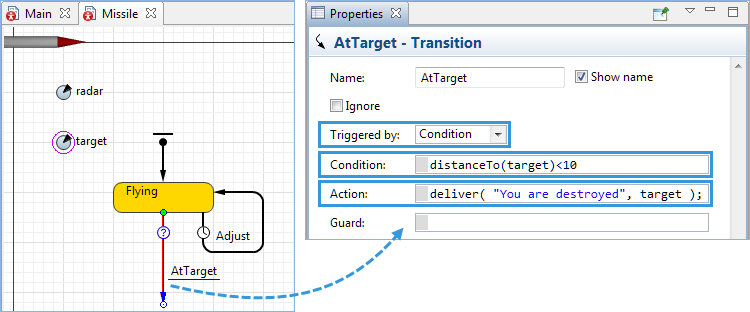
Missile diagram and connect them. Name it AtTarget and navigate to its properties and perform the following changes:
- Set the Triggered by parameter to Condition.
- Type the following code into the Condition field to specify the distance to the bomber at which the missiles will explode:
distanceTo(target)<10 - Type the following code into the Action field to specify the message the missile will transfer to the bomber’s statechart.
target.statechart.receiveMessage("You are destroyed");
We use the receiveMessage() function of the statechart, not the common agent’s send() function since the latter schedules the message to be sent after the current action. In our case by that time this missile will already be destroyed itself (by the code of the final state we will add next), and due to this the message sending will be cancelled.
-
Drag the
 Final State element to the statechart that we are designing and connect it to the AtTarget element. Name it Exploded and type the following code into the Action field of its Properties:
main.remove_missiles( this ); — to destroy the current missile once the message has been delivered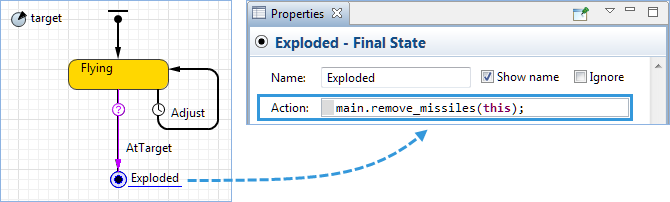
-
Now drag the another
Transition element to the
Flying element. Name it OutOfRange and navigate to its properties and perform the following changes:
- Set the Triggered by parameter to Condition.
-
Specify the distance to the bomber at which the missile will explode by typing the following code into the Condition field:
distanceTo(radar) > radar.range

The next step is to program the launch and the guiding processes of the missiles
Program the missile launch and guiding
-
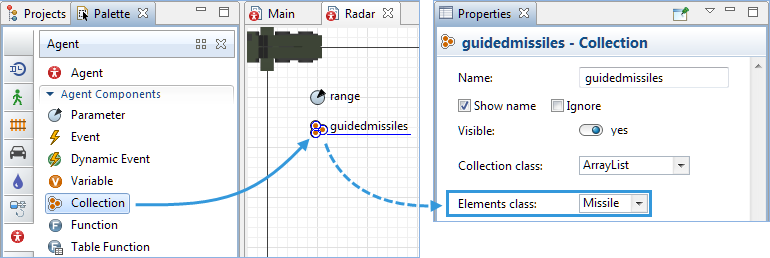
Create a collection inside the
Radar. Name it guidedmissiles and set the Elements class to Missile. This collection will contain the missiles currently guided by the radar.
-
Click somewhere within the
Radar diagram’s empty space to open the agent’s properties and add the following code to the On step field:
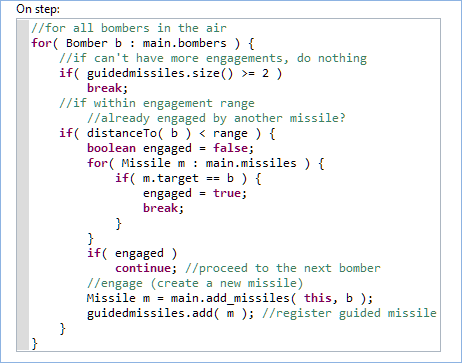
The radar iterates across all the bombers in the model. If a bomber without a missile is found, a new missile is launched. Zone scanning is done on every time step, which is defined in the Properties view of the top level agent.
Enable steps
-
Navigate to the properties of the
Main diagram and select the Enable synchronous steps option in the Space and network section. Leave the set by default: 1 seconds.

Now we need to let the radar know that the missile reached the aircraft and exploded so that the radar could launch and guide another missile.
Adjust missile behavior
-
Navigate to the
Main diagram and double-click
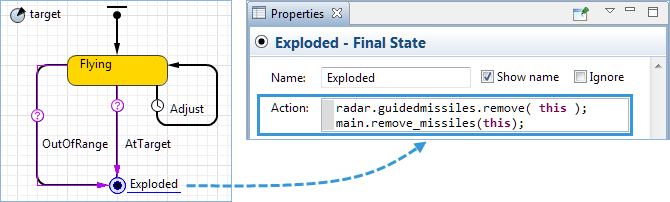
missiles to open the agent’s diagram. Add one more line to the Action parameter of the
Exploded statechart element:
radar.guidedmissiles.remove( this ); — to clear itself from the radar
With the final step of this tutorial we will program the bomber’s reaction to the missile explosion.
Modify Bomber’s statechart
- Double-click the
State element in the Statechart section of the
Agent palette to activate its drawing mode.
- Click and drag your mouse over the drawn statechart to enclose it into the new element as shown on the picture below.
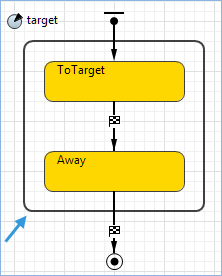
- Now drag the
Transition element to the diagram and connect it to the previously drawn
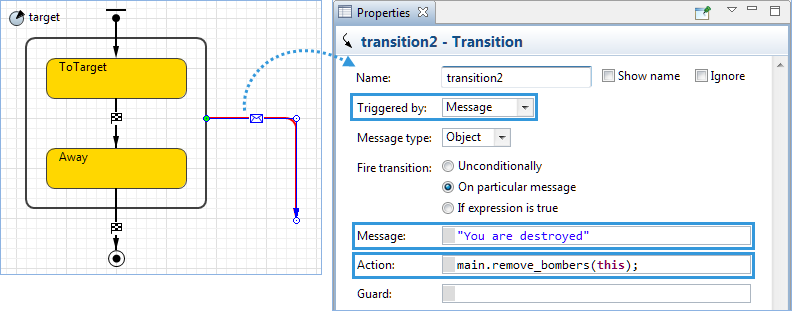
State element. Navigate to its properties and:
- Set the Triggered by parameter to Message.
- Specify "You are destroyed" in the Message field.
- Add main.remove_bombers(this); to the Action field.
-
Finally add the
Final State element to the agent diagram and connect it to the previously added
Transition element. The state should look like this:
Run the model. You will see that a missile explodes on reaching the attack distance. The bombers disappear once the missiles heading to them explode.

While running, the model can finally reach the point when all the buildings have been destroyed. To avoid our model throwing an exception in this case, we can set it up to show a notification and stop simulation when all the buildings are destroyed by bombers.
Stop bombing when targets are hit
- Open the
Bomb diagram and select the transition leaving the
Falling state.
-
In the transition’s Action field, add the code shown in the image below.
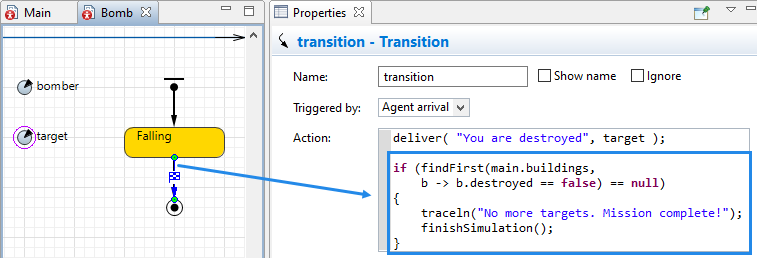
This code searches for buildings that have not been destroyed yet. If none exist (the findFirst() function returns null), the "No more targets. Mission complete!" message is displayed in the console, and the simulation is finished.
Congratulations! You have successfully completed the Air defense system tutorial.
Demo model: Air Defense System - Phase 4 Open the model page in AnyLogic Cloud. There you can run the model or download it (by clicking Model source files). Demo model: Air Defense System - Phase 4Open the model in your AnyLogic desktop installation.-
How can we improve this article?
-