

The Run Configuration panel is used to specify the parameters, analysis elements, and file resources of the model that must be transferred to the cloud model version.
To access the Run Configuration panel
-
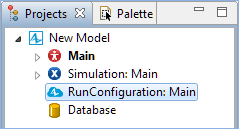
Double-click the Run Configuration element in the model tree.
The Run configuration panel is divided into two areas.
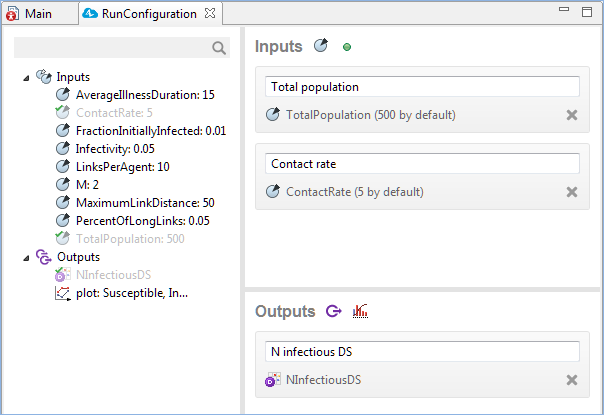
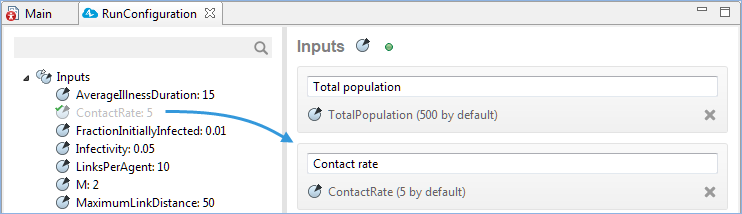
- The left area contains a tree of all the elements that were added to the top-level agent diagram of the current model. These are the elements that can be transferred to the Cloud model. The tree consists of two sections:
-
The Inputs — section may contain:
-
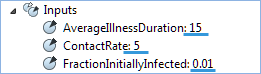
 Parameters — you can use only static parameters of the top-level agent, belonging to the following types: int, double, boolean, string, Date. It is also possible to use values in the Time, Rate, Length, Speed, and other units. The values of the parameters are specified next to their names. The order of parameters in the list corresponds to the order in the Parameters preview section of the top-level agent’s Properties.
-
 File resources — you can use resources that satisfy the following conditions: they are referenced in the model, stored in the model folder, and have a relative path. If the resource does not satisfy one of these conditions, it will be grayed out in the elements tree.
When the model is uploaded to Cloud, files in the Inputs section can be replaced on the experiment screen: you don’t need to upload the model in AnyLogic for desktops manually.
-
-
The Outputs — section may contain:
-
All elements from the
 Analysis palette.
- Files of any kind: see below.
The elements of the Outputs section will be automatically grouped if there are more than two elements of the same type. The sections are instantly updated, that is, a new element becomes listed here as soon as you place it onto the top-level agent diagram. -
All elements from the
-
The Inputs — section may contain:
-
The right area of the configuration panel shows the elements that will be transferred to Cloud upon exporting the current model to AnyLogic Cloud. It consists of Inputs and Outputs areas that correspond to the sections of the left tree in terms of content they may contain.
The added element creates a block containing information about the element.-
Blocks of the Inputs area contain:
- Label — it will be shown instead of the Name.
- Name — the name of the parameter or the file.
- Value — shows the value of a parameter with measurement units if specified, or the path to the file.


-
Blocks of the Outputs area contain the same set of parameters, providing corresponding information on the element the block belongs to.
The text field inside the element’s block allows for setting the label for the added element that will be displayed in the AnyLogic Cloud user interface. For a Parameter element, its Label is used by default, if any. For an Output, its name is used by default. For a Chart, the Title of its data item is used by default. If the chart data contains multiple data items, the Name of the chart is used.
-
Blocks of the Inputs area contain:
The Search field that is located in the left part of the configuration panel allows for searching within the tree of elements only.
To add an element to the exporting Inputs and Outputs
There are several ways of adding an element to the list of the to be exported elements:
-
Right-click the required element and select Add from the context menu.
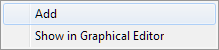
- Double-click the required element in the tree of elements. It will be automatically added to the Inputs or Outputs section, depending on its type.
-
Drag-and-drop the required element from the tree to the corresponding section on the right.
The added element will be highlighted in grey in the tree of elements with its icon acquiring a green checkmark (for example, ).
).
- If you try to add a resource file that does not satisfy one of the required conditions, the drag-and-drop operation will fail and AnyLogic will display an error message.
To add multiple inputs or outputs
- To add multiple elements, select them by holding Ctrl and clicking the elements you need to add. Release the Ctrl button once you have selected all the needed elements.
-
Now you can do any of the following:
- Drag-and-drop the selected elements from the tree to the corresponding area on the right.
- Right-click a selected element to open the context menu, then click Add.
-
You can also add all input and output elements at once by dragging the Inputs or Outputs header to the corresponding area on the right. In this case, all elements will be immediately added, including the resource files that do not satisfy the necessary conditions. These will be marked by the warning icon:
 . You need to either remove them from the Inputs or Outputs — or make the necessary changes to make these files valid. Otherwise, it will prevent the export of the model to AnyLogic Cloud.
To remove an element from the exporting Inputs and Outputs
There are several ways to remove an element from the list of the to be exported elements:
-
Right-click the required element and select Remove from the context menu.
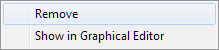
- Double-click the required element in the Inputs or Outputs section.
-
Click the
 Remove icon of the element’s block in the Inputs or Outputs area.

Cloud allows using files as experiment outputs in the same vein as the desktop installation of AnyLogic allows you to handle file resources.
All types of files are supported, including ZIP archives.
Check this video to see how this works in a simple example:
To attach an output file to an experiment, make sure the following requirements are met:
- the file is referenced in the model, for example, some code writes lines to a text file
- the file is stored in the model folder
- the path to the file is specified as relative
In the context of a single model, the input and output files may be the same file.
Different editions of AnyLogic Cloud have varying limits on the file size. For more information, check AnyLogic Cloud Options. Private Cloud administrators can reduce the limit in the corresponding configuration file.
- General
-
Export model to AnyLogic Cloud — Opens the wizard, allowing to export the model to Cloud.
Alternative ways of exporting a model to Cloud are described here.Top-level agent — Defines the top level agent by selecting the required agent from the drop-down list of the available agents. The agent of this type will play a role of a root for the hierarchical tree of agents in your model.
Maximum available memory — The maximum size of Java heap allocated for the model and the built-in DB.
- Model time
-
Stop — Defines if the simulation in Cloud should be stopped and when to stop it.
- Stop at specified time — Simulation will stop at the time specified in the Stop time option below.
- Stop at specified date — Simulation will stop at the date specified in the Stop date option below.
Start time — Defines the simulation starting time point.
Stop time — [Enabled if the Stop at specified time option is selected in the Stop parameter] Defines the time point at which simulation will stop.
Start date — Defines the simulation starting date.
Stop date — [Enabled if the Stop at specified date option is selected in the Stop parameter] Defines the date at which simulation will stop.
- Animation
-
Animation stops — Defines if the animation in Cloud should be stopped and when to stop it.
- Never — animation will be running until you stop it.
- According to Model time settings — animation will be stopped according to the settings of the Model Time section.
Execution mode — Choose the animation execution mode here:
- Virtual time (as fast as possible) — The model will run at its maximum speed with no mapping to be made between model time and real time. This time mode is useful when you need to simulate your model for a long period of time.
- Real time with scale — In this mode you specify how many model time units one second takes. It is frequently needed when you want your presentation to appear as in real life.
Enable zoom and panning — If selected, the user will be allowed to pan and zoom the model animation window in AnyLogic Cloud.
Enable developer panel — Defines the availability of the developer panel in the model animation window in Cloud.
Show developer panel on start — [Enabled if the Enable developer panel option is selected] If selected, the developer panel will be visible by default upon launching the model animation in Cloud.
-
How can we improve this article?
-