

You save changes made to a model under the Git version control with commits. Each commit represents a well-formed snapshot of all the files stored in the repository.
Commits are a way to save your changes and record what you have done in your project. Each commit has a unique identifier that helps you track the history of changes in your code. A commit is essentially a checkpoint that allows you go back to a specific state of your code at any point in time. Committing your changes regularly is important because it helps you keep a record of your work and makes it easier to collaborate with others.
The History view provides a commit-oriented interface for inspecting file changes, searching and checking out commits, branching, tagging, patching, and resetting the repository.
The History view is located at the bottom of the Git perspective and is open by default.
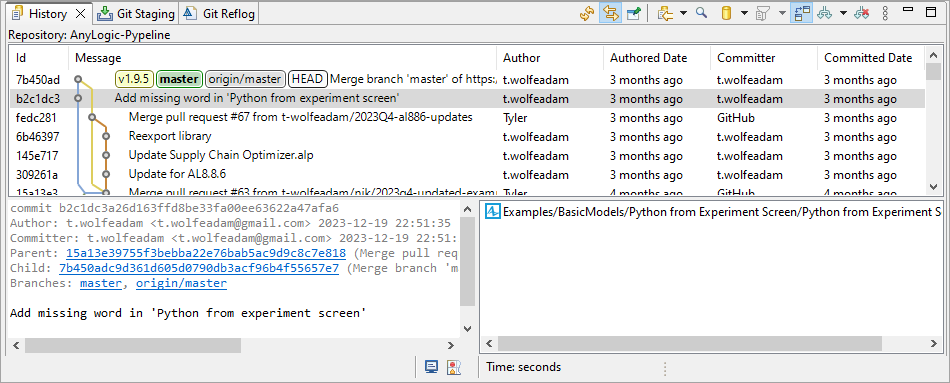
It consists of three parts:
- The commit graph shows the commit history in the reverse chronological order (the most recent commit is on top). Click on a commit in the graph to see its details.
- The left pane below the graph is the revision comment, which shows the commit message and a textual representation of the difference between the file in the commit and the source file.
- The right pane below the graph is the revision detail pane, which shows which files were changed by the commit.
The easiest way to create a new commit is to use the Git Staging view, located at the bottom of the Git perspective. Switch to the Git Staging tab by clicking its name.
The staging view always displays the current Git status for the selected repository, and allows you to stage and unstage modified files.

To create a commit
-
The files from the Git repository that you have changed will appear in the Unstaged Changes panel.
You can double-click the file there, and the Git client will attempt to show you the difference between the local (modified) version of the file and the version that exists in its original state. -
Add files you want to commit to the Git index by doing any of the following:
- Right-click the file in the Unstaged changes view and select Add to Index.
-
Select the file in the Unstaged changes view by clicking it and click the
 Add Selected files to the index icon.
-
Click the
 Add all files including not selected ones to the index icon.
-
On the right side of the view, enter your commit message.
It is good practice to start the message with a short first line summarizing the change. - Click Commit.
Congratulations: you have successfully created a commit. You may have noticed the button that allows you to commit and push the changes to the repository immediately, but for the purposes of this guide, the process of pushing changes to a remote repository is covered elsewhere.
This section covers all the ways to revert changes you have made to the files in the model repository, as well as how to revert them to a specific state.
To revert changes that have not been yet committed
- Switch to the Git staging view.
- Locate the file containing changes you want to revert, in the Changes panel (it may be Staged or Unstaged; it does not matter).
- Right-click on the file name.
- Select Replace with HEAD revision from the context menu.
- Confirm the action in the dialog that appears.
To revert changes done in a particular commit
- Switch to the History view.
- Right-click the commit you want to revert.
- Select Revert commit from the context menu.
-
If the files in the target commit are unmodified, a new commit is created that reverts the changes made in that commit.
If files are being modified, you must either revert the changes made in them, or commit them first.
When the reverted commit is complete, you can push it to the remote repository so that the changes are reflected there as well.
To reset a file to a particular state
- Switch to the History view.
- Left-click the commit you want to use.
- In the lower right corner of the perspective, in the revision detail area, locate the file you want to revert.
- Right-click on the file name.
- Select Check Out This Version from the context menu.
The file is added to your current working copy of the repository. This action does not automatically create the commit, but it does stage it, adding the file you’ve checked out to the Git index.
There are a number of actions available from the context menu in the History and Git Staging views. These include:
- Compare with working tree — Available when the context menu is called for a file or a single commit. It will open a compare editor that compares the file content of the selected commit with the file content in the working tree.
- Compare with each other — Available when the context menu is called for a file and exactly two commits are selected. It will open a compare editor that compares the file content of the selected commits with each other.
- Open — This action is only available if the context menu is called for a file. It will open an editor for each selected commit displaying the content of the file for the given commit.
- Checkout — Checks out the selected commit. If a branch exists for that commit, it will be checked out. If multiple branches exist, a dialog prompts to select which branch to checkout. If no branches exist, the commit is checked directly and HEAD becomes detached.
- Create Branch — Creates a branch on the selected commit. It prompts for a branch name and whether to checkout the new branch.
- Delete Branch — Available if a non-checked out branch exists for the selected commit. It deletes this branch. If multiple branches exist, it prompts to select the branches to delete. If a delete action makes commits unreachable, a confirmation dialog is shown.
- Revert Commit — Reverts changes of the selected commit by creating a new commit on top of the checked-out commit.
- Merge — Merges the selected commit into the checked-out branch.
-
How can we improve this article?
-