

If you are creating a rail model of some existing rail yard consisting of multiple railway tracks, you can go without drawing all the tracks manually using AnyLogic space markup shape railway track. Instead of this, you can simply find the GIS shapefile with the data on the existing railways, and convert this shapefile data to AnyLogic space markup shapes: railway tracks and switches. The railway network will be drawn automatically, and you will have just to make few adjustments.
To convert GIS shapefile data to AnyLogic railway network shapes
-
Drag the
 GIS Map element from the GIS section of the
 Space Markup palette into the graphical editor.
You can add GIS map only on the diagram that does not contain any rail road space markup shapes yet.
Space Markup palette into the graphical editor.
You can add GIS map only on the diagram that does not contain any rail road space markup shapes yet. - You can use your own files, or find them on the web. You can download GIS data shapefiles e.g. from the https://diva-gis.org/data.html. On the web page, select Country (e.g. France), and select Railroads from the Subject drop-down list below. Download the data files as a .zip archive and extract them to some folder.
-
Expand the Shapefiles section of the GIS map’s properties.
Make this GIS map use the downloaded shapefile. Add a shapefile (with
file extension “.shp”) by clicking the
 button.
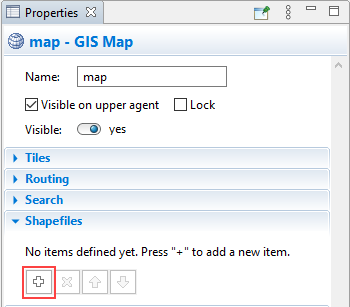
- This opens the Open dialog box. Browse to the file you have downloaded, select it and click Open. The GIS map will show the file data, and the shapefiles will be copied to the model folder.
-
To get the space markup elements with meaningful names (and not just
items with random names like track145,
track146), you should specify column of
the shapefile containing the names of the items. Specify the index of
the shapefile’s name column in the Name column index field
located in the Shapefile section of GIS map properties. To find
out the index of the name column, use third-party shapefile editors.

- Zoom in to the required part of the rail network (rail yard). This is very important to avoid converting numerous tracks that you really do not need in your model. Zoom in the GIS map until you see all the railway tracks you need to consider in your model.
-
Right-click the GIS map and choose
Convert Shapefile to Space Markup from the context menu.

-
In the Convert Shapefile to Space Markup dialog box, select
Railway in the Convert to list. Configure other options,
and finally click OK.
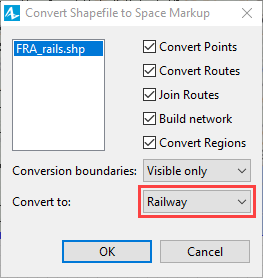
- Confirm the action in next dialog boxes.
The conversion may take a relatively long time. Finally the GIS map will be substituted with the image. On top of this image you will see the rail network composed of AnyLogic’s Railway Track and Switch space markup elements.
-
How can we improve this article?
-