

Now let us simulate how the rail cars are classified and put on different tracks according to their types.
Draw additional tracks
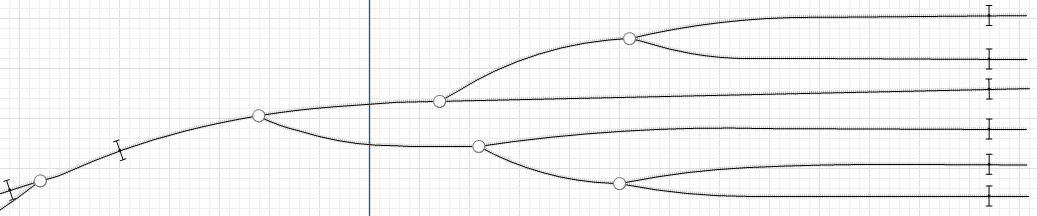
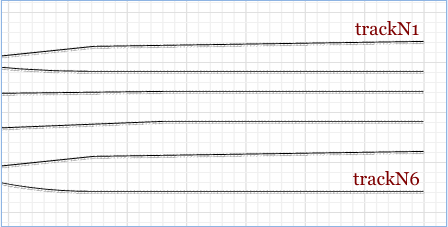
- Draw more railway tracks as shown on the picture below. These will be the destination tracks. To draw such rail topology, first draw several long tracks right to the end of the hump yard, and then add branch tracks.
- Give meaningful names to the destination tracks like trackN1...trackN6.
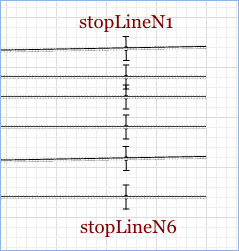
- Add six
 Position On Track elements on every destination track and name them stopLineN1...stopLineN6. That’s how we define stop lines for each track. The cars rolling down by gravity onto their destination tracks will stop at these lines.
Define the flowchart logic
Train arriving to the hump yard may contain several cars of the same type in sequence. Those cars can be rolled to their track at once.
- Create a
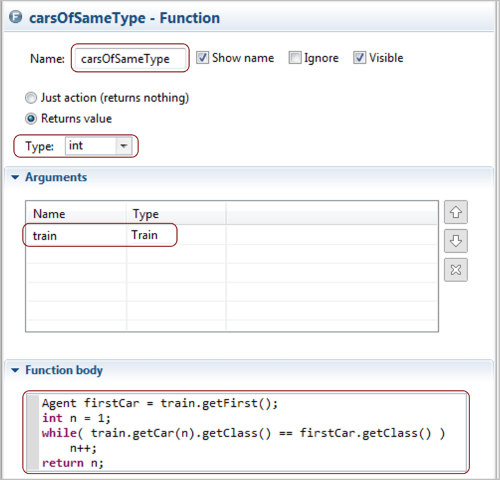
 Function element that will calculate the number of successive cars of the same type in the train standing on the hump. Name it carsOfSameType and make sure to set the following parameters:
- Create another
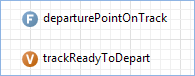
Function and name it departurePointOnTrack.
It will determine the destination track for the rail cars in the classification bowl (the tracks where the cars of this particular type are sorted). This function takes the train as the argument, then checks the type of the first car of the train (since train usually consists just of a single car). We find the type of the car with the help of instanceof Java operator. It evaluates to true if the object is an instance of the specified class. Finally the function returns Position on track that depends on the car type.
Make sure to set the following parameters: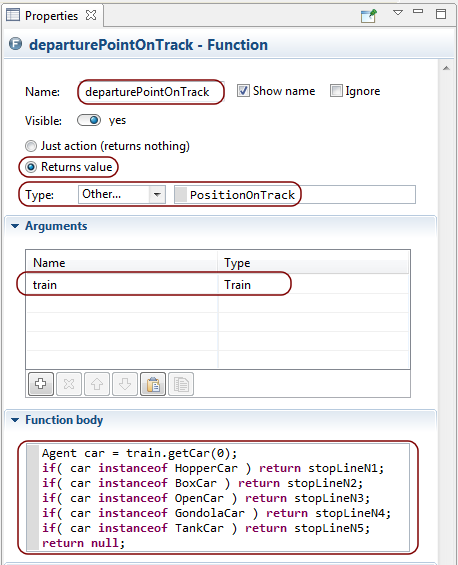
- Drag a
 Variable element into the graphical editor from the
 Agent palette. This variable will store the reference to the track where the required number of cars of the same type is ready to be taken by a loco from the yard.
- Modify
Variable:
Name: trackReadyToDepart.
Choose Other in the Type drop down list and specify RailwayTrack in field that will appear next to it.
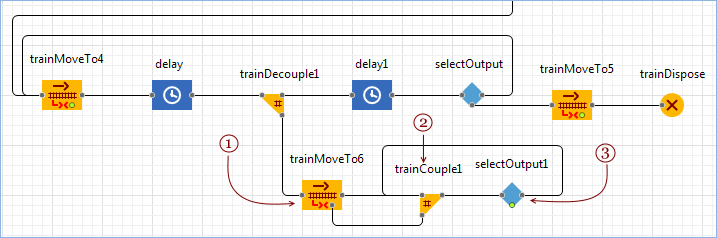
Modify the flowchart
-
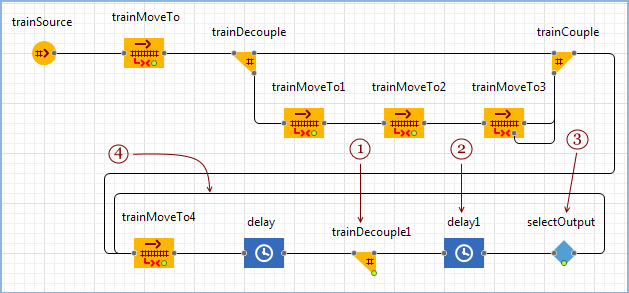
 TrainDecouple block decouples the cars when the train is on the hump. The train may contain several cars of the same type in sequence. Those cars are rolled to their track at once. (We find the number of the cars to be rolled by the function carsOfSameType created on the previous step). The destination is defined by the function departurePointOnTrack that we have defined on the previous step.
Set the following parameters for the TrainDecouple block:
Number of cars to decouple: carsOfSameType(train)
New train: Train
Train
- There is a short delay before the train continues decoupling.
Set the following parameters for the Delay block:
Delay time: 5 seconds - Now we should determine whether the train contains more freight cars to be decoupled. This is done by
 SelectOutput block. We check whether the train contains more than one car (remember, that one car is the loco itself). If it is so, the train enters the
TrainDecouple block again. The cycle repeats until the train contains just one loco ready to depart from the yard.
SelectOutput block. We check whether the train contains more than one car (remember, that one car is the loco itself). If it is so, the train enters the
TrainDecouple block again. The cycle repeats until the train contains just one loco ready to depart from the yard.
Set the following parameters for the SelectOutput block:
Select True output: If condition is true
Condition:agent.size() > 1 - Do not forget to connect the right port of the
SelectOutput block to the input port of the trainMoveTo4 block to move the train to the hump again.
Simulate how the loco leaves the yard
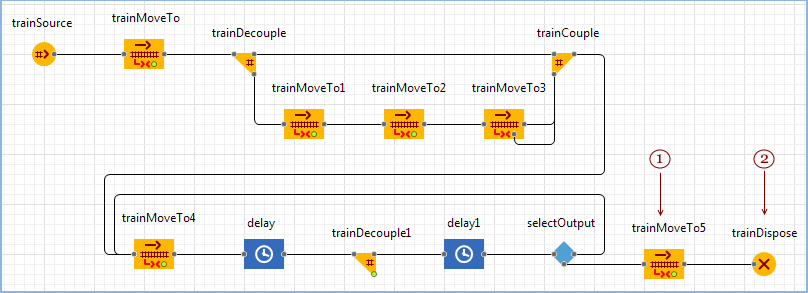
- We use
 TrainMoveTo again to simulate train movement. We specify the name of the lower track (
 trackN6) as the destination point.
Set the following parameters for the TrainMoveTo block:
Route is: Calculated automatically…
Target is: A given offset on a track
Railway track: trackN6
- Finally, the loco is removed from the model by
 TrainDispose block.
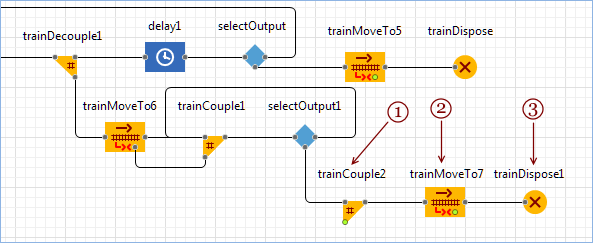
Modify the flowchart
Simulate how rail cars roll by gravity onto their destination tracks (the tracks where the cars are sorted).
- The movement (as always) is simulated with
TrainMoveTo block. The train consists of single cars, or some coupled cars of the same type in a block. The destination (stop line of the track corresponding to this rail car type) is returned by the function departurePointOnTrack we’ve defined earlier.
Set the following parameters for the TrainMoveTo block:
Route is: Calculated automatically…
Target is: A given position on track
Position on track: departurePointOnTrack(train)
Finish options: Decelerate and stop - If there are any other cars on the same destination track, they are assembled together with the just rolled cars in the
 TrainCouple block.
 - The cars continue assembling until the required number of cars is on the track (a locomotive arrives at this point to take them away from the yard). This
SelectOutput block checks whether the assembly should be stopped or not. We specify that the train should be assembled until it has 8 cars.
Set the following parameters for the SelectOutput block:
Select True output: If condition is true
Condition: agent.size() < 8
Add a new flowchart branch
It will simulate how the ready train combined from 8 cars of the same type leaves the yard.
- First, we couple the cars with the loco by means of the
TrainCouple block (the loco logic will be defined on the next step).
- Then the train leaves the yard (this is modeled with a common
TrainMoveTo block).
Set the following parameters for the TrainMoveTo block:
Route is: not specified (train will follow switches)
Target is: not specified - Finally, we remove the train from the model with the
TrainDispose.
Add loco logic to the flowchart
Simulate how locomotives take ready trains combined from the cars of the same type and leave the yard.
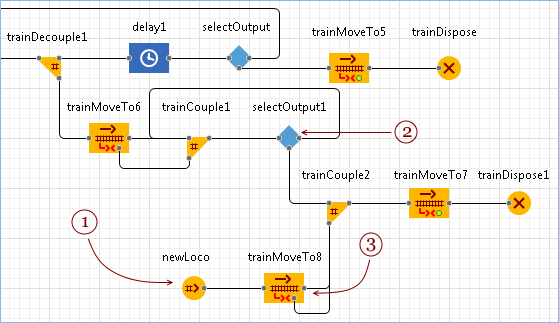
- First, let us add
 TrainSource block to model locomotive arrival. The train consists just of one railcar (the loco itself). Choose the manual train generation mode since this block will create trains only when the new train is ready to depart from the yard. The loco should appear on the track defined by the variable trackReadyToDepart (we calculate the variable value on the next step).
Set the following parameters for the TrainSource block:
Name: newLoco
Arrivals defined by: Call of inject() function
# of cars (including loco): 1
Entry point defined as: offset on the track Railway track: trackReadyToDepart (Switch to the code field by clicking the icon)
icon)
Offset from: Beginning of the track
Offset of 1st car: tracklength - 15 meters
New train: Train
New rail car: Locomotive
- This block checks whether the required number of the cars of the same type is already on the yard track, or not yet. Define the On exit (false) action. It is executed when the required number of rail cars is reached. The line trackReadyToDepart = agent.getTrack( true ); stores the current track to the variable trackReadyToDepart.
The line newLoco.inject(); generates new locomotive. Being created, the loco follows to the block we create next.
Set the following parameters in the Actions section of the SelectOutput block:
On exit (false):trackReadyToDepart = agent.getTrack( true ); newLoco.inject(); -
This
TrainMoveTo block simulates how the loco moves to the cars ready to depart.
The movement direction is Backward (the loco moves in the direction opposite to the track direction, from right to left.Then the loco couples with the cars and the resulting train passes to the flowchart branch simulating how the train leaves the yard.
Set the following parameters for the TrainMoveTo block:
Direction: Backward
Route is: not specified (train will follow switches)
Target is: not specified
Cruise speed: 10 meters per second
Finally your flowchart should look like this:
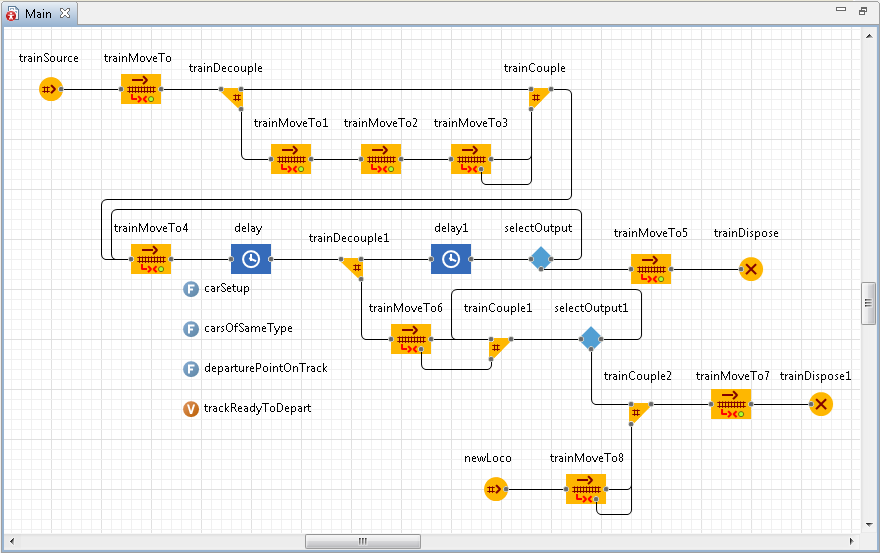
Now run the model. You will see that the rail cars are classified according to their types. When the required number of railcars of the same type reaches the destination track, a locomotive will take them away from the yard.

We have completed the AnyLogic Hump Yard tutorial!
Demo model: Hump Yard Open the model page in AnyLogic Cloud. There you can run the model or download it (by clicking Model source files). Demo model: Hump YardOpen the model in your AnyLogic desktop installation.-
How can we improve this article?
-