

You can select any shape (or several ones) in a graphical diagram using the commands described below.
| In order to | Use the mouse like described here |
|---|---|
| Select a shape | Click the shape. |
| Select more than one shape | Drag the mouse around the area containing the shapes you want to select. |
| Select all shapes |
Choose Edit > Select All from the main menu, or Press Ctrl + A (macOS: Cmd + A). |
| Add a shape to the selection | Click the shape with Shift pressed. |
| Add or remove a shape to or from the selection |
Click the shape with Ctrl (macOS: Cmd) pressed. If the shape was not selected, it gets selected. If the shape was selected, the action clears the selection. |
| Add shapes to the selection | Drag the mouse around the area containing the shapes you want to select with Shift pressed. |
| Add or remove shapes to or from the selection |
Drag the mouse around the area containing the shapes you want to select with Ctrl (macOS: Cmd) pressed. If the shapes was not selected, it gets selected. If the shape was already selected, the action deselects it. |
| Select a shape from a group |
Click the shape. The first click will select the group that contains this particular shape. Click the shape once more — this click will select the shape itself. |
| Select a shape that lies under another shape |
Click the place where the shape lies. The first click will select the shape that lies on the upper level. Click once more at the same place — the second click will select the shape that lies one level down. Continue clicking until you will select the required shape. |
The selected shapes and graphical elements can be saved as an image.
Save selection as an image
- In the graphical editor, select the shapes and/or graphical elements that you would like to save as an image.
- From the Edit menu choose the Copy as Image command.
- Paste the copied image into any system image editor and save it or edit it further.
You can copy, move, and delete shapes and elements.
To copy the selection on the clipboard
-
Choose Edit >
 Copy from the main menu, or
Right-click (macOS: Ctrl + click) the selection and choose Copy from the popup menu, or
Press Ctrl + C (macOS: Cmd + C).
To cut the selection
-
Choose Edit >
 Cut from the main menu, or
Right-click (macOS: Ctrl + click) the selection and choose Cut from the popup menu, or
Press Ctrl + X (macOS: Cmd + X). - Drag the selection rectangle around the shapes.
To paste the content of the clipboard
-
Choose Edit >
 Paste from the main menu, or
Right-click (macOS: Ctrl + click) the empty area of the diagram and choose Paste from the popup menu, or
Press Ctrl + V (macOS: Cmd + V).
The pasted shapes appear in blue outline. - Move the pasted shapes to the desired position.
To copy the selection
- Ctrl + drag (macOS: Cmd + drag) the selection.
To move the selection
-
Drag the selection, or
Use arrow keys.
To delete the selection
-
Choose Edit >
 Delete from the main menu, or
Right-click (macOS: Ctrl + click) the selection and choose Delete from the popup menu, or
Press Del.
You can align elements in the graphical editor.
To align elements, first, you should select them in the graphical editor, then right-click (macOS: Ctrl + click) the selection and choose the required alignment command from the Align submenu.
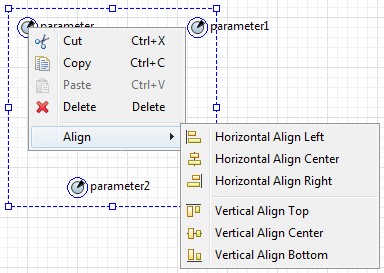
You cannot align statechart elements since this may distort their structure and logic.
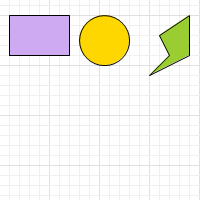
Let’s illustrate all alignment commands by example of three shapes:
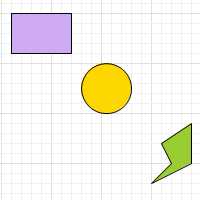
Assume that the shapes are located initially as shown in the figure above. The table below shows results of applying each alignment command for this particular case.
| Command | The result of the command | Description |
|---|---|---|
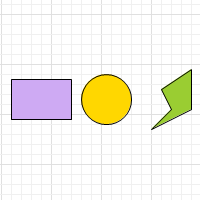
 Horizontal Align Left Horizontal Align Left
|
 |
Detects the leftmost element and aligns left borders of all selected elements to the left border of this particular element. |
 Horizontal Align Center Horizontal Align Center
|
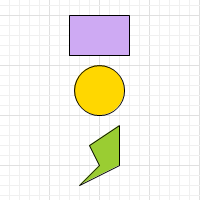 |
Detects the vertical axis that goes through the center of the selected area, and shifts all the selected elements horizontally so that their centers lie on this axis. |
 Horizontal Align Right Horizontal Align Right
|
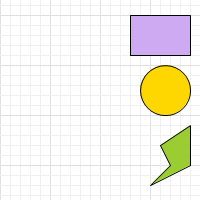 |
Detects the rightmost element and aligns right borders of all selected elements to the right border of this particular element. |
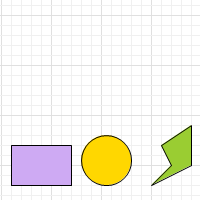
 Vertical Align Top Vertical Align Top
|
 |
Detects the topmost element and aligns top borders of all selected elements to the top border of this particular element. |
 Vertical Align Center Vertical Align Center
|
 |
Detects the horizontal axis that goes through the center of the selected area, and shifts all the selected elements vertically so that their centers lie on this axis. |
 Vertical Align Bottom Vertical Align Bottom
|
 |
Detects the bottommost element and aligns bottom borders of all selected elements to the bottom border of this particular element. |
-
How can we improve this article?
-