

Preferences dialog box allows you to change AnyLogic preferences.
To open AnyLogic Preferences dialog box
- Select Tools > Preferences... from the main menu.
The General page contains controls for setting up general AnyLogic preferences:
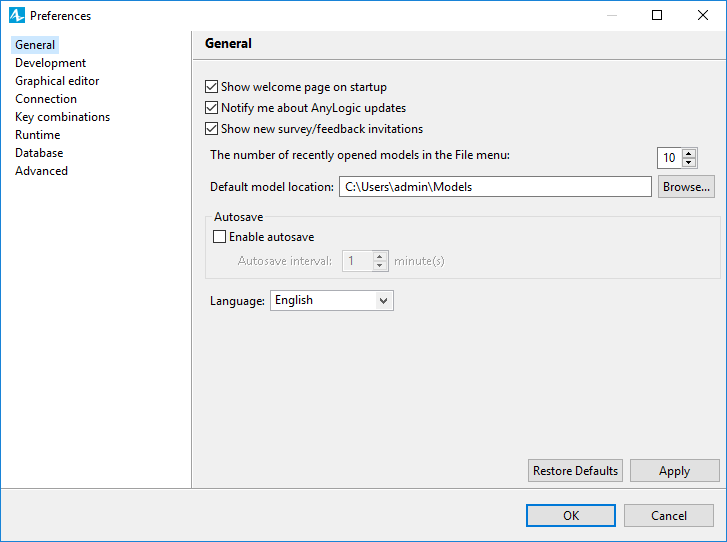
- Show welcome page on startup — If selected, the Welcome page will be shown every time you start AnyLogic.
- Notify me about AnyLogic updates — If selected, you will be notified about new updates of AnyLogic. In the case you have valid Support Services, you will be able to download new releases from the website.
- Show new survey/feedback invitations — If selected, checks whether there is a new online survey to fill and prompts the user to the survey, if any.
- The number of recently opened models in the File menu — Here you can define the maximum number of shortcuts to recently opened models that will be present in the File > Recently Opened Models submenu.
- Default model location — Here you select the folder that will serve as a default location when creating a model or saving it with a new name.
- Enable autosave — If selected, all AnyLogic models currently opened in the workspace will be automatically saved in the background when the defined interval (set in the Autosave interval box) will elapse from the moment of the last save. You can find more information on automatic backup and recovery of AnyLogic models in Automatic backup and recovery of models.
- Language — AnyLogic UI is currently localized into English, Chinese, Spanish, Russian, and Portuguese (Brazil). When you start AnyLogic, it chooses the localization language according to the locale settings of your operating system (if AnyLogic is not localized for the particular user's locale, English is used). Here you can change the language of AnyLogic if you want to use another language.
The Development page contains the preferences that define development details of models and libraries.
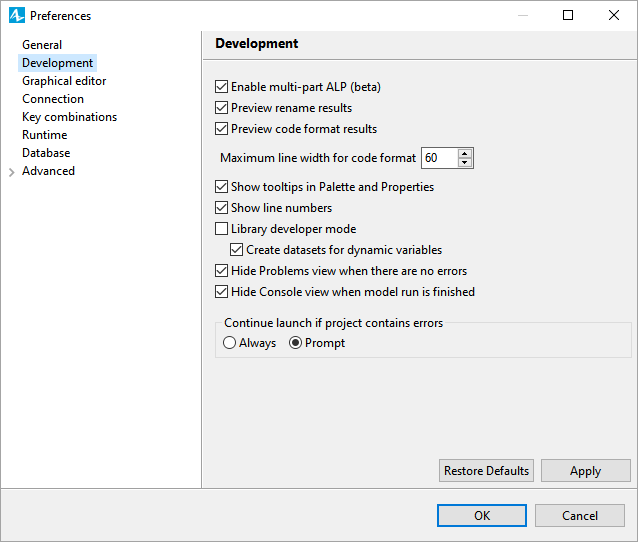
- Preview rename results — If selected, every time the user will rename some model element(s) using the Refactor > Rename command, the Operation results preview dialog showing all possible changes will be displayed.
-
Preview code format results — If selected, every time the user wants to format their code using the Format Code command, the Operation results preview dialog showing the preview of formatted code will be displayed.
- Maximum line width for code format — Here the user can specify the maximum number of symbols to fit in one line of code. The code formatting operation will modify the code accordingly when executed.
- Show tooltips in Palette and Properties — If selected,hovering the mouse over an item name in the Palette and Properties displays a tooltip with the item description.
- Show line numbers — If selected, the line numbers are displayed in the Java editor.
-
Library developer mode — If selected, enables the display of the specific properties that may be useful only if you develop custom libraries. See Library Developer Mode for details.
- Create datasets for dynamic variables — Defines the default value of the Create datasets for dynamic variables option for all new agent types the user will create (you can find this option in the Advanced section of the agent type’s properties, more details in the Create datasets for dynamic variables property description).
- Hide Problems view when there are no errors — If selected, the Problems view is automatically hidden when there are no errors in the models, otherwise the visibility of the view is controlled by the user.
- Hide Console view when model run is finished — If selected, the Console view is automatically hidden when the model is finished, otherwise the visibility of the view is controlled by the user.
-
Continue launch if project contains errors — The group of buttons that define whether AnyLogic will continue to attempt to launch the model if the project contains errors.
- Always — The model will be launched anyway.
- Prompt — The message box will be displayed informing about the errors and offering to cancel the launch or to continue anyway.
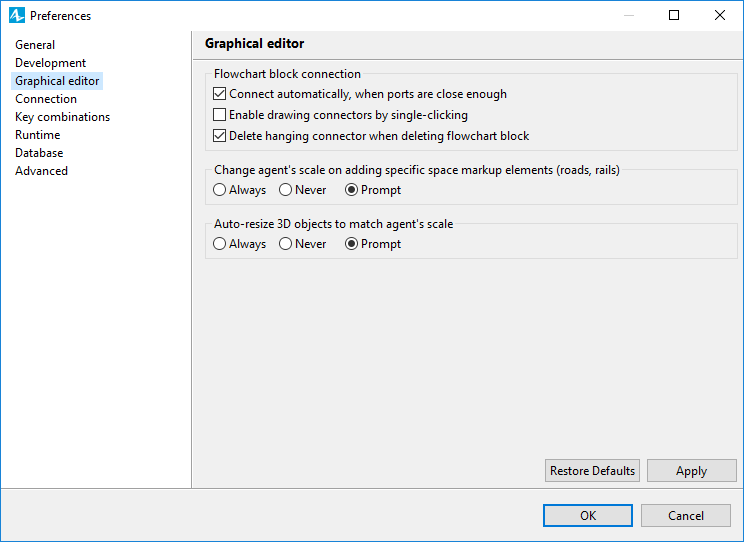
The Graphical editor page of AnyLogic preferences contains settings related to the graphical editor.
-
Flowchart block connection — The section of preferences that defines rules for drawing flowcharts in the graphical editor.
- Connect automatically, when ports are close enough — If this option is selected, the connectors between library blocks that you drop onto the agent diagram will be drawn automatically if the distance between them is less than 70 pixels.
- Enable drawing connectors by single-clicking — This option is not selected by default. Select it if you want to start drawing connectors with one click.
- Delete hanging connector when deleting flowchart block — This option may be useful when you do not want to delete connectors that you do not need anymore, and the new library blocks, which you might want to add instead of deleted ones, connect automatically.
- Change agent’s scale on adding specific space markup elements (roads, rails) — Here you define whether AnyLogic will propose the user to change the agent scale on adding rail- or road-related space markup shapes on its graphical diagram.
- Auto-resize 3D objects to match agent’s scale — Here you define whether AnyLogic will automatically resize 3D objects that you add on the agent's graphical diagram to make them correspond to the current agent scale (e.g., scale houses to correspond to railways drawn on the canvas). Note that this setting affects only the newly added 3D objects and does not affect the 3D objects already present on the graphical diagram.
- Graphical editor Python API connection port — The port that the Python runtime uses to connect to the AnyLogic editor when executing calls through the design-time API.
- Choose the Browser for 3D Preview Rendering — Here you select whether AnyLogic renders the 3D Preview using Chromium (preferable for Windows), your default browser (preferable for MacOS arm64 or Linux), or an external browser (preferable for MacOS x64).
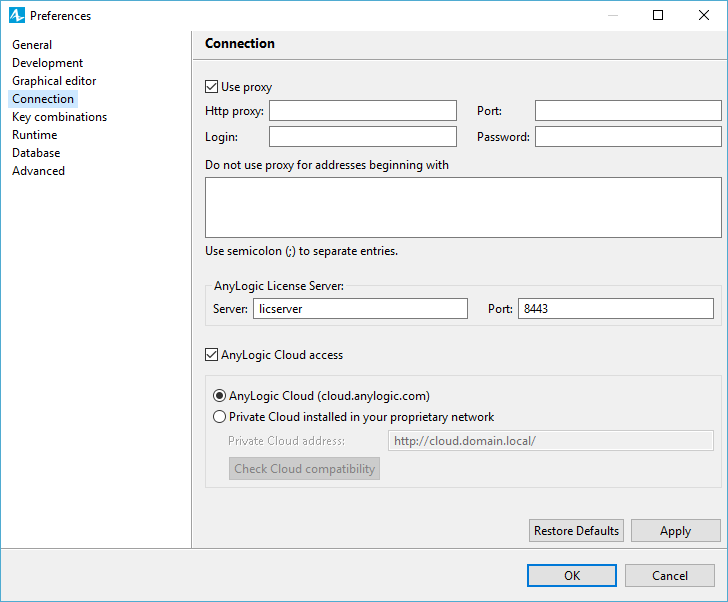
The Connection page enables to set up connection settings.
The Connection settings comprises three sections
-
General connection settings
- If you use a proxy, select the Use proxy check box and define the settings in the Http proxy and Port edit boxes. If required, specify Login and Password.
- If you use a proxy to access internet (e.g. a GIS map server), but you also need to bypass a proxy to connect to a local server (e.g. a database server), you can type the local server name in the Do not use proxy for addresses beginning with list (see the figure above). You can list several URLs here separated by semicolons.
-
AnyLogic License Server settings
- The AnyLogic License Server section is available only if you use team license.
- Server — Name (address) of Team License Server installed on a corporate server.
- Port — Port that is used to connect to Team License Server.
-
AnyLogic Cloud connection settings
-
AnyLogic Cloud access — Enables or disables access to AnyLogic Cloud.
This option is enabled by default and allows you to export models to AnyLogic Cloud. Use the options below to select the type of Cloud you are using:- AnyLogic Cloud (cloud.anylogic.com) — The public version of AnyLogic Cloud.
- Private Cloud installed in your proprietary network — The Private Cloud instance on your corporate network.
Disabling the AnyLogic Cloud access option will hide the toolbar Log in button and the Run Configuration editor, as well as the controls for logging into the AnyLogic Cloud account and exporting models from the AnyLogic interface. -
Private Cloud address [Enabled if the Private Cloud installed in your proprietary network option is selected] — Enter the address of your Private Cloud instance.
The default address is a stub. It will not connect you to any instance of Private Cloud. -
Check Cloud compatibility — [Enabled if the Private Cloud installed in your proprietary network option is selected] Click this button to check whether it is possible to connect to your AnyLogic Private Cloud and if the instance supports all required features.
Starting with version 8.9, AnyLogic requires that the Private Cloud instance you are using supports Java 17, which means that your Private Cloud version must be 2.4.0 or higher.
-
AnyLogic Cloud access — Enables or disables access to AnyLogic Cloud.
The Key combinations page enables you to change the shortcut keys for the commands. The table on the page lists commands and shortcut keys assigned to them. Currently it allows to change the key combination for code completion.
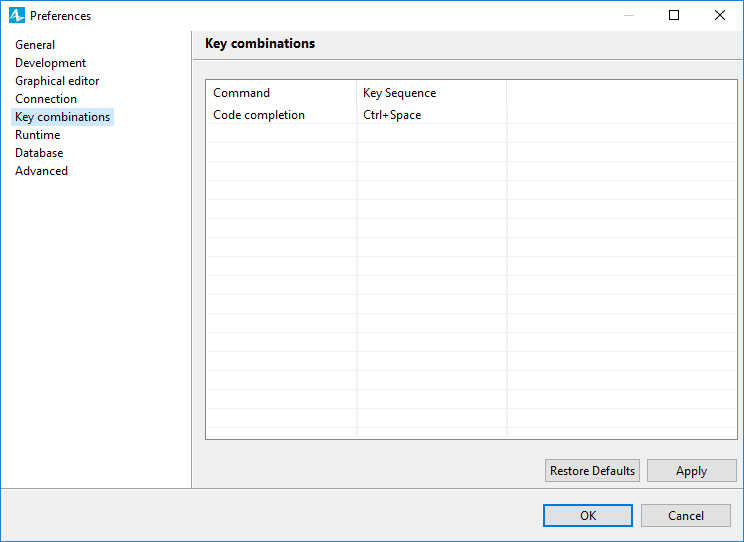
To set a new shortcut for a command
- Select the row holding a required command in the table.
- Click in the Key Sequence cell and press the keys combination that you want to use as a shortcut key.
The Runtime preferences page allows you define a model run-time behavior.
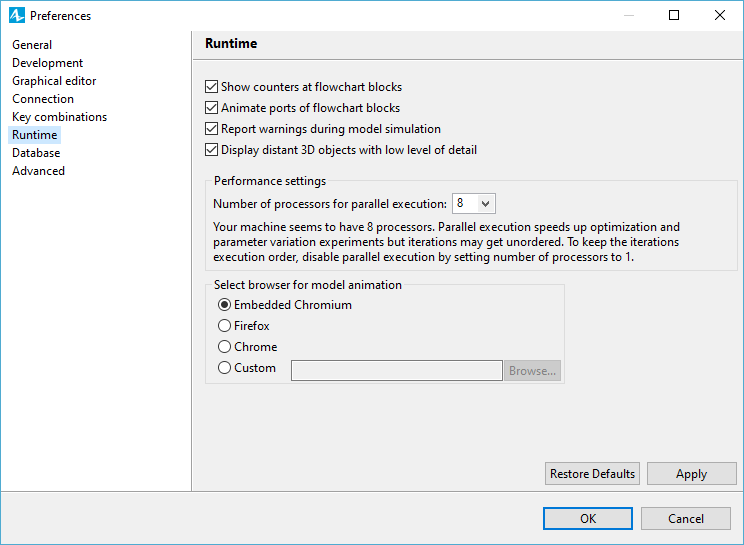
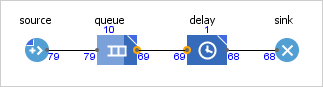
- Show counters at flowchart blocks — If selected, the counters will be shown near libraries' block icons (displaying the number of agents inside the block, the number of agents entered the block, etc.), see the figure below.
-
Animate ports of flowchart blocks — If selected, the states of the flowchart block ports will be animated at model runtime. If there are some agents pending at the port, the port will be highlighted with dark orange, as shown on the figure below.
- Report warnings during model simulation — If selected, the warnings will be displayed in the console during the model run.
- Display distant 3D objects with low level of detail — If selected, particularly complex 3D objects are displayed in a simplified manner at camera zoom out. Simplification starts when the distance from the camera to the 3D object exceeds 12 * r, where r - radius of the sphere that circumscribes the 3D object. Displaying 3D objects with low level of detail will improve the performance in models with heavy 3D animation.
- Ignore 2D shapes outside of visible area — If selected, the 2D animation shapes that are beyond the visible range, are not rendered. Ignoring invisible 2D shapes may improve the model performance.
- Number of processors for parallel execution — AnyLogic supports multicore processors. When you start an optimization or a parameter variation experiment, AnyLogic may run several iterations in parallel on different processor cores. Thereby performance is multiply increased and the experiment is performed significantly faster than on single core processor. If your machine has a multicore processor, here you can set the number of processors to be used for parallel execution of model runs by AnyLogic.
- Select browser for model animation — Here you can select the browser to run the model animation. If Embedded Chromium option is selected, the model animation will run in the default Chromium browser which is included in the AnyLogic installation package. If you want to use a browser that is not on the list of offered options, select Custom option and specify the path to the browser.
On the Database page you can tune the settings related to the built-in AnyLogic database.
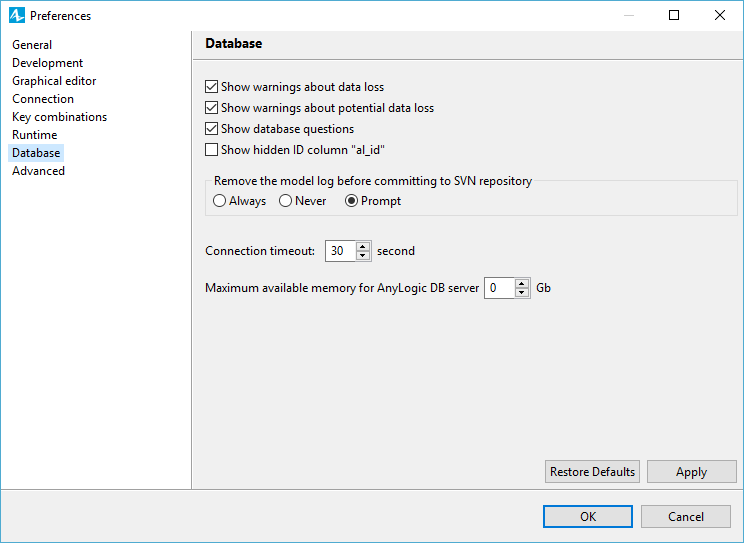
- Show warnings about data loss — If selected, the user will see warnings about data loss.
- Show warnings about potential data loss — If selected, the user will see warnings about potential data loss.
- Show database questions — If selected, the user will see questions generated by the database.
- Show hidden ID column "al_id" — If selected, the hidden column al_id will be visible in the table editor. This column contains unique identifiers for the table records.
- Remove the model log before committing to SVN repository — If you use SVN and commit your models to it, this option allows to choose whether the model log should be committed along with the model or not.
- Connection timeout — Here you define the timeout for connection to the database (in seconds).
- Maximum available memory for AnyLogic DB server — Here you define how much memory (in GB) you want to make available for the AnyLogic DB server. The default setting (0 GB) means that AnyLogic database will use 1/4 of the available RAM. This setting is applicable only to the models run in the AnyLogic IDE. The exported models use a common memory resource both for the model and the DB. The maximum size of the required memory should be specified either in the properties of the experiment (in case of export as a standalone Java application) or in the Run Configuration panel in case of export to the AnyLogic Cloud.
The Advanced page of AnyLogic preferences contains additional AnyLogic settings.
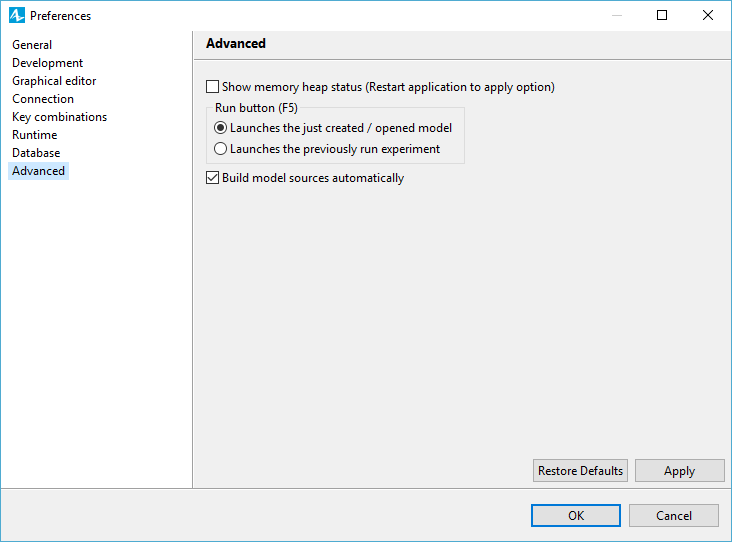
- Show memory heap status (Restart application to apply option) — If selected, the heap status will be shown in the AnyLogic status bar (this option requires restarting AnyLogic to be applied).
-
Run button (F5) — The option sets the default behavior of the
 Run
button, which you can find the on the AnyLogic toolbar. You can select which type of the model should be run when you click this button or press F5 on your keyboard: Launches the just created / opened model or Launches the previously run experiment.
You can click the arrow next to the Run button on the AnyLogic toolbar to explicitly select the experiment you want to run.
Run
button, which you can find the on the AnyLogic toolbar. You can select which type of the model should be run when you click this button or press F5 on your keyboard: Launches the just created / opened model or Launches the previously run experiment.
You can click the arrow next to the Run button on the AnyLogic toolbar to explicitly select the experiment you want to run.
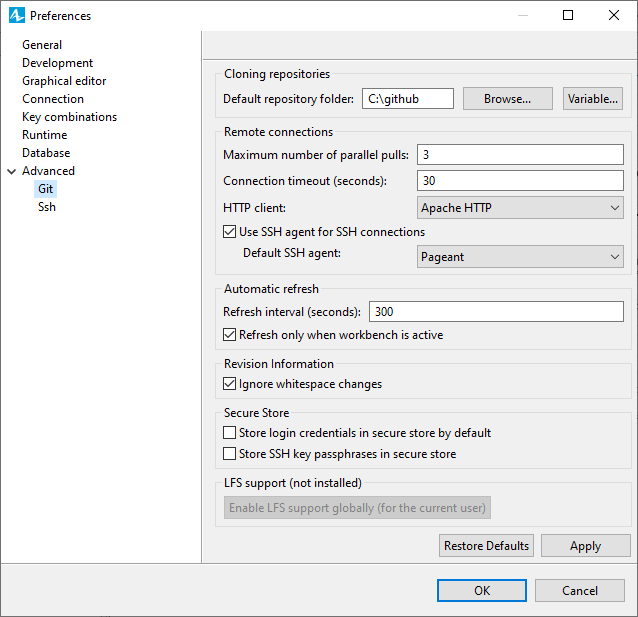
The Git page of the AnyLogic preferences contains settings for the built-in Git client.
-
Cloning repositories
-
Default repository folder — The folder where the Git client clones and creates new repositories by default.
Click Browse to navigate through the computer file system to find the folder, or click Variable to open the dialog where you can select one of the default AnyLogic IDE variables or create a new one.
-
Default repository folder — The folder where the Git client clones and creates new repositories by default.
-
Remote connections
- Maximum number of parallel pulls — Specifies how many threads (pulls) the Git client will allow when you try to synchronize with multiple remote repositories at once.
- Connection timeout (seconds) — Maximum connection timeout allowed when connecting to the remote repositories.
- HTTP client — Allows you to select the HTTP client. Apache HttpClient and the built-in Java client are supported.
-
Use SSH agent for SSH connections — Specifies whether you want to use a standalone SSH agent for SSH connections.
- Default SSH agent — Specifies the SSH agent to use by default (usually Pageant or the built-in Windows OpenSSH client).
- Automatic refresh — The settings that define how the client performs the automatic refresh of the repositories.
- Refresh interval (seconds)
- Refresh only when workbench is active
- Revision information
- Ignore whitespace changes — If checked, the client will not treat whitespace changes within Git-controlled files as actual changes, that is, such files will not appear in the diff.
- Secure Store — Configure how the Git client handles the repository credentials.
- Store login credentials in secure store by default
- Store SSH key passphrases in secure store
- Enable LFS support globally (for the current user) — Specifies whether to enable the Git LFS support.
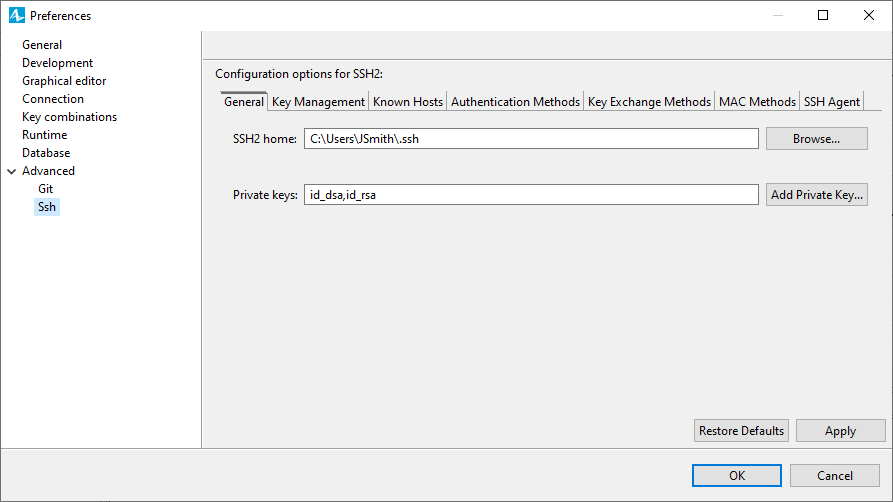
The Ssh page of AnyLogic preferences contains settings of the built-in SSH2 client.
-
General
- SSH2 home — Specifies the directory path where SSH2 configuration and key files are stored.
- Private keys — List and manage your private keys associated with SSH here, including adding new private keys.
-
Key management
- Generate DSA Key
- Generate RSA Key
- Load Existing Key
- Public Key — Displays the generated or loaded public key.
- Fingerprint — Displays the fingerprint of the public key.
- Comment
- Passphrase — Specify a passphrase for the key.
- Confirm Passphrase — Confirm the passphrase set for the key.
- Known hosts — Lists the hosts already added to the SSH2 client.
-
Authentication Methods — Specifies the used authentication methods, and their priority.
- gssapi-with-mic — GSSAPI (Generic Security Service Application Program Interface) authentication method. GSSAPI is a standard interface for programs to access security services.
- publickey — Public key authentication, where the user has a pair of cryptographic keys — a public key and a private key. The public key is placed on all systems where the user should have access, and the private key is kept secret and safe by the user.
- password — This option is for password-based authentication.
- keyboard-interactive — This is a flexible authentication method that can support various types of authentication processes. Essentially, it is a series of questions and answers.
- Key Exchange Methods — Specifies the key exchange methods that SSH uses to generate per-connection keys, and their priority. Key exchange methods are used to establish a secure connection between two parties (client and server).
- MAC Methods — Specifies the MAC (Message Authentication Code) methods used to ensure the integrity of the data being transferred over SSH2, and their priority. The MAC algorithm creates a unique piece of code (the MAC) for each piece of data.
- SSH Agent — Lists the associated SSH agent utilities that keep track of identifiers and passphrases, and their priority.
-
How can we improve this article?
-