

This article covers how to create, clone, and add Git repositories, that is, how to set up them for your AnyLogic models.
To start working with Git in AnyLogic, switch to the Git perspective by clicking on the Git icon in the top right corner of the AnyLogic application window.
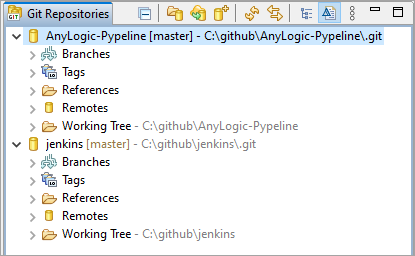
You work with Git repositories in the Git Repositories view. By default, it’s located on the left side of the Git perspective.
A Git repository is a folder that contains the files and history of a Git-managed project, that is, the repository stores all objects that make up the history of the project.
To work with the contents of a Git repository in the AnyLogic Git perspective, add the repository to the list. You can either add a repository that exists on your computer, clone a remote repository, or create a new one.
Your computer may already have a local Git repository. This can happen if you already have a Git client or an application with Git support installed. In this case, you will need to reuse this repository in AnyLogic.
To add a local repository
-
In the empty Git Repositories view, click Add an existing local repository, or
Click the Add icon on the view toolbar.
-
The Add Git Repositories dialog will appear.
Start by specifying the directory where you want to search for repositories. You can enter the path manually in the Directory edit box, or click Browse and search for Git repositories on your local file system.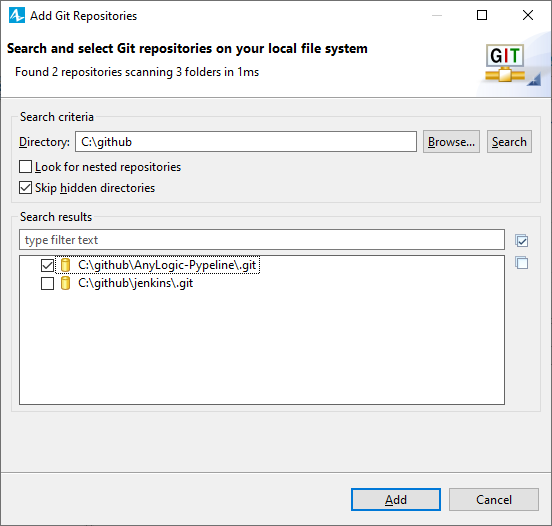
If you want to search for Git modules deeper within the subdirectories, select the Look for nested repositories option.
To avoid searching for repositories in hidden directories, select the Skip hidden directories option. -
The Search results will display the Git repositories found in the specified directory.
- Select or clear the checkboxes next to the found repositories to specify which of them should be added to the AnyLogic Git perspective.
- Use the edit box at the top of this section to narrow down the results by specifying a filter expression.
- Use the Check All Repositories or Uncheck All Repositories options to manipulate the selection.
- Once you have selected all the repositories you want to add, click Add.
When you “clone” a repository, you create a local copy of a repository that exists on a remote server, such as GitHub. This means that you download all the files and directories available in the remote repository to your computer. You also get a copy of the entire history of the repository, including all versions of every file and folder for the model.
To clone a repository
-
In the empty Git Repositories view, click Clone a Git repository, or
Click the Clone icon on the view toolbar.
-
The Clone Git Repositories dialog will appear.
On the first page of the dialog, configure the connection to the remote repository: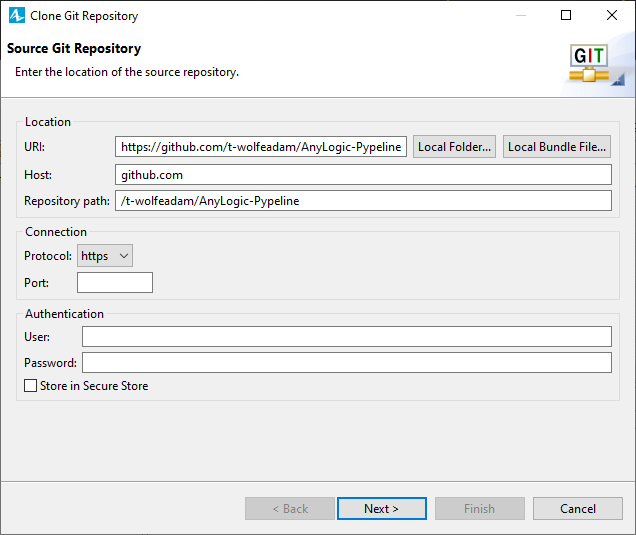
- URI — The full URI of the remote repository or the path on the file system. This field is automatically synchronized with the other fields. Optionally, click Local Folder or Local Bundle File to browse for a repository or a Git bundle file on the computer.
- Host — The name of the remote host. Empty if cloning from the file system.
- Repository path — The path to the remote repository or to the file system.
- Protocol — One of the supported protocols (file, ftp, git, http, https, sftp, ssh).
- User — The username to use for authentication.
- Password — The password to use for authentication.
- Store in Secure Store — Whether to store the password in the application’s internal secure store.
- Click Next.
-
On the next page, select which branches you want to clone.
If you are not sure which branches you need, click Select All (or Deselect to do the opposite).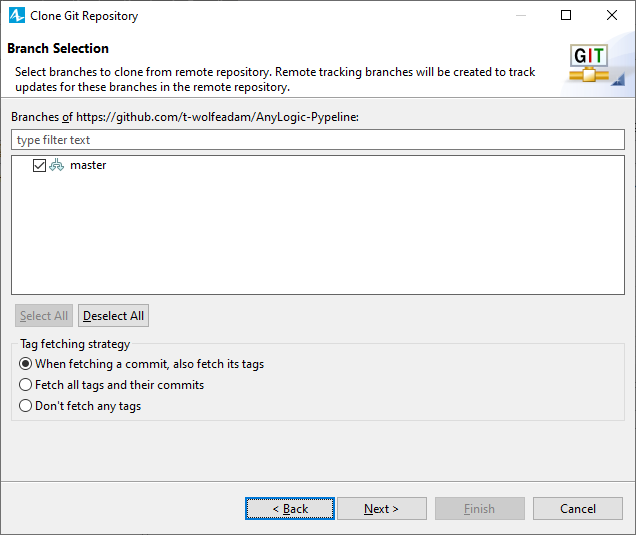
You can filter the branches by their name by typing in the edit box control above the list. The selected branches are always shown in the list (they are not filtered). - Optionally, specify Tag fetching strategy (see the Git documentation for more information on Git tags).
- Click Next.
-
On the next page, specify where you want to store the repository on the local file system, and set some initial settings:
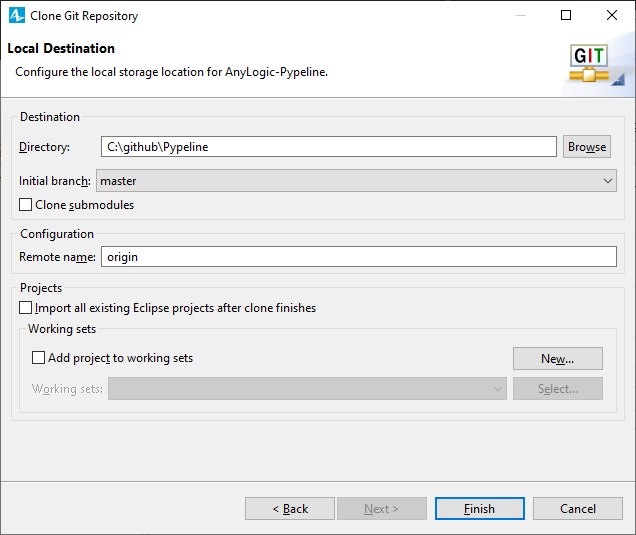
- Directory — The directory that will contain the Git repository. It will be created automatically if it does not already exist.
- Initial branch — Select which local branch to create and check out initially.
- Clone submodules — Specify whether all the Git submodules will be cloned with the parent repository.
- Remote name — Specify a name for the remote repository. The default is origin.
- Click Finish.
By creating a new repository, you start tracking changes in a directory that hosts your model, building a history over time. This allows you to save versions of your model, which you can access when needed.
AnyLogic allows creating local Git repositories.
To create a repository
-
In the empty Git Repositories view, click Create a new local Git repository, or
Click the Create icon on the view toolbar.
-
The Create a Git Repository dialog will appear.
Specify the path to the directory of the repository in the Repository Directory edit box, or click Browse and locate it on your computer in the subsequent dialog.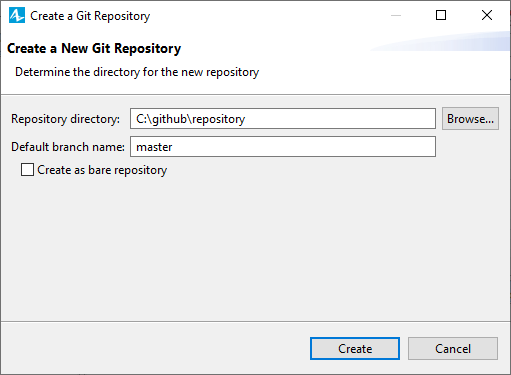
Set the default branch name in the Default branch name field.
If you select the Create as bare repository checkbox, the new repository will not have a working directory. You then can only add content to it by pushing changes from another repository. Its intended use is as a remote repository for sharing solid code. - Click Create.
You can paste the local file system path of a Git repository from the clipboard into the Git repositories view. To do that, copy the repository path (local or remote) to your clipboard, right-click in the Git repositories view, then select Paste Repository Path or URI. This will open the cloning dialog with most of the settings already configured.
Setting up a private repository (such as one from GitHub or GitLab) in the built-in Git client can be tricky. However, once you get the hang of it, it is no different from configuring any other Git repository.
Create a private access token (PAT) using the web interface of the repository provider you are using. Each provider offers its own documentation on this process:
When creating the token, be sure to specify the correct scope for it (for example, the token with no scopes will only provide read access to the repository).
As an alternative to using an access token, you can use an SSH key.
- Go to Tools > Preferences from the AnyLogic menu.
- Go to the Advanced > SSH page.
- On the page, switch to the Key Management tab.
-
Click Generate... Key or use an existing key from a file by clicking Load Existing Key.
If you generate the key, be sure to specify the secure passphrase to protect your repositories from unwanted changes. - Click Apply to save the key in your AnyLogic Git client.
-
Once the key is generated, go to the key setup page of your GitHub account or GitLab profile settings.
If you are using an enterprise version of either GitHub or GitLab that is located on a subdomain, you have to specify your key there. - Add your newly generated keys to the list.
After that, when you clone a private repository or push your changes (using the Advanced push dialog), select the SSH protocol and enter the SSH address of your repository (not the regular one).
When you go through the clone or push wizard, you will be asked for a passphrase. Make sure you enter it correctly.
After the initial setup, the experience of working with private repositories is identical to working with regular repositories. Proceed with committing changes, branching, and merging as usual.
-
How can we improve this article?
-