

Railway Track is a graphical space markup element that represents a continuous (that is, without switches) rail track of any shape. A track can contain multiple linear and curved segments. A single track is automatically placed within a railway network, which can be extended further by adding and connecting additional tracks.
The track recognizes switches at both ends, if there are any. If there is no switch at one of the ends (a track is open-ended) and a rail car leaves the track at that end, the car leaves the rail yard model.
The track is “aware” of all cars that are on it (in whole or in part), and you can get those cars using the track API.
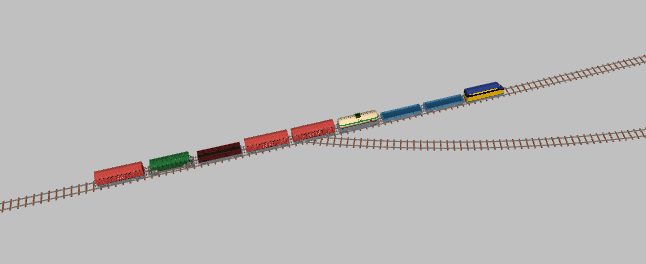 Cars on a track
The track API provides a number of functions:
- For blocking tracks — making them unavailable to all trains;
- For reserving tracks — making them available only to the specified trains.
The behavior of the train when the track becomes unavailable depends on the state of the train at the time of the blocking or reservation:
- The train has not started moving yet. The track is automatically excluded from the train’s route.
-
The train is already moving. If the train has no specified route and is simply following switches, or if the route contains the unavailable track, then the train will stop at the switch just before the unavailable track and wait until it becomes available.
If you have set the train to automatically calculate its route, you can define the behavior of the train in the properties of the TrainMoveTo block. It can either recalculate its route to exclude the unavailable track, or it can stop at the switch in front of the unavailable track and wait for it to become available again. - The train is moving through the blocked track. The train is allowed to leave the track, but cannot re-enter it until the track is unblocked.
Tracks remain blocked until the unblock() function is called. The reservation is removed automatically after the specified trains have passed the track that was reserved for them, or it can be removed by calling the cancelReservation() function.
Demo model: Railway Track Reservation Open the model page in AnyLogic Cloud. There you can run the model or download it (by clicking Model source files). Demo model: Railway Track ReservationOpen the model in your AnyLogic desktop installation. Demo model: Blocking Railway Tracks Open the model page in AnyLogic Cloud. There you can run the model or download it (by clicking Model source files). Demo model: Blocking Railway TracksOpen the model in your AnyLogic desktop installation. Demo model: Level Junction Open the model page in AnyLogic Cloud. There you can run the model or download it (by clicking Model source files). Demo model: Level JunctionOpen the model in your AnyLogic desktop installation.To draw a railway truck
-
Double-click the
 Railway Track element in the Space Markup section of the
  Rail Library palette.
-
The icon of the element should change to
 . This means that the drawing mode is activated and you can now draw the railway track point by point in the graphical editor.
- Click in the graphical editor to draw the first point of the track. Click again to add more points.
-
To draw a curved segment, do not release the mouse button while clicking, but move the mouse with the left mouse button pressed.
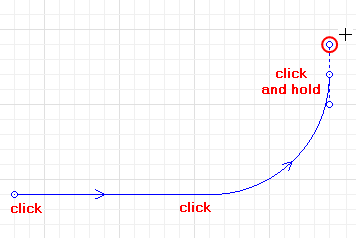
-
Finally, double-click to set the end point of the track.
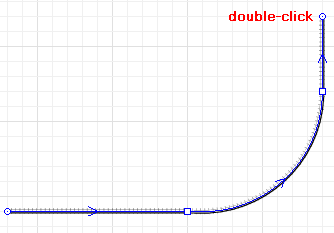
-
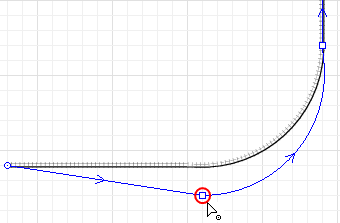
You can make changes to the railway track even after it is finished. Select the track in the graphical editor, click on an editing point and drag it without releasing the left mouse button. The connecting parts of the track will change as you drag the point. Release the mouse button when you have finished adjusting the shape of the railway track.
- The editing points can be added or removed by double-clicking anywhere on the railway track. Double-clicking the end point of the first or last segment deletes that segment.
- You can edit the track by making segments linear or curved at any stage of the drawing.
You can continue drawing the railway track after you finish by double-clicking it.
To add a segment to the railway track
-
Right-click the track you have drawn and select Append Line from the context menu. You can append a line to any end point of the track by clicking this point.

- You are now back in the drawing mode. You can add as many new segments as you need, both linear and curved.
- Set the end point of the track by double-clicking it.
You can change a linear line to a curved line and vice versa, as well as edit the curve shape at any time.
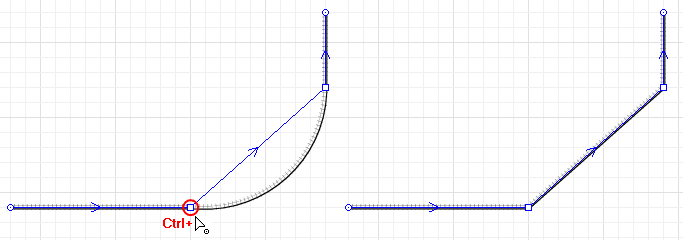
To change a curved line to linear
- Click a railway track in the graphical editor to select it.
- Press and hold the Ctrl key on your keyboard. At the same time click a point on the curved segment and drag the point without releasing the key.
-
Release the keys when the line is linear and has the desired shape.
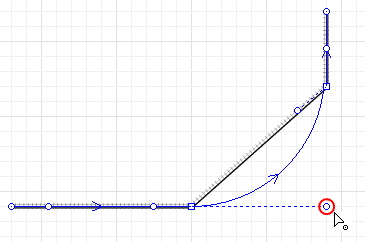
To change a linear line to a curved line
-
Right-click the railway track and select Edit Using Guiding Lines from the context menu. The guiding lines for editing points appear. Click and drag the editing point and drag it around without releasing the mouse button.
- Right-click the track and deselect Edit Using Guiding Lines from the context menu to turn off this editing mode.
Multiple railway tracks can be connected together, with or without the use of a railway switch. You can also disconnect the track segments.
To connect two or more railway tracks into one track
- Drag the end point of one railway track onto the end point of another track where you want it to join. Two railway tracks will merge into one.
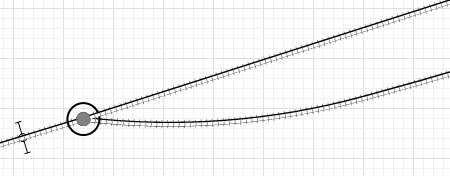
To connect two or more railway tracks with a switch
-
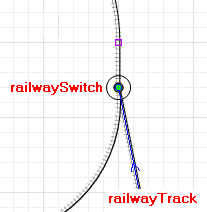
You can connect railway tracks with a railway switch by drawing a segment that connects anywhere on the track, not at its endpoint. In the example below, the element railwayTrack is connected to railwayTrack1 in the middle. Multiple railway tracks can be connected with each other this way.
-
The railway switch itself will appear in the place of connection. It is highlighted in the cyan color. Now you have created a railway network with several tracks in it. In the example below, the railway switch divides the track into two parts, railwayTrack1 and railwayTrack2, while railwayTrack does not join railwayTrack1, but remains a separate track.
You can connect as many tracks as you need in a railway switch.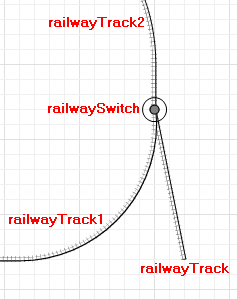
- The first click selects all elements of this railway network, another selects the railway switch and allows to edit its properties. If you right-click the railway switch and select Delete from the context menu, the railway tracks will be graphically connected, but they will no longer form a railway network.
You might want to split the railway track into several tracks by segments.
To disconnect the railway track segments
- Right-click the railway track in the graphical editor and select the option Split into Two Shapes from the context menu.
-
When the editing points are highlighted, click an editing point where you want to split the track. The railway track will be split immediately even if the segments look connected in the graphical editor, you can select one or the other to check that they are separate tracks now.
- General
-
Name — The name of the track. The name is used to identify and access the track from code and flowchart block properties.
Ignore — If selected, the track is excluded from the model.
Visible on upper agent — If selected, the track is also visible on the upper agent where this agent lives.
Lock — If selected, the railway track is locked. Locked shapes do not react to mouse clicks — it is impossible to select them in the graphical editor until you unlock them. This is often needed when you want to prevent the shape from being edited while other shapes are drawn over it.
Visible — Specifies whether or not the shape is visible on animation at model runtime, or not. Use the control to select yes or no.
- Appearance
-
Type — The element type is Railroad.
Track gauge — The distance between the rails on a railroad track, measured between the inside surfaces of the supporting rails.
- Position
-
X — X-coordinate of the track’s start point.
Y — Y-coordinate of the track’s start point.
Z — [Enabled if the Show in 3D option is selected] Z-coordinate of the track’s start point.
- Points
-
The table located in the Points property section enables users to view and adjust the coordinates of the track turning points.
The coordinates are relative, not the absolute ones. The first point always has coordinates (0, 0, 0) that cannot be changed.
Other rows of the table define relative coordinates of the successive points. The coordinates of each point are actually offsets of the corresponding point from the start point along the X, Y (and optionally Z) axes correspondingly.
- Advanced
-
Show in — Select whether to show the shape in both 2D and 3D animation, 2D only, or 3D only.
Show name — If selected, the track’s name is displayed on the graphical diagram.
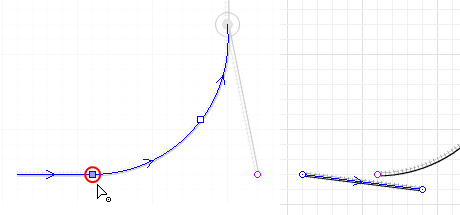
The track has a start point and an end point, and therefore has an orientation. The exact position on the track can be defined by the special Position on Track markup element.
To find out the direction of the track, click on it in the graphical diagram.
To change the direction of the track
- Right-click the track in the graphical diagram and select Change Direction from the context menu. You will see that the arrows have changed their direction.
- Cars
-
Function Description int nCars() Returns the number of cars on the track (including cars that are only partially there). Agent getFirstCar() Returns the car closest to the beginning of the track, or null if the track is empty. Agent getLastCar() Returns the car closest to the end of the track, or null if the track is empty. Agent getCar(int index) Returns a car on the track with a given index counted from the beginning of the track. All cars count: moving, standing, coupled, and cars that are only partially on this track.
index — the index of the carList<Agent> getCars() Returns the list of rail cars that are located on this track including the cars that are only partially on this track. List<Agent> getTrains() Returns the list of trains that are located on this track including the trains that are only partially on this track. boolean isEmpty() Tests if the track is empty, that is, there are no cars that are (even partially) on the track. Returns true if the track is empty, false otherwise. double getFreeSpace(boolean fromstart) Tests the availability of space on the track. If there are no cars on the track, returns infinity. If there are cars, returns the distance from the track start or end point (depending on the fromstart parameter) to the nearest car. If there is a car that has partially entered or exited the track at a given side, the functions returns a negative value.
fromstart — if true, space is checked from the start point of the track, otherwise from the end point - Switches
-
Function Description RailwaySwitch getStartSwitch() Returns switch (Switch object) at the beginning of the track. RailwaySwitch getEndSwitch() Returns switch at the end of the track. RailwaySwitch getSwitch(boolean atend) Returns the switch at the beginning or at the end of the track.
atend — if true — the switch at the end is returned, otherwise at the beginningRailwaySwitch getOtherSwitch(RailwaySwitch sw) If the given switch is a “start switch” of this track, the function returns current track’s “end switch”, otherwise it returns “source switch”. This function does not check that the given is either “start switch” or “end switch”: this is the responsibility of the user calling this function.sw — the switch (one of the track endings) - Blocks and reservations
-
Function Description void block() Blocks the track. Trains located on this track at the moment of blocking can leave the track but cannot re-enter it unless the block has been removed. void unblock() Unblocks the track. boolean isBlocked() Checks whether the track is blocked. If the function returns true, the track is blocked. If false — the track is not blocked. void setBlocked(boolean blocked) Sets the track’s “blocked” status.
blocked — if true, the track will be blocked; if false — the track will be unblocked.void reserveFor(Agent... trains) Reserves the track so that only the given trains can move through it.
trains — trains that are allowed to move through the track.List<Agent> reservations() Returns the list of trains that this track has been reserved for. void cancelReservation() Cancels existing reservations for the track. Any train will be able to move through the track provided that this track is not blocked. boolean isAvailableFor(Agent train) Checks if the given train can move through the track. The function checks for both blocking and reservation.
train — if true, the given train can move through the track; if false — the train cannot move through the track. - Location
-
Function Description RailwayNetwork getRailYard() Returns rail yard (railway network) this track belongs to, or null if it is not a part of a rail yard. - Dimensions
-
Function Description double length() Returns the length of the track in pixels. double length(LengthUnits units) Returns the length of the track in specified length units.
units — a constant defining the length unitsdouble getWidth() Returns the width of the track, measured in pixels. double getWidth(LengthUnits units) Returns the width of the track, measured in given units.
units — a constant defining the length unitsvoid setWidth(double width) Sets the width of the track, 0 means thinnest possible.
width — the new width of the track, in pixelsvoid setWidth(double width, LengthUnits units) Sets the width of the track, 0 means thinnest possible.
width — the new width of the track, measured in given units
units — a constant defining the length units - Level
-
Function Description Level getLevel() Returns the level on which this track is located. - Appearance
-
Function Description Texture getTexture() Returns the texture of the shape, if the shape has texture. Color getColor() Returns the color of the shape, or null if shape has no color or if it has texture (in this case getTexture() should be used instead). void setColor(Color color) Sets the color of the shape.
color — the new color, if null the track is not drawnvoid setColor(Paint color) Sets the texture of the shape.
color — the new color, if null the track is not drawn - Visibility
-
Function Description boolean isVisible() Returns the visibility of the track. If it returns true, the track is visible, if false — not visible. void setVisible(boolean v) Sets the visibility of the track.
v — visibility of the track. If true, track is visible, if false — not visible. - Removal
-
Function Description void remove() Removes this track from the presentation. If the track is not a part of presentation, the function does nothing. Note, that removal from the presentation does not necessarily mean removing from the model logic, since logical networks and routes may have been created before the removal and survive it.
-
How can we improve this article?
-