

A Git branch is a separate version of your model that you can create, edit, and merge into without affecting the main (master) version. Use branches to experiment with new features, fix bugs, or try out different ideas. When you are finished with your changes, you can merge your branch back into the master and share your work with others.
There are two main types of branches in Git:
- A local branch is a version of a model that exists only on your computer. You can make changes to your project on a local branch without affecting any other versions. You can also switch between different local branches to work on different things.
- A remote tracking branch is the branch that is automatically created when you clone or fetch from a remote repository. It corresponds to a specific branch that exists in the remote repository, usually has the same name, and the commits in it should always be synchronized.
When naming branches, it’s good practice to use descriptive names that reflect the purpose of the branch. Avoid using spaces and special characters in branch names.
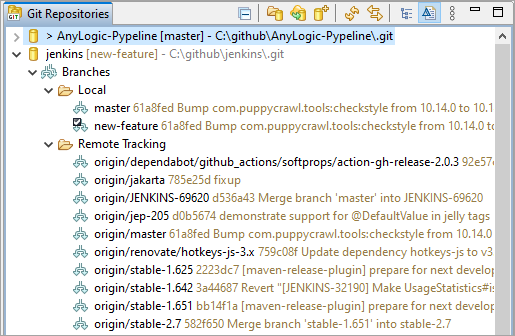
You manage branches from the Git Repositories view if your repository has already been added.
The process of switching to a new branch is usually referred to as “checking out” the branch.
To switch to a different local branch
- Locate your repository in the Git Repositories view.
- Expand the <repository name>/Branches/Local section.
- Double-click the name of the branch you want to check out.
-
Confirm the action in the dialog that appears.
You can disable the dialog by selecting Don’t show this dialog again.
To switch to a different remote tracking branch
- Locate your repository in the Git Repositories view.
- Expand the <repository name>/Branches/Remote Tracking section.
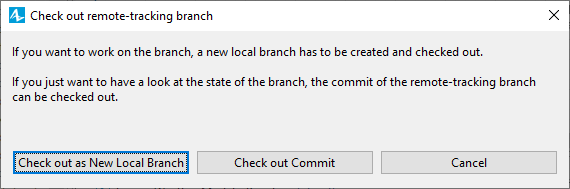
- Double-click the name of the branch you want to check out.
-
In the subsequent dialog, you have two primary options:
-
Check out as new local branch — This will create a new local branch based on the remote branch. You will then be able to work wth this branch from your computer as if it were a regular local branch.
If you already have the local branch with the same name, you won’t be able to do this easily: you’ll have to create a local branch with a different name, and configure the upstream properly to synchronize changes with the remote repository.
- Check out commit — You will check out a single commit, which allows you to see the state of the model. This creates what’s called a “detached head”, which means you won’t be able to commit properly in this branch. It is not recommended to use this option unless you just want to review the branch.
-
Check out as new local branch — This will create a new local branch based on the remote branch. You will then be able to work wth this branch from your computer as if it were a regular local branch.
-
A dialog will appear allowing you to change the settings before creating a branch.
Since you are creating a local branch based on the remote, the settings are already set. All you need to do is to click Finish. - The new local branch will appear as Local, and you can now commit into it.
Whether you want to work with the branch that exists only on your computer or you want to synchronize with the remote tracking branch, you will need to use the Create Branch dialog at some point.
To create a new local branch
- Locate your repository in the Git Repositories view.
- Right-click the repository name.
- Select Switch To > New Branch.
-
The Create branch dialog appears.
In Source, select a branch that will be the “parent” of this branch. The newly created branch will have the same state as the last available commit at the source branch. Usually the source is one of the remote tracking branches, but you can use any branch or commit in the repository.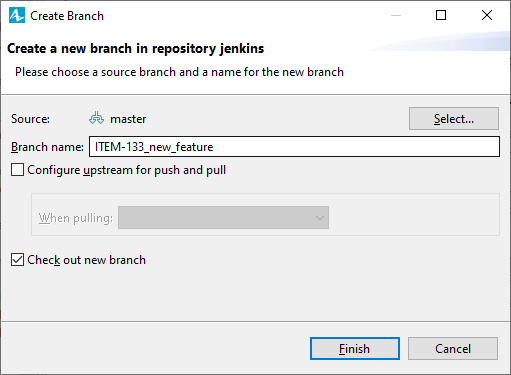
- In the Branch name edit box, enter a name for your new branch.
-
Select Configure upstream for push and pull if you intend to synchronize it with the remote repository:
- When you merge upstream commits, than when you pull, the changes from the main source are combined with your local work. This is the usual method if your new work is based on the main source.
- When you rebase, then when you pull, your local work is moved to start from the latest point in the main source.
- Select Check out new branch to switch to it immediately.
- Click Finish.
A merge incorporates changes from another branch or commit into the currently checked-out branch since the time their histories diverged from the current branch.
To merge another branch into your current branch
- Locate your repository in the Git Repositories view.
- Expand the <repository name>/Branches section.
- Locate the branch you want to merge into your current branch.
- Right-click its name.
- Select Merge from the context menu.
-
The result of a merge is summarized in a dialog. The first line shows the result of the merge, and the second line shows the new HEAD commit if the merge was successful (if it is already up-to-date, fast-forwarded, or merged).
The merge result can be any of the following:- Already up to date: Your current branch is the same as the selected branch or tag, so no changes are made.
- Fast-forward: Your current branch is behind the selected branch or tag. Your branch will be updated to match the selected branch. This is common when updating from remote repositories.
-
Real merge: If the above conditions don’t apply, a merge is triggered. If there are no conflicts, a new merge commit is created. If there are conflicts, the conflicting files are marked and need to be resolved.
To learn how to resolve Git conflicts, read the Git documentation.
-
If your merge resulted in a merge commit, you can then commit that into a branch.
If a merge has resulted in conflicts, you can abort the merge with a hard reset to the current branch (right-click the current branch in the Git Repositories view and select Reset from the context menu).
There is a number of actions you can access from the branch context menu in the Git Repositories view. This includes:
- Check out — Visible when you are not on the branch. Lets you to switch to it.
- Push branch — Opens the dialog which allows you to push the branch, sending the changes you made locally to the remote branch.
- Create branch — Allows you to create a new branch.
- Rename branch — Opens the dialog where you can enter a new name for the branch.
- Configure branch — Opens the dialog with some configuration options, where you can select a remote for this branch or configure the upstream.
-
Delete branch — Deletes the branch and all the local work.
If you delete a local branch, you won’t be able to retrieve any work done on it unless it has been merged.
-
How can we improve this article?
-