

In the previous phases we created a new model, populated it with facilities, bomber aircrafts, defined behavior of aircrafts and their mission, specified animation shapes, added 3D view, camera, and protected area.
In this phase we will add bombs to our model and learn how to destroy facilities with them. To do that we must create interaction between the bomber and the target building. We will use yet another agent type,
![]() Bomb. On approaching the attack distance, the bomber will drop a bomb onto the targeted building, which will change its state to Destroyed once the bomb reaches the building.
Bomb. On approaching the attack distance, the bomber will drop a bomb onto the targeted building, which will change its state to Destroyed once the bomb reaches the building.
Although aircrafts carry bombs, the
![]() Bomb agents will be located not inside the
Bomb agents will be located not inside the
![]() Bomber agent in the model, but directly inside the
Bomber agent in the model, but directly inside the
![]() Main agent, that is, on the same level as the
Main agent, that is, on the same level as the
![]() bombers and the
bombers and the
![]() buildings populations. It will be easier to place bombs in the same space with this model architecture.
buildings populations. It will be easier to place bombs in the same space with this model architecture.
Let us start with creating the
![]() Bomb agent type and program its interaction with the building:
Bomb agent type and program its interaction with the building:
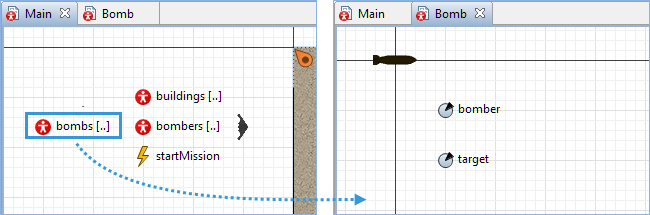
Create Bomb agent
- Drag the
 Agent element from the
 Agent palette onto the
Main diagram. Place it beside the
bombers population to the left of the model animation.
Agent palette onto the
Main diagram. Place it beside the
bombers population to the left of the model animation. - Click Population of agents. You will be taken to the next step.
- Specify Bomb in the Agent type name field on the third step of the agent wizard. Click Next.
- Choose the Bomb animation shape in the Military section. Click Next.
- Create two parameters:
- Click add new... to create a parameter.
- Type target into the Parameter field.
- Set Type to Other (additional drop-down list will appear next to it).
- Select Building from the additional drop-down list of the parameter’s type (This will be the target building in the bomber mission).
- In the same way create parameter bomber of type Bomber.
- Click Next.
- Select the Create initially empty population, I will add agents at the model runtime option.
- Finally, click Finish.
The new agent population will be created with two parameters inside. You can observe them by double-clicking the
![]() bombs population on the
bombs population on the
![]() Main diagram.
Main diagram.
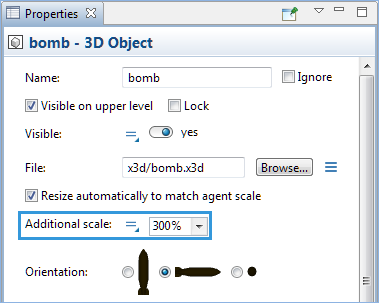
Now we need to adjust the scale of the animation shape to perfectly fit it into our environment.
Adjust scale of the animation shape
- Click the black 2D animation shape of the bomb in the previously opened
Bomb diagram to open its Properties view.
-
Set the Additional scale parameter to 300%. The animation shape will be resized on the
Bomb diagram.
Now we will make a bomb and the targeted building interact with each other by means of a statechart. The bomb will send the "You are destroyed" message to the building on hitting it, destroying itself immediately afterwards.
Start creating the statechart in the
![]() Bomb diagram that you are currently in.
Bomb diagram that you are currently in.
Create the interaction between the bomb and the building
- Switch to the
Agent palette to use its statechart section.
- Drag the
 Statechart Entry Point element to the graphical editor of the
Bomb agent.
Statechart Entry Point element to the graphical editor of the
Bomb agent.
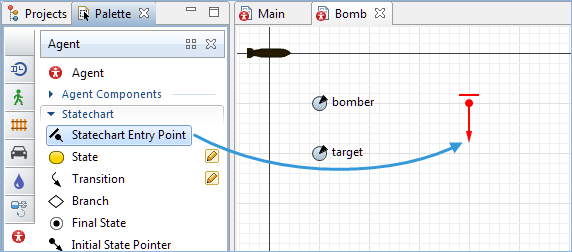
-
Modify the Action parameter in the Properties of the
Statechart Entry Point element by typing in the following code:
setXYZ( bomber.getX(), bomber.getY(), bomber.getZ() );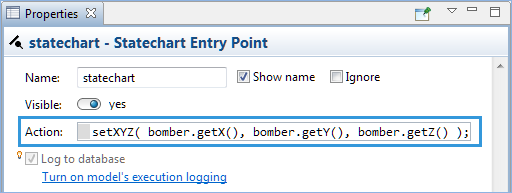
-
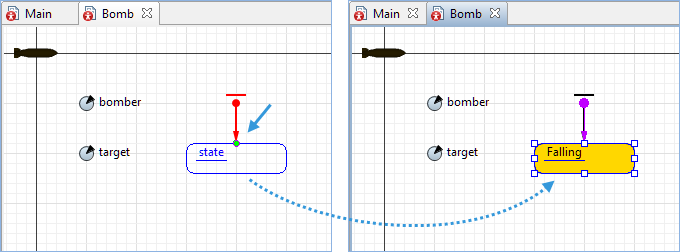
Now click and drag the
 State element from the Statechart section of the
Agent palette up to the previously drawn
Statechart Entry Point element on the
Bomb diagram. Release the mouse button when the green dot appears. It indicates that the two elements will be connected. Name it Falling.
State element from the Statechart section of the
Agent palette up to the previously drawn
Statechart Entry Point element on the
Bomb diagram. Release the mouse button when the green dot appears. It indicates that the two elements will be connected. Name it Falling.
-
Type the following code into the Entry action parameter of the element’s Properties:
moveTo( target.getX(), target.getY(), target.getZ() );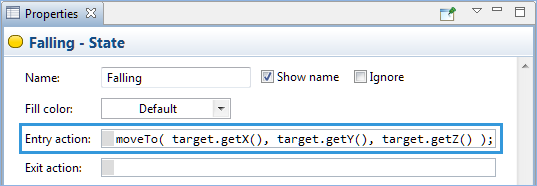
- Now drag the
 Transition element to the
Falling state on the
Bomb diagram and connect them. Navigate to its properties and set the Triggered by parameter to Agent arrival.
Transition element to the
Falling state on the
Bomb diagram and connect them. Navigate to its properties and set the Triggered by parameter to Agent arrival. -
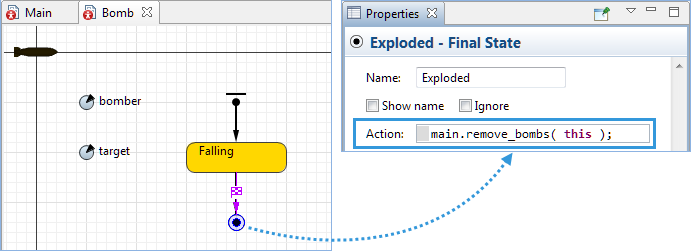
Drag the
 Final State element to the agent diagram and connect it to the
Transition element. Type the following code into the Action field of its Properties to destroy the current bomb once the message has been delivered:
Final State element to the agent diagram and connect it to the
Transition element. Type the following code into the Action field of its Properties to destroy the current bomb once the message has been delivered:
main.remove_bombs( this );
We have completed the statechart and the only missing piece that is left is the bomber’s decision to drop a bomb. We will do it exactly upon arrival to the point directly above the target building (in the action of the transition going from
ToTarget and
Away states).
Define bomb dropping
- Click the
Main tab to switch to the top level agent diagram. We will further navigate to the
Bomber agent diagram from
Main.
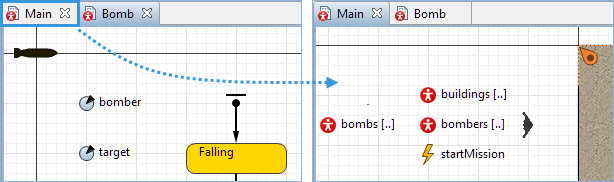
- Double-click
bombers to open its diagram.
- Click the
Transition element to open its properties and modify the Action field by typing in the following code:
main.add_bombs(target,this);On creating a new bomb, the bomber passes itself (this) and the target building to the bomb constructor parameters.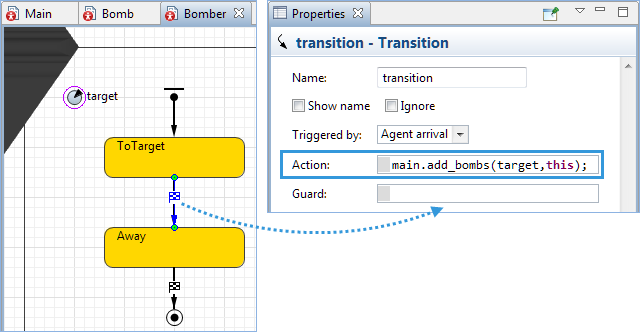
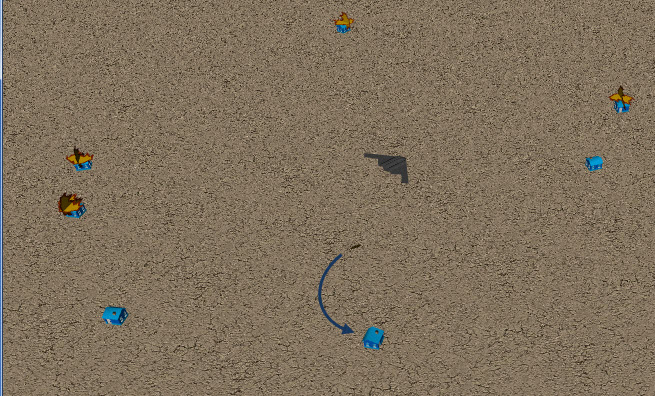
Let us run the model now and watch the bombs being dropped on the buildings in the 3D view mode.
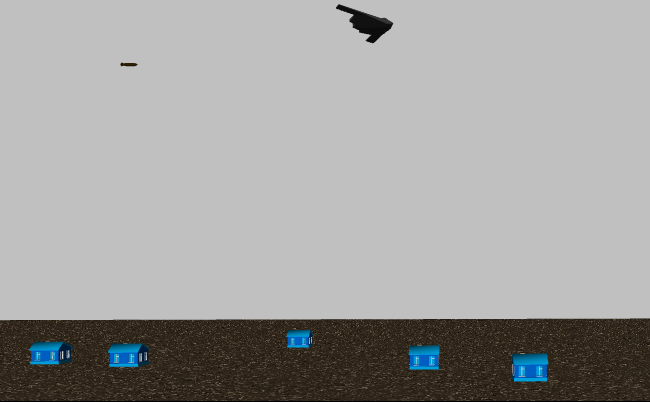
As you can see, the bombs are falling down unnaturally slowly, that is because the initial speed of the bombs is set to the default 10 meters per second.
Define the speed of the bombs
- Click the
 bombs population on the Main diagram to navigate to its Properties.
 - Set the Initial speed parameter of the Dimensions and movement section to 400, then click the speed units drop-down menu to the right of it and select kilometers per hour.
If you run the model now, you will see that bombs are falling faster in the 3D view mode.
The next step is to show the result of a bomb hitting the building, i.e. to implement the building’s reaction to the bomb explosion. The state of being hit will be transferred to the building by a message inside the bomb.
Transfer the message from the bomb to a building
- Double-click the bombs population on the Main to open its agent’s diagram.
- Click the Transition element on the opened Bomb diagram and type the following code in the Action field of its properties:
Type deliver( "You are destroyed", target );
We are using the deliver() function, which delivers the message instantly (within the same event) instead of the send() function, which does it in a separate event (still at the model time though). This is because the message sent by the send() function will be discarded once the sender agent ceases to exist.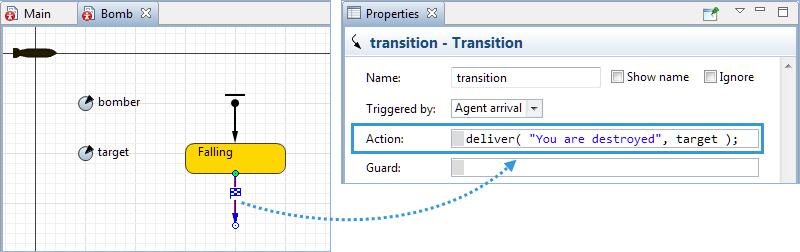
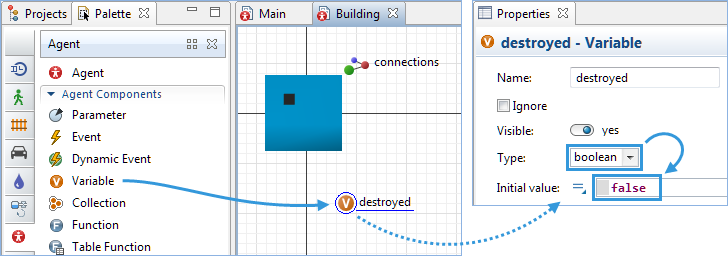
Now we will add a boolean flag destroyed and some animation to the building hit by the bomb.
Modify the Building agent
- Navigate to building’s properties by double-clicking the buildings on the Main.
- Click and drag the
 Variable element from the Agent Components section of the Agent palette onto the diagram and name it destroyed.
 - Navigate to its Properties view and perform the following modifications:
- Set Type parameter to boolean.
- Type false into the Initial value field.
-
Click the connections element on this diagram to open its properties and type the following code into the On message received field of the Communication section:
destroyed = true;
We are not analyzing the content of the message because a bomb is the only message source for our building for now.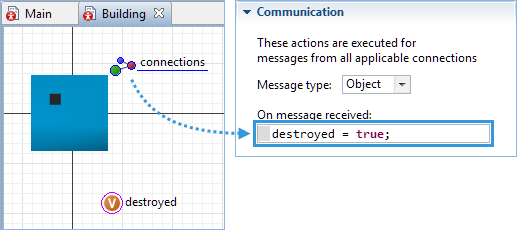
-
Navigate to the 3D objects palette and drag Fire object to the Building diagram. A dialog box will appear "3D Object’s size will change automatically to match with the agent’s scale". Click Yes.
-
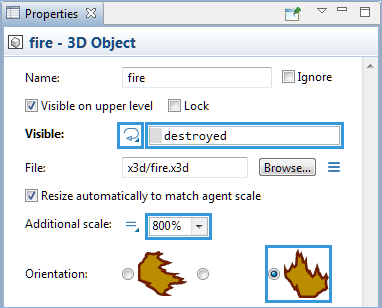
Navigate to Properties view of the object and perform the following changes:
- Click the
 icon to the right of the Visible parameter to switch to the code field, then type destroyed into it. It will make the fire appear around the house once it has been bombed.
 - Set the Additional scale parameter to 800.
- Set the Orientation parameter to Vertical.
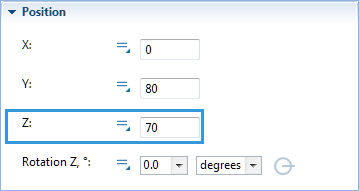
- Click the
- Move on to the Position section and set the Z parameter to 70.
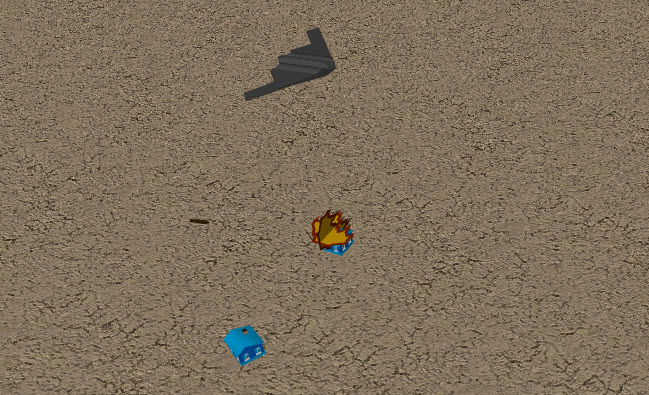
Run the model to observe the building catching on fire when hit.
You must have noticed that, although all buildings are destroyed by the very first bomber attack, the new bombers are, nevertheless, sent to the target area. This happens because the mission assignment is done regardless of the state of the target assets. We will fix it now.
Modify mission assignment
- Navigate to the Main and click the
 startMission event to open its Properties view.
 -
Type in the following code into the box of the Action section:
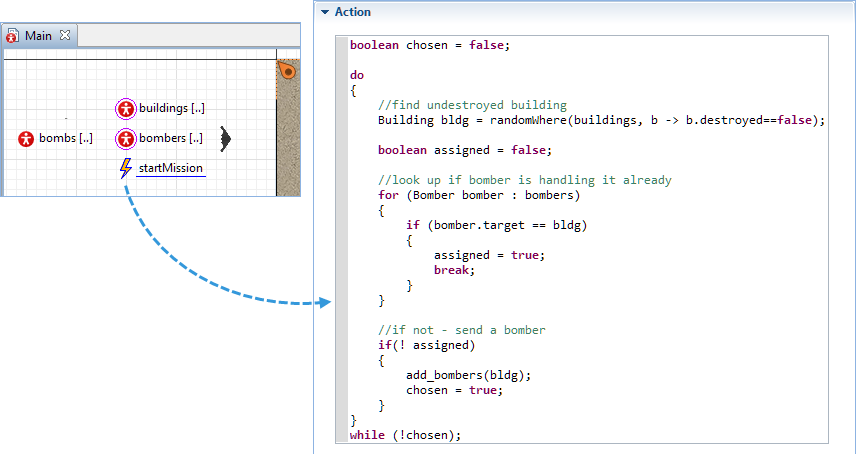
Run the model. As you can see, the bombers are sent to bomb the still intact facilities.
We have completed the third phase of the Air defense system tutorial.
Demo model: Air Defense System — Phase 3 Open the model page in AnyLogic Cloud. There you can run the model or download it (by clicking Model source files).-
How can we improve this article?
-