

Now that the electrode groups have been placed inside the battery case, the case will be covered with a lid and the battery terminals will be welded. After this the battery will undergo a quality check. Batteries that have passed the quality check will be filled with acid while the defective batteries will be removed from the production line.
Let’s start modeling these processes with preparing the layout.
Prepare the layout
- Drag the
 Station element from the Material Handling section of the
 Space Markup palette and place it on the
 batteryConveyor.
 - Name the station addCapAndTerminalsStation.
-
In the station’s properties specify the following:
- Visible: no
- Process time: 1 minute
- Length: 1 meter
- Add another station to the conveyor and name it qaStation.
-
In the properties of the station specify:
- Visible: no
- Process time: uniform( 20, 30 ) seconds
- Length: 1 meter
-
Adjust the placement of the stations of the conveyor according to the layout.

-
Drag the
 Turntable element from the Material Handling section of the
Space Markup palette palette and place it on the
batteryConveyor.
Turntable element from the Material Handling section of the
Space Markup palette palette and place it on the
batteryConveyor.
The turntable element divides the conveyor it has been placed on into two independent conveyors.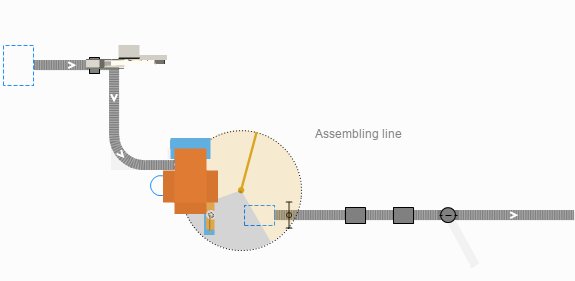
-
Double-click the
Conveyor element in the
Space Markup palette to switch to the drawing mode and draw another conveyor branching from the turntable according to the layout.
- Name the new conveyor defectiveBatteryConveyor.
- In the Position and size section of its properties specify the following:
- Z: 20
- Width: 0.5 meter
- Add another station after the turntable to the
batteryConveyor1 and name it electrolyteFillingStation.
- In its properties specify the following:
- Visible: no
- Process time: 2 minutes
- Capacity: 3
- Length: 2.5 meter
Add the 3D animation
- Drag the Heat Sealing Machine 3D object from the Manufacturing section of the
 3D Objects palette to the
 Main graphical diagram and place it over the
addCapAndTerminalsStation.
Main graphical diagram and place it over the
addCapAndTerminalsStation. - In the displayed Auto scale 3D object dialog window click Yes.
- In the same manner use the Leakage Testing Machine 3D object from the Manufacturing section of the
3D Objects palette to create 3D animation for the
qaStation and the Filling Machine 3D figure for the
electrolyteFillingStation.
-
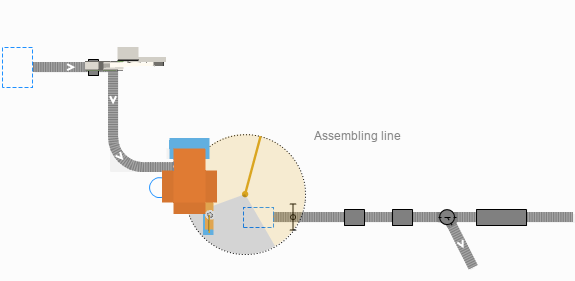
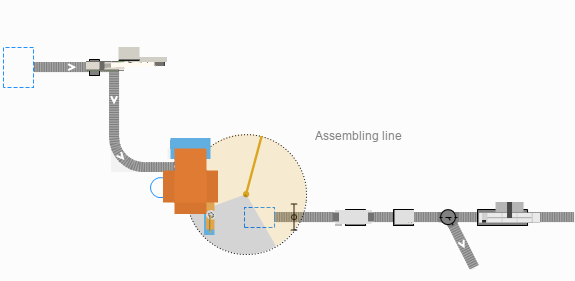
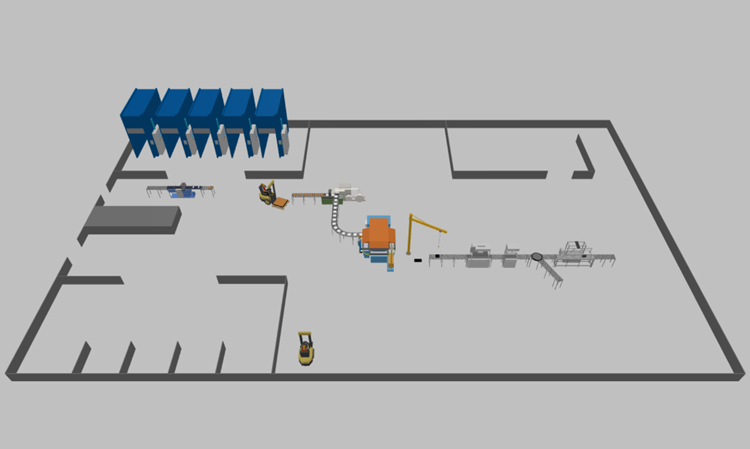
Consult the image below for the correct placement of the stations:
Furthermore, let’s enhance the animation of the battery case to make it more realistic. Initially, we’ve used a simple black container, but during this phase we add a lid to the container and build the terminals. All these actions take place at the
addCapAndTerminalsStation.
- Go to the
 Projects view and double-click the
Battery agent in the model tree.
Projects view and double-click the
Battery agent in the model tree. - Scroll the bottom of the Manufacturing section of the
3D Objects palette and find the Lead Acid Battery 3D object.
- Drag the object to the
Battery agent graphical diagram and place it over the previous animation.
- In the displayed Auto scale 3D object dialog window click Yes.
- In the Lead Acid Battery 3D object properties specify Visible: no.
- Now, go to the
addCapAndTerminalsStation properties, expand the Actions section and type the following code in the On process finished field:
This way, when the batteries leave this station, one 3D figure will become invisible, while the other 3D figure will become visible.agent.industrial_container_1.setVisible(false); agent.lead_acid_battery.setVisible(true);
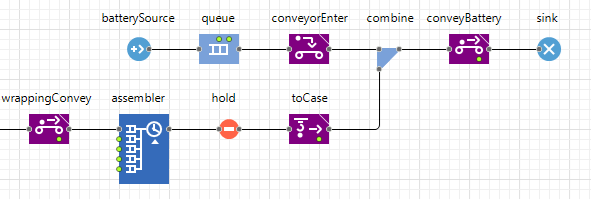
Now, let’s build the logic behind this production phase.
Add the logic
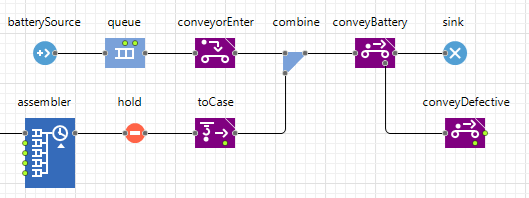
- Add a
 Convey block to the flowchart after the combine block.
 - Name it conveyBattery.
-
In the block’s properties specify the Convey from: Current position and the Target conveyor:
batteryConveyor1.
This block will direct the major flow of the batteries along the conveyor. - Drag another
Convey block to the
Main graphical diagram and connect it to the port at the bottom of the conveyBattery block.
-
Name the block conveyDefective and specify the following parameters in the block’s properties:
- Convey from: Current position
- Target conveyor:
defectiveBatteryConveyor
-
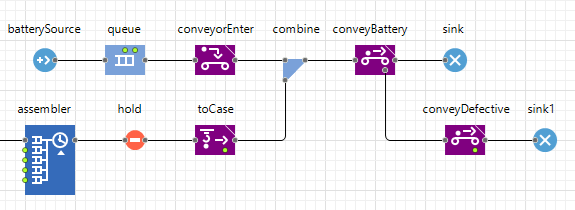
Add a
 Sink block to the flowchart after the conveyDefective block.
-
Go to the
qaStation properties, expand the Actions section and type the following code in the On process finished field:
if (randomTrue(0.01))
      conveyBattery.cancel(agent);
This way we model the batteries that don’t pass the quality assurance test. Now some of the agents passing through the
qaStation will be cancelled. The cancelled agents will exit the conveyBattery block through its cancel port situated at the bottom of the block and will go through the conveyDefective block. -
Run the model.
-
How can we improve this article?
-