

Templates allow you to save and reuse custom property configurations for palette elements. With this feature, you can create multiple identical items with non-default settings or apply saved properties to existing elements without manually configuring each item. Templates are available in AnyLogic version 8.9.7 and later.
Templates can be created for:
- library blocks
- space markup and GIS elements
- presentation shapes, pictures and 3D objects
- controls
User-created templates are placed in a dedicated Templates section within the palette. The original elements remain in their standard palette locations and continue to be available for use.
Template files are saved and stored together with your models, in the AnyLogicTemplates subfolder. You can access them from any model.
Templates do not store the following data:
- distinctive properties, such as Name, Description, or coordinates
- links to other elements and database references
- code
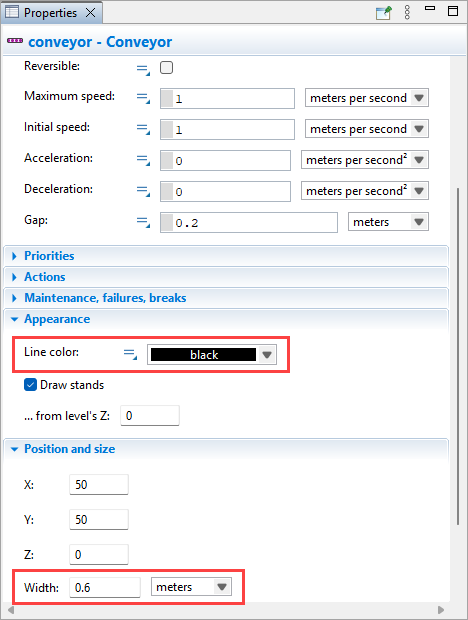
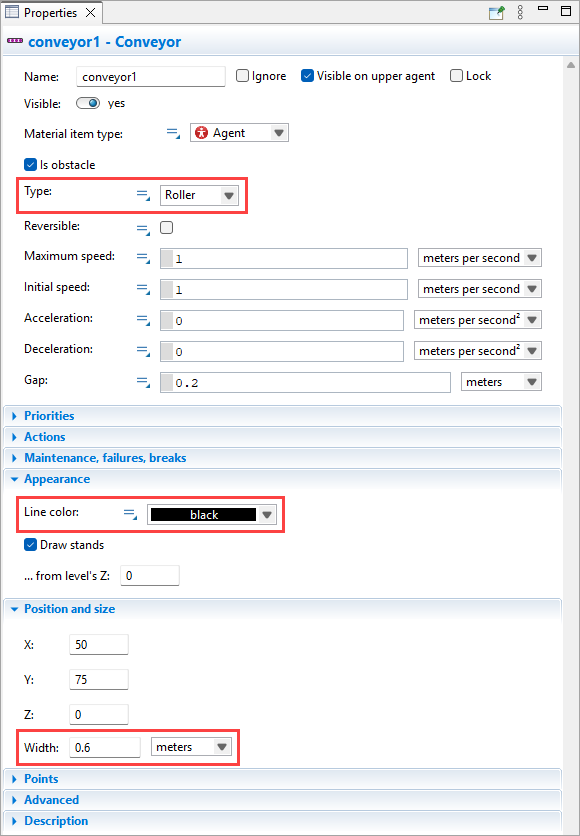
Consider the following scenario. When modeling a large conveyor network system where all conveyors have a width of 0.6 meters (instead of the default 1 meter), you must manually adjust the width property for each new shape during the markup drawing phase. Custom templates enable you to configure an element with the required settings once, then reuse that configured element instead of the default palette element. This allows you to immediately create fully configured elements that match your specific requirements.
Templates are useful for working in imperial units. AnyLogic uses the metric system by default, so you have to manually convert each element to switch to imperial units. However, with templates, you can configure elements with your preferred unit system in advance.
To create a template
- Drag an element (in our case, a Conveyor) from the Palette view into the graphical editor or use the drawing mode if available.
-
In the Properties view, configure the settings for your element. You will be able to select which properties to use in the template later.
-
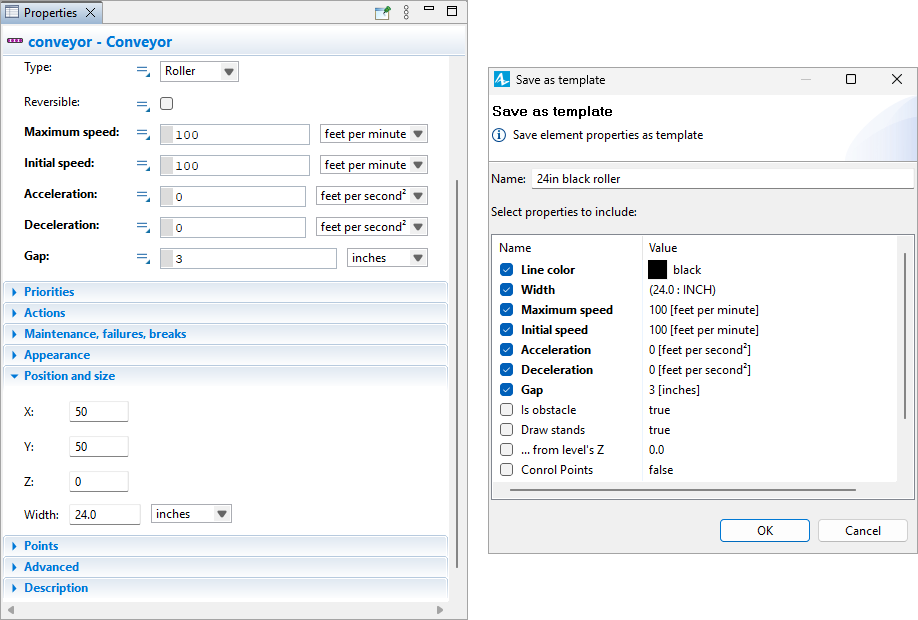
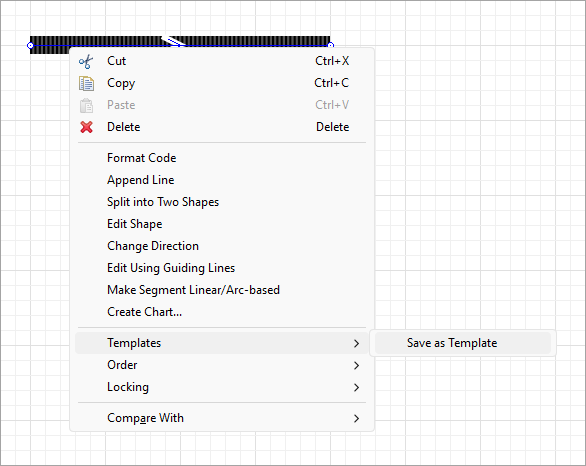
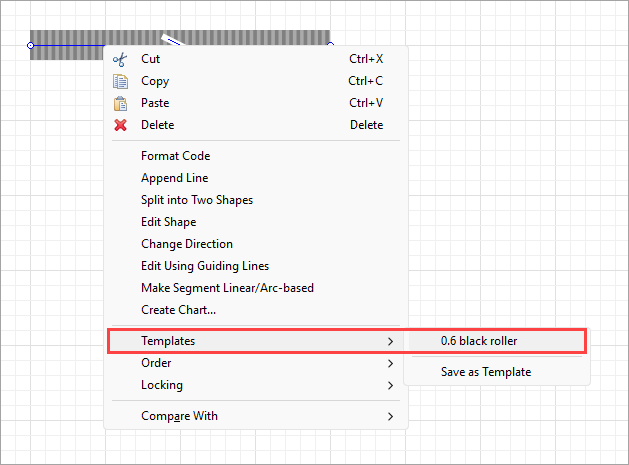
Right-click the element. In the context menu, select Templates > Save as Template. The template wizard will appear.
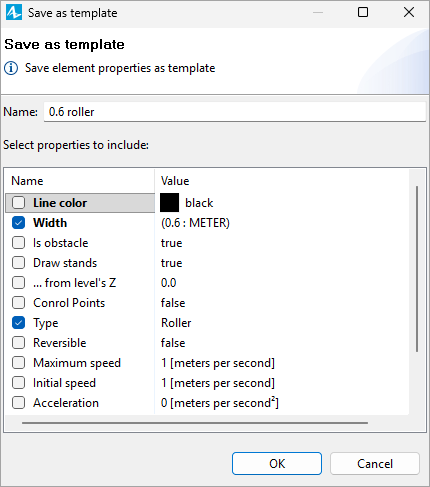
- In the wizard, enter the name for your template in the Name field (we will call our example template “0.6 black roller”) or leave the default one.
- Select the properties you would like to include in the template.
The settings you modified earlier appear in bold, while default settings appear in regular text. You must explicitly select each setting you want to include in the template, even if it uses the default value. For the conveyor template, we will select the Line color (black instead of gray), Width (0.6 meters instead of 1 meter), and Type (roller, which is the default setting we want to keep).
-
Click OK. The template will appear in the Templates section of the palette the element belongs to.

Now you can easily create numerous elements identical to this one in any of your models.
To use a template
-
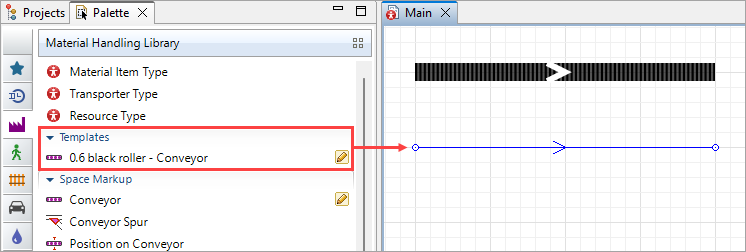
Drag the template element from the Templates section of the corresponding palette into the graphical editor or use the drawing mode if available. With the conveyor, we will find the “0.6 black roller” template in the Material Handling Library, in the Templates section.
-
A new element is created. Its properties match the template settings. Make sure to configure the settings that use links to other elements, such as agent types, as they are not saved in the template.
To apply a template to an existing element
- Right-click an element in the graphical editor. In the context menu, click Templates, then select the required template from the list.
- Now the element’s properties match the template settings. Adjust them if needed or use the element as is.
To edit a template
Editing existing templates allows you to quickly select which settings to apply to certain elements and which ones to ignore. These changes will not affect the elements created using the template before it was edited.
- In the Palette view, open the necessary palette and find the Templates section.
- In the list, right-click the template you want to modify and select Edit Template. The template wizard will appear.
-
Select or deselect the properties as needed. In our example, we will deselect the conveyor Line color property so that new conveyors use the default gray line color. The width of 0.6 meters and the selected roller conveyor type will remain as template settings.
- Click OK to save your changes.
To delete a template
- In the Palette view, open the palette your element belongs to and find the Templates section.
- Right-click the element and select Delete Template from the context menu.
-
How can we improve this article?
-