

 Robot in graphical editor Robot in graphical editor
|
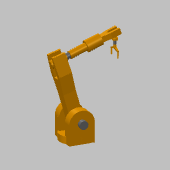 Robot at model runtime in 3D animation Robot at model runtime in 3D animation
|
Robot is the space markup element that graphically defines a robot. You can use Material Handling Library block ProcessByRobot to simulate how the robot processes or transports the agents (material items).
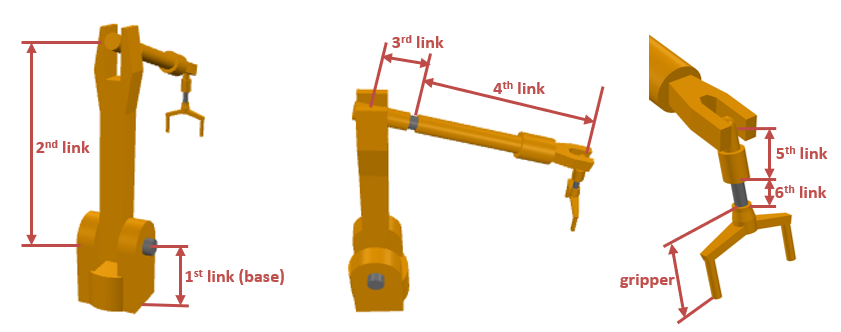
In the current version, the robot has six links. The figures below help to identify the robot links visually.
You can choose the type of the robot's end effector: the robot can be equipped with a gripper, vacuum gripper, welding gun or it may have no animation of the end effector. You only change the visual appearance of your robot: the robot will be able to pick up material items even if the Type of its end effector is set to none.
The base of the robot can serve as an obstacle on the way of pedestrians and transporters moving in free space navigation mode. If you need to impose a further restriction (e.g. a robot operates inside a cage), you can add a restricted area.
Available only in Professional and University Researcher editions.
To draw a robot
-
Drag the
 Robot element from the Material Handling section of the
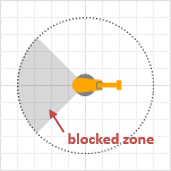
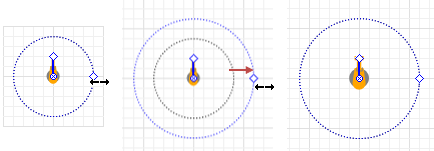
  Space Markup palette into the graphical editor. You will see the top view on the robot displayed inside the circle.
- If you are creating a material handling model that uses a layout, check that the scale of the layout image in your model corresponds to the scale of the graphical diagram. If required, zoom the graphical diagram.
-
The circle defines the robot's maximum arm reach. To adjust it, drag the handle that is located on the right side of the circe. As you move the handle, the current maximum arm reach value will be displayed in the status bar. Alternatively, you can define it explicitly in the robot properties, in the Maximum arm reach field.
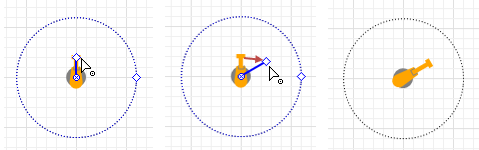
- You can adjust the initial position of the end effector by dragging the handle located at the end of the robot’s arm shape. As you move the handle, the actual position will be displayed in the status bar. Alternatively, you can define it explicitly in the Position and size section of the robot properties.
-
The robot has six links, and in the Links length table you can define the length values for each link of the robot (you should specify only positive values). The length values in the table are defined in the length units that are selected in the Maximum arm reach property above. If you change the length units there, e.g. from meters to feet, the values in the table will not be automatically recalculated, and you will have to do it manually. If you have data in some external editor, you can copy and paste them here using the
 button below the table.
Note that links’ lengths are defined independently of other robot settings, and they will not be automatically adjusted when you change the robot’s maximum arm reach, or initial position of its end effector. So you should always ensure that all these settings are valid and there is no logical contradiction.
button below the table.
Note that links’ lengths are defined independently of other robot settings, and they will not be automatically adjusted when you change the robot’s maximum arm reach, or initial position of its end effector. So you should always ensure that all these settings are valid and there is no logical contradiction. - You can set up a sector in the robot’s rotational periphery where the robot’s arm cannot move. To enable this feature for the robot, select the Blocked zone option in the Position and size section of its properties. The blocked zone can be adjusted in the graphical editor.
- To customize the robot’s appearance, select the type of the robot’s end effector in the End effector section of its properties: choose the robot to either have a gripper, vacuum gripper, welding gun or none end effector. Here you can also define the Gripper length.
- You can change the color of the robot’s links and end effector in the Appearance section of the robot’s properties.
- General
-
Name — The name of the robot. The name is used to identify and access the robot from code and Material Handling Library blocks.
Ignore — If selected, the robot is excluded from the model.
Visible on upper agent — If selected, the robot is also visible on the upper agent where this agent lives.
Lock — If selected, the robot’s shape is locked. Locked shapes do not react to mouse clicks — it is impossible to select them in the graphical editor until you unlock them. It is frequently needed when you want to prevent editing this shape while drawing other shapes over it.
Visible — Here you specify whether the shape is visible on animation at model runtime, or not. Using the control, choose yes or no.
Material item type — The type of the material item that is processed by this robot.
Is obstacle — If selected, the base of the robot will be considered an obstacle for pedestrians and transporters moving in free space mode.
Maximum arm reach — Here you can specify the robot’s maximum arm reach, in selected length units.
Note that the length units specified here are also applied to the Links length.Links length — Here you set the length values of the robot’s links (you should specify only positive values). The names of the links can not be modified. The length values in the table are defined in the length units that are selected in the Maximum arm reach property above. If you change the length units there, e.g. from meters to feet, the values in the table will not be automatically recalculated, and you will have to do it manually. If you have data in some external editor, you can copy and paste them here using the
button below the table.
Note that when you change the robot's maximum arm reach, it does not affect the values of the robot's link lengths, and vice versa. You will have to check that the values match each other and modify the values if required.Default values:
0.5 1.5 0.3 1.2 0.2 0.1 - Actions
-
On seize — Here you can type Java code that will be executed after the agent (material item) seizes the robot.
Local variable: T agent — the agent (material item) that seized the robot.
On robot movement start — Here you can type Java code that will be executed after the robot starts its movement.
On robot movement end — Here you can type Java code that will be executed after the robot finishes its movement.
On agent processing start — Here you can type Java code that will be executed when the robot starts processing the agent (material item).
Local variable: T agent — the agent (material item) that is processed by the robot.
On agent processing end — Here you can type Java code that will be executed when the robot ends processing the agent (material item).
Local variable: T agent — the agent (material item).
On release — Here you can type Java code that will be executed after the agent (material item) releases the robot.
Local variable: T agent — the agent (material item) that released the robot.
On robot state changed — Here you can type Java code that will be executed when the robot state changes.
Local variables:
T agent — the agent (material item) that is processed by the robot.
RobotState newState — the new robot state. Possible return values are:
RobotState.IDLE — robot is idle
RobotState.MOVING_TO_AGENT — robot is moving to the agent
RobotState.TRANSPORTING — pick-up robot is transporting the agent
RobotState.PROCESSING — robot is processing the agent
RobotState.MOVING_HOME — robot is moving (e.g. to initial position) after finishing its operation
RobotState.MOVING_IDLE — robot is moving due to the move() function call, and its state was not changed explicitly using the state argument of the function
RobotState.WAITING — robot, whose agent is located between the SeizeRobot, ProcessByRobot, ReleaseRobot blocks and has not released the robot yet. When calculating utilization, WAITING time is considered working time. - End effector
-
Type — Here you can choose the type of the robot's end effector: gripper (the robot is equipped with a gripper), vacuum gripper, welding gun or none (the robot is not equipped with an end effector).
You only change the visual appearance of your robot: the robot will be able to pick up material items even if the Type of its end effector is set to none.Gripper length — The robot’s gripper length, in selected length units.
Vacuum gripper width — The robot’s vacuum gripper width, in selected length units.
Vacuum gripper length — The robot’s vacuum gripper length, in selected length units.
Welding gun length — The robot’s welding gun length, in selected length units.
- Appearance
-
Links color — Color of the robot’s links.
End effector color — Color of the robot’s end effector.
- Position and size
-
Level — Level to which this element belongs.
X — X-coordinate of the point where the robot is located.
Y — Y-coordinate of the point where the robot is located.
Z — Z-coordinate of the point where the robot is located.
End effector X — Absolute X-coordinate of the point where the robot’s end effector is initially located.
End effector Y — Absolute Y-coordinate of the point where the robot’s end effector is initially located.
End effector Z — Absolute Z-coordinate of the point where the robot’s end effector is initially located.
Blocked zone — If selected, this option allows you to define a sector in the robot’s rotational periphery where the robot will not be able to enter and operate.
Zone start angle — [Visible if Blocked zone is selected] Here you can specify the angle where the blocked zone will start. A graphical tip located to the right of the control element displays the specified angle.
Zone angle, ° — [Visible if Blocked zone is selected] Here you will specify the sector of the blocked zone itself. It will be calculated starting from Zone start angle.
- Advanced
-
Show in — Here you can choose whether you want the shape to be shown both in 2D and 3D animation, or in 2D only, or in 3D only.
Show name — If selected, the shape’s name is displayed on the graphical diagram.
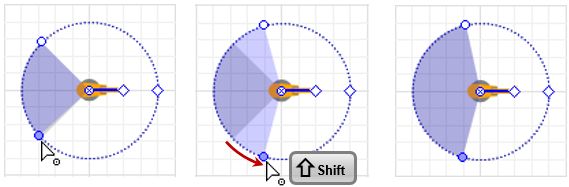
To adjust the robot’s blocked zone
- Click the robot shape in the graphical editor to select it.
- To enable the robot’s blocked zone, select Blocked zone option in the robot’s properties. In the graphical editor it will be displayed as a colored sector of the robot’s circle shape. The sector will have two handles for adjustment.
-
Drag the blue handle either clockwise or counter-clockwise to specify where the angle where the blocked zone of the robot should start.
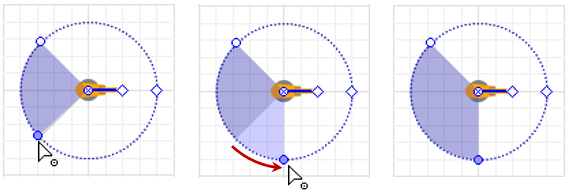
- To prevent changing current size of the blocked zone, press and hold Ctrl button while dragging the blue handle.
-
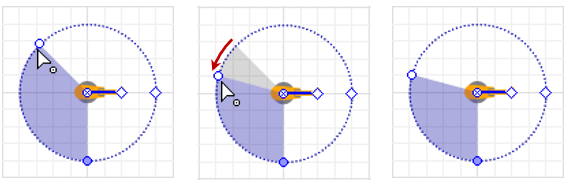
Drag the white handle to adjust the size of the blocked zone.
-
If you want to increase or decrease the blocked zone by changing both start and end angles in equal measure, press and hold Shift key while dragging either handle.
You can manually move a robot using the move() function. There are several notations of the move() function for robots, which you can find in the Manual control section of the robot API.
If you need to show the animation of the agent that is processed or transported by the robot under the manual control, you can use the attachAgentAnimation() function to attach the agent animation to the robot and detachAgentAnimation() function to detach it at the end.
The move() function is a low-priority movement command that cannot interrupt the movement commands originating from the SeizeRobot and ProcessByRobot blocks. The only exception is the ”returning home” movement when the robot is moving (e.g. to its initial position) after finishing its operation.
The commands issued by the blocks that affect the robot always take precedence over the manual movement, that is, if the agent moving through the flowchart triggers the control of the robot, the manual movement will stop.
When manually commanding the robot to move, you can either specify its state explicitly, or omit the state argument; in the latter case, the robot will change its state to MOVING_IDLE.
If the robot is already under the control of an agent as a result of the agent passing through Material Handling Library blocks (SeizeRobot, ProcessByRobot, or ReleaseRobot), it cannot be moved manually. However, you can call move() after the SeizeRobot block even if the robot is not yet released: for example, if the agent using the robot is currently performing some other task, such as staying inside the Delay block. This also applies to the cases when the robot was moved with the ProcessByRobot block which had the Release robot parameter disabled (that is, the block only seized the robot).
If the robot is moving after the move() function call and receives a new move() function call, the new command will completely interrupt the previous one, regardless of the robot’s state caused by the first call.
You can dynamically modify robot properties and control the robot at model runtime using the following API.
- State and statistics
-
Function Description RobotState getState() Returns the current robot state. Possible return values are:
RobotState.IDLE — robot is idle
RobotState.MOVING_TO_AGENT — robot is moving to the agent
RobotState.TRANSPORTING — pick-up robot is transporting the agent
RobotState.PROCESSING — robot is processing the agent
RobotState.MOVING_HOME — robot is moving (e.g. to initial position) after finishing its operation
RobotState.MOVING_IDLE — robot is moving due to the move() function call, and its state was not changed explicitly using the state argument of the function
RobotState.WAITING — robot, whose agent is located between the SeizeRobot, ProcessByRobot, ReleaseRobot blocks and has not released the robot yet. When calculating utilization, WAITING time is considered working time.int numberOfItemsProcessed() Returns the number of items, transported or processed by the robot since model start or since the last resetStats() call. double getUtilization() Returns the robot utilization: the fraction of the time the robot was operating. The returned robot utilization value lies in the range [0..1]. double averageCycleTime() Returns the average time the robot spent to transport or process an agent, in model time units. As any other robot statistics, it can be reset with the resetStats() function. double averageCycleTime(TimeUnits timeUnits) Returns the average time the robot spent to transport or process an agent, in model time units.
timeUnits — a constant defining the time unitsdouble timeInState(RobotState robotState) Returns time (in model time units) the robot spent in specified state since model start or since the last resetStats() call.
robotState — robot state.
Valid values are:
RobotState.IDLE — robot is idle
RobotState.MOVING_TO_AGENT — robot is moving to the agent
RobotState.TRANSPORTING — pick-up robot is transporting the agent
RobotState.PROCESSING — robot is processing the agent
RobotState.MOVING_HOME — robot is moving (e.g. to initial position) after finishing its operation
RobotState.MOVING_IDLE — robot is moving due to the move() function call, and its state was not changed explicitly using the state argument of the function
RobotState.WAITING — robot, whose agent is located between the SeizeRobot, ProcessByRobot, ReleaseRobot blocks and has not released the robot yet. When calculating utilization, WAITING time is considered working time.double timeInState(RobotState robotState, TimeUnits timeUnits) Returns time (in specified time units) the robot spent in specified state since model start or since the last resetStats() call.
robotState — robot state.
Valid values are:
RobotState.IDLE — robot is idle
RobotState.MOVING_TO_AGENT — robot is moving to the agent
RobotState.TRANSPORTING — pick-up robot is transporting the agent
RobotState.PROCESSING — robot is processing the agent
RobotState.MOVING_HOME — robot is moving (e.g. to initial position) after finishing its operation
RobotState.MOVING_IDLE — robot is moving due to the move() function call, and its state was not changed explicitly using the state argument of the function
RobotState.WAITING — robot, whose agent is located between the SeizeRobot, ProcessByRobot, ReleaseRobot blocks, and has not released the robot yet. When calculating utilization, WAITING time is considered working time.
units — a constant defining the time unitsvoid resetStats() Resets all robot statistics. - Arm reach
-
Function Description double getMaxArmReach() Returns maximum arm reach of the robot, in pixels. double getMaxArmReach(LengthUnits units) Returns maximum arm reach of the robot, in specified length units.
units — a constant defining the length unitsvoid setMaxArmReach(double maxArmReach) Sets the robot’s maximum arm reach in pixels.
maxArmReach — robot’s maximum arm reachvoid setMaxArmReach(double maxArmReach, LengthUnits units) Sets the robot’s maximum arm reach in the specified length units.
maxArmReach — robot’s maximum arm reach
units — a constant defining the length unitsboolean canReach(double x, double y, double z, RobotApproachType approachType) Returns true if the robot can reach the given point with the specified approach type, otherwise returns false.
x — X-coordinate of the point
y — Y-coordinate of the point
z — Z-coordinate of the point
approachType — defines how robot should approach the given point. Valid values are:
RobotApproachType.ROBOT_APPROACH_NEAREST_SIDE — robot approaches the point from the nearest side
RobotApproachType.ROBOT_APPROACH_TOP_SIDE — robot approaches the point from the top sideboolean canReach(Agent agent, RobotApproachType approachType) Returns true if the robot can reach the given agent with the specified approach type, otherwise returns false.
agent — the agent
approachType — defines how robot should approach the given agent. Valid values are:
RobotApproachType.ROBOT_APPROACH_NEAREST_SIDE — robot approaches the agent from its nearest side
RobotApproachType.ROBOT_APPROACH_TOP_SIDE — robot approaches the agent from its top side - Blocked zone
-
Function Description boolean isBlockedZoneEnabled() Returns true if the robot’s blocked zone is enabled, otherwise returns false. void setBlockedZoneEnabled(boolean blockedZoneEnabled) Enables or disables the robot’s blocked zone.
blockedZoneEnabled — If this parameter is true, blocked zone is enabled. If false, blocked zone is disabled.double getBlockedZoneStartAngle() Returns the angle where the robot’s blocked zone starts, in radians. double getBlockedZoneStartAngle(AngleUnits units) Returns the angle where the robot’s blocked zone starts, in specified angular units.
units — a constant defining the angular unitsdouble getBlockedZoneAngle() Returns the delta angle of the robot’s blocked zone, in radians. double getBlockedZoneAngle(AngleUnits units) Returns the delta angle of the robot’s blocked zone, in specified angular units.
units — a constant defining the angular unitsvoid setBlockedZoneStartAngle(double angle) Sets the angle where the robot’s blocked zone starts, in radians.
angle — a new angle valuevoid setBlockedZoneStartAngle(double angle, AngleUnits units) Sets the angle where the robot’s blocked zone starts, in specified units.
angle — a new angle value
units — a constant defining the angular unitsvoid setBlockedZoneAngle(double angle) Sets the delta angle of the robot’s blocked zone, in radians.
angle — a new angle valuevoid setBlockedZoneAngle(double angle, AngleUnits units) Sets the delta angle of the robot’s blocked zone, in specified units.
angle — a new angle value
units — a constant defining the angle unitsvoid setBlockedZone(double startAngle, double deltaAngle, AngleUnits units) Sets the blocked zone of the robot with the specified parameters. If the blocked zone is disabled, then it will be enabled by this method.
startAngle — an angle where the blocked zone starts
deltaAngle — a delta angle of the blocked zone
units — a constant defining the angular units - Agents
-
Function Description T getAgent() Returns the agent, currently operated by robot, including the case when robot is moving to the agent. Returns null if there is no such agent. List<T> getAgentsInQueue() Returns list of agents, waiting for the robot. The queuing discipline is FIFO (”First In, First Out” — the first stored agent will be the first agent to process). - Manual control
-
Function Description void move(T agent, RobotApproachType endEffectorApproaches, double time, TimeUnits timeUnits) Starts moving the robot’s end effector to the specified agent to pickup it.
agent — target agent
endEffectorApproaches — defines how the robot should approach the given agent. Valid values are:
RobotApproachType.ROBOT_APPROACH_NEAREST_SIDE — robot approaches the agent from the nearest side
RobotApproachType.ROBOT_APPROACH_TOP_SIDE — robot approaches the agent from the top side
time — movement time in specified time units
timeUnits — a constant defining the time unitsvoid move(T agent, RobotApproachType endEffectorApproaches, double time, TimeUnits timeUnits, double safeHeight) Starts moving the robot’s end effector to the specified agent to pickup it.
agent — target agent
endEffectorApproaches — defines how the robot should approach the given agent. Valid values are:
RobotApproachType.ROBOT_APPROACH_NEAREST_SIDE — robot approaches the agent from the nearest side
RobotApproachType.ROBOT_APPROACH_TOP_SIDE — robot approaches the agent from the top side
time — movement time in specified time units
timeUnits — a constant defining the time units
safeHeight — if possible, robot will move above the specified safe height level (in meters)void move(T agent, RobotApproachType endEffectorApproaches, double time, TimeUnits timeUnits, RobotState state) Starts moving the robot’s end effector to the specified agent to pickup it.
agent — target agent
endEffectorApproaches — defines how the robot should approach the given agent. Valid values are:
RobotApproachType.ROBOT_APPROACH_NEAREST_SIDE — robot approaches the agent from the nearest side
RobotApproachType.ROBOT_APPROACH_TOP_SIDE — robot approaches the agent from the top side
time — movement time in specified time units
timeUnits — a constant defining the time units
state — robot will be in this state during movement. Valid values are: RobotState.MOVING_TO_AGENT, RobotState.TRANSPORTING, RobotState.PROCESSING, RobotState.MOVING_HOME, RobotState.MOVING_IDLEvoid move(T agent, RobotApproachType endEffectorApproaches, double time, TimeUnits timeUnits, RobotState state, double safeHeight) Starts moving the robot’s end effector to the specified agent to pickup it.
agent — target agent
endEffectorApproaches — defines how the robot should approach the given agent. Valid values are:
RobotApproachType.ROBOT_APPROACH_NEAREST_SIDE — robot approaches the agent from the nearest side
RobotApproachType.ROBOT_APPROACH_TOP_SIDE — robot approaches the agent from the top side
time — movement time in specified time units
timeUnits — a constant defining the time units
state — robot will be in this state during movement. Valid values are: RobotState.MOVING_TO_AGENT, RobotState.TRANSPORTING, RobotState.PROCESSING, RobotState.MOVING_HOME, RobotState.MOVING_IDLE
safeHeight — if possible, robot will move above the specified safe height level (in meters)void move(Point point, RobotApproachType endEffectorApproaches, double time, TimeUnits timeUnits) Starts moving the robot’s end effector to place it (with the attached agent, if it exists) in the target point.
point — target point
endEffectorApproaches — defines how the robot should approach the given point. Valid values are:
RobotApproachType.ROBOT_APPROACH_NEAREST_SIDE — robot approaches the point from the nearest side
RobotApproachType.ROBOT_APPROACH_TOP_SIDE — robot approaches the point from the top side
time — movement time in specified time units
timeUnits — a constant defining the time unitsvoid move(Point point, RobotApproachType endEffectorApproaches, double time, TimeUnits timeUnits, double safeHeight) Starts moving the robot’s end effector to place it (with the attached agent, if it exists) in the target point.
point — target point
endEffectorApproaches — defines how the robot should approach the given point. Valid values are:
RobotApproachType.ROBOT_APPROACH_NEAREST_SIDE — robot approaches the point from the nearest side
RobotApproachType.ROBOT_APPROACH_TOP_SIDE — robot approaches the point from the top side
time — movement time in specified time units
timeUnits — a constant defining the time units
safeHeight — if possible, robot will move above the specified safe height level (in meters)void move(Point point, RobotApproachType endEffectorApproaches, double time, TimeUnits timeUnits, RobotState state) Starts moving the robot’s end effector to place it (with the attached agent, if it exists) in the target point.
point — target point
endEffectorApproaches — defines how the robot should approach the given point. Valid values are:
RobotApproachType.ROBOT_APPROACH_NEAREST_SIDE — robot approaches the point from the nearest side
RobotApproachType.ROBOT_APPROACH_TOP_SIDE — robot approaches the point from the top side
time — movement time in specified time units
timeUnits — a constant defining the time units
state — robot will be in this state during movement. Valid values are: RobotState.MOVING_TO_AGENT, RobotState.TRANSPORTING, RobotState.PROCESSING, RobotState.MOVING_HOME, RobotState.MOVING_IDLEvoid move(Point point, RobotApproachType endEffectorApproaches, double time, TimeUnits timeUnits, RobotState state, double safeHeight) Starts moving the robot’s end effector to place it (with the attached agent, if it exists) in the target point.
point — target point
endEffectorApproaches — defines how the robot should approach the given point. Valid values are:
RobotApproachType.ROBOT_APPROACH_NEAREST_SIDE — robot approaches the point from the nearest side
RobotApproachType.ROBOT_APPROACH_TOP_SIDE — robot approaches the point from the top side
time — movement time in specified time units
timeUnits — a constant defining the time units
state — robot will be in this state during movement. Valid values are: RobotState.MOVING_TO_AGENT, RobotState.TRANSPORTING, RobotState.PROCESSING, RobotState.MOVING_HOME, RobotState.MOVING_IDLE
safeHeight — if possible, robot will move above the specified safe height level (in meters)void move(PointNode node, RobotApproachType endEffectorApproaches, double time, TimeUnits timeUnits) Starts moving the robot’s end effector to place it (with the attached agent, if it exists) in the target point node.
node — target point node
endEffectorApproaches — defines how the robot should approach the given node. Valid values are:
RobotApproachType.ROBOT_APPROACH_NEAREST_SIDE — robot approaches the node from the nearest side
RobotApproachType.ROBOT_APPROACH_TOP_SIDE — robot approaches the node from the top side
time — movement time in specified time units
timeUnits — a constant defining the time unitsvoid move(PointNode node, RobotApproachType endEffectorApproaches, double time, TimeUnits timeUnits, double safeHeight) Starts moving the robot’s end effector to place it (with the attached agent, if it exists) in the target point node.
node — target point node
endEffectorApproaches — defines how the robot should approach the given node. Valid values are:
RobotApproachType.ROBOT_APPROACH_NEAREST_SIDE — robot approaches the node from the nearest side
RobotApproachType.ROBOT_APPROACH_TOP_SIDE — robot approaches the node from the top side
time — movement time in specified time units
timeUnits — a constant defining the time units
safeHeight — if possible, robot will move above the specified safe height level (in meters)void move(PointNode node, RobotApproachType endEffectorApproaches, double time, TimeUnits timeUnits, RobotState state) Starts moving the robot’s end effector to place it (with the attached agent, if it exists) in the target point node.
node — target point node
endEffectorApproaches — defines how the robot should approach the given node. Valid values are:
RobotApproachType.ROBOT_APPROACH_NEAREST_SIDE — robot approaches the node from the nearest side
RobotApproachType.ROBOT_APPROACH_TOP_SIDE — robot approaches the node from the top side
time — movement time in specified time units
timeUnits — a constant defining the time units
state — robot will be in this state during movement. Valid values are: RobotState.MOVING_TO_AGENT, RobotState.TRANSPORTING, RobotState.PROCESSING, RobotState.MOVING_HOME, RobotState.MOVING_IDLEvoid move(PointNode node, RobotApproachType endEffectorApproaches, double time, TimeUnits timeUnits, RobotState state, double safeHeight) Starts moving the robot’s end effector to place it (with the attached agent, if it exists) in the target point node.
node — target point node
endEffectorApproaches — defines how the robot should approach the given node. Valid values are:
RobotApproachType.ROBOT_APPROACH_NEAREST_SIDE — robot approaches the node from the nearest side
RobotApproachType.ROBOT_APPROACH_TOP_SIDE — robot approaches the node from the top side
time — movement time in specified time units
timeUnits — a constant defining the time units
state — robot will be in this state during movement. Valid values are: RobotState.MOVING_TO_AGENT, RobotState.TRANSPORTING, RobotState.PROCESSING, RobotState.MOVING_HOME, RobotState.MOVING_IDLE
safeHeight — if possible, robot will move above the specified safe height level (in meters)void attachAgentAnimation(T agent) Attaches the agent animation to the robot’s end effector (for instance, before performing the agent transportation by the robot using the move() command). Should be called only when the robot is not moving. Only one agent animation can be attached at a time.
agent — the agentvoid detachAgentAnimation() Detaches the agent animation that was previously attached by the attachAgentAnimation() function from the robot’s end effector. Should be called only when the robot is not moving. - End effector
-
Function Description RobotEndEffector getEndEffector() Returns the type of the end effector the robot is equipped with. Possible return values are:
RobotEndEffector.ROBOT_END_EFFECTOR_NONE — the robot is not equipped with an end effector
RobotEndEffector.ROBOT_END_EFFECTOR_GRIPPER — the robot is equipped with a gripper
RobotEndEffector.ROBOT_END_EFFECTOR_VACUUM_GRIPPER — the robot is equipped with a vacuum gripper
ROBOT_END_EFFECTOR_WELDING_GUN — the robot is equipped with a welding gunvoid setEndEffector(RobotEndEffector robotEndEffector) Sets the type of the end effector the robot is equipped with. It is possible to change the end effector only when the robot is idle or moving after it has finished its operation.
robotEndEffector — end effector type
Valid values are:
RobotEndEffector.ROBOT_END_EFFECTOR_NONE — the robot is not equipped with an end effector
RobotEndEffector.ROBOT_END_EFFECTOR_GRIPPER — the robot is equipped with a gripper
RobotEndEffector.ROBOT_END_EFFECTOR_VACUUM_GRIPPER — the robot is equipped with a vacuum gripper
ROBOT_END_EFFECTOR_WELDING_GUN — the robot is equipped with a welding gunvoid uninstallEndEffector() Uninstalls the robot’s end effector. It is possible to uninstall the end effector only when the robot is idle or moving after it has finished its operation. Position getEndEffectorPosition() Returns the Position object storing the current coordinates and rotation angle of the robot’s end effector. double getEndEffectorHorizontalRotation() Returns the horizontal (along Z-axis) rotation of the robot’s end effector, in radians. double getEndEffectorVerticalRotation() Returns the vertical (along Y-axis) rotation of the robot’s end effector, in radians. double getInitialEndEffectorX() Returns the initial X-coordinate of the robot’s end effector. double getInitialEndEffectorY() Returns the initial Y-coordinate of the robot’s end effector. double getInitialEndEffectorZ() Returns the initial Z-coordinate of the robot’s end effector. void setInitialEndEffectorX(double initialEndEffectorX) Sets the initial X-coordinate of the robot’s end effector.
initialEndEffectorX — a new X-coordinatevoid setInitialEndEffectorY(double initialEndEffectorY) Sets the initial Y-coordinate of the robot’s end effector.
initialEndEffectorY — a new Y-coordinatevoid setInitialEndEffectorZ(double initialEndEffectorZ) Sets the initial Z-coordinate of the robot’s end effector.
initialEndEffectorZ — a new Z-coordinate - Gripper
-
Function Description double getGripperLength() Returns the length of the robot’s gripper, in pixels. double getGripperLength(LengthUnits units) Returns the length of the robot’s gripper, in the specified length units.
units — a constant defining the length unitsvoid setGripperLength(double gripperLength) Sets the length of the robot’s gripper, in pixels.
gripperLength — new length of the grippervoid setGripperLength(double gripperLength, LengthUnits units) Sets the length of the robot’s gripper, in the specified length units.
gripperLength — new length of the gripper, in the specified units
units — a constant defining the length units - Vacuum gripper
-
Function Description double getVacuumGripperLength() Returns the length of the robot’s vacuum gripper, in pixels. double getVacuumGripperLength(LengthUnits units) Returns the length of the robot’s vacuum gripper, in the specified length units.
units — a constant defining the length unitsvoid setVacuumGripperLength(double vacuumGripperLength) Sets the length of the robot’s vacuum gripper, in pixels.
vacuumGripperLength — new length of the vacuum grippervoid setVacuumGripperLength(double vacuumGripperLength, LengthUnits units) Sets the length of the robot’s vacuum gripper, in the specified length units.
vacuumGripperLength — new length of the vacuum gripper, in the specified units
units — a constant defining the length unitsdouble getVacuumGripperWidth() Returns the width of the robot’s vacuum gripper, in pixels. double getVacuumGripperWidth(LengthUnits units) Returns the width of the robot’s vacuum gripper, in the specified length units.
units — a constant defining the length unitsvoid setVacuumGripperWidth(double vacuumGripperWidth) Sets the width of the robot’s vacuum gripper, in pixels.
vacuumGripperWidth — new width of the vacuum grippervoid setVacuumGripperWidth(double vacuumGripperWidth, LengthUnits units) Sets the width of the robot’s vacuum gripper, in the specified length units.
vacuumGripperWidth — new width of the vacuum gripper, in the specified units
units — a constant defining the length units - Welding gun
-
Function Description double getWeldingGunLength() Returns the length of the robot’s welding gun, in pixels. double getWeldingGunLength(LengthUnits units) Returns the length of the robot’s welding gun, in the specified length units.
units — a constant defining the length unitsvoid setWeldingGunLength(double weldingGunLength) Sets the length of the robot’s welding gun, in pixels.
weldingGunLength — new length of the welding gunvoid setWeldingGunLength(double weldingGunLength, LengthUnits units) Sets the length of the robot’s welding gun, in the specified length units.
weldingGunLength — new length of the welding gun, in the specified units
units — a constant defining the length units - Links
-
Function Description double[] getLinksLength() Returns an array containing length values of the robot’s links, in pixels. double[] getLinksLength(LengthUnits units) Returns an array containing length values of the robot’s links, in specified units.
units — a constant defining the length unitsvoid setLinksLength(double[] linksLength) Sets new length values for the robot’s links, in pixels.
linksLength — array of the links length values, measured in pixels. Should contain exactly 6 values.void setLinksLength(double[] linksLength, LengthUnits units) Sets new length values for the robot’s links, in specified units.
linksLength — array of the links length values, measured in specified units. Should contain exactly 6 values.
units — a constant defining the length units - Position
-
Function Description double getX() Returns the X-coordinate of the robot. double getY() Returns the Y-coordinate of the robot. double getZ() Returns the Z-coordinate of the robot relative to robot’s level. Point getXYZ() Returns the Point object storing the (X, Y, Z) point location of the robot. void setX(double x) Sets the X-coordinate of the robot.
x — a new X-coordinatevoid setY(double y) Sets the Y-coordinate of the robot.
y — a new Y-coordinatevoid setZ(double z) Sets the Z-coordinate of the robot (relative to the robot’s level).
z — a new relative Z-coordinatevoid setXYZ(Point point) Places the robot to the location of the given point.
point — object storing the (X, Y, Z) location - Color
-
Function Description Color getLinksColor() Returns the color of the robot links. void setLinksColor(Color color) Sets the specified color as the new color for the robot links.
color — the new colorColor getEndEffectorColor() Returns the color of the robot’s end effector. void setEndEffectorColor(Color color) Sets the specified color as the new color for the robot’s end effector.
color — the new color - Visibility
-
Function Description boolean isVisible() Returns true if the robot is visible; returns false otherwise. void setVisible(boolean v) Sets the visibility of the robot.
v — visibility. If v is true — the robot is set to be visible, if it is false — not visible. - Obstacle
-
Function Description boolean isObstacle() Returns true if this robot is considered an obstacle by pedestrians and transporters moving in free space mode. Otherwise, returns false. void setObstacle(boolean isObstacle) Sets this robot as an obstacle for pedestrians and transporters moving in free space mode.
isObstacle — if true, the robot is set as an obstacle. Otherwise, not. - Level
-
Function Description Level getLevel() Returns the level where this robot is located. - Removal
-
Function Description void remove() Removes the robot from the presentation. If the robot is not a part of presentation, the function does nothing. Removal from the presentation does not necessarily mean removing from the model logic, since logical networks and routes may have been created before the removal and survive it.
-
How can we improve this article?
-