

Applies to AnyLogic Cloud 2.8.1. Last modified on July 06, 2026.
In AnyLogic Cloud, an experiment consists of input parameters and corresponding outputs. Inputs include model parameters, including those specific to the experiment type, along with their values. Outputs represent the results generated by the model when given these input values.
Once an experiment is run, its results are stored in the database. There is no need to rerun an experiment with the same input values (except for the stochastic experiments). However, if even a single input value is changed, the experiment must be rerun to obtain updated results.
In AnyLogic Cloud 2.5.0 and later, a separate view is available that shows all completed runs of a particular version of the experiment.
There are several types of experiments in AnyLogic Cloud:
- Simulation — A simple experiment to obtain model output or observe model animation.
- Monte Carlo 1st order — Runs the model multiple times with different seed of randomness for each replication to obtain a collection of outputs. Inputs are fixed.
- Monte Carlo 2nd order — Runs multiple iterations with different input values provided by the probability distribution. Optionally, replications can be performed for each iteration.
- Variation — Multiple iterations in which one or more inputs are varied by the specified step within the specified range.
- Variation with replications — A variation experiment with replications performed for each iteration.
- Optimization — Helps find the best input values to minimize or maximize some model output, or to calibrate the inputs.
- Optimization with replications — Same as optimization, but allows multiple replications to be run with different random seeds.
Each experiment has several predefined settings available for customization. The way the inputs and outputs appear in the experiment’s dashboard is determined by your customization. To learn how to customize a dashboard, see the corresponding section.
You can also find additional information about optimization in the following article: Setting up the optimization experiment.
-
Click the
 button in the model version node. The New experiment dialog box opens:
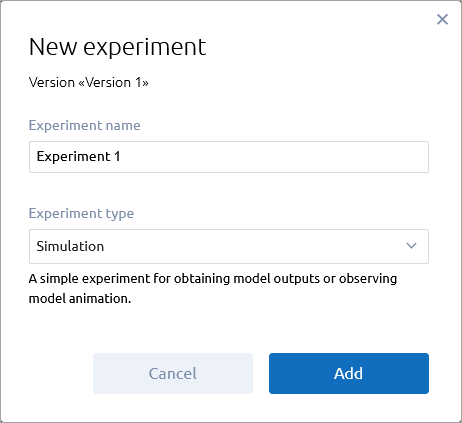
- Type the name of the experiment in the Experiment name field.
- Select the type of the experiment from the Experiment type drop-down list.
- Click Create. The created experiment appears as the top item under the corresponding model version.
-
Adjust the experiment’s settings as needed.
If you are creating an Optimization or Optimization with replications experiment, make sure to specify the Objective (one of the output values), and whether it should be minimized or maximized.To run optimization experiments more efficiently, consider adding a chart that will display the optimized input values. Start by adding the chart to the Outputs section of the experiment dashboard, then select the appropriate inputs as its data items.
A model in AnyLogic Cloud is treated as a black box: you provide the values for the model’s inputs, run the experiment, and observe the output results.
To run the experiment
-
Click the Run button in the experiment toolbar or the run link in the Outputs section of the experiment dashboard.
Because experiments are run on a remote server, you do not have to stay on the experiment page until the experiment is finished. You are free to leave the experiment page (for example, to run another experiment) and return to it at a later time.
-
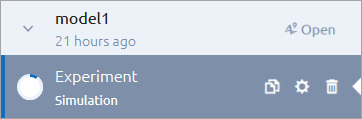
The progress of the experiment is visualized by the progress bar in the Outputs section and the circular indicator next to the experiment’s name in the sidebar:
 In addition to running an experiment, you can view the running model animation in vector graphics. Unlike running an experiment, viewing the model animation takes into account the input values that you specify, but does not produce any output values.
Once you have run the experiment, the Run button in the toolbar becomes inactive and is displayed as .
The first run of the experiment produces the output set, which is saved and shared among all experiments of the current model version. You can view the saved output state by specifying the input values for which an experiment has already been run.
To copy an experiment
- Expand the model version node that contains the experiment you want to rename.
- Select the experiment in the sidebar.
- Click
 .
.
The copy of the experiment will appear immediately. It will have the default name: Experiment name - Copy.
To delete an experiment
- Expand the model version node that contains the experiment you want to delete.
-
Click the
 icon in the corresponding experiment element.
The experiment is deleted. A notification message will appear in the upper right corner of the screen confirming the successful deletion. You can restore the deleted experiment if necessary by clicking the Restore button in the notification message: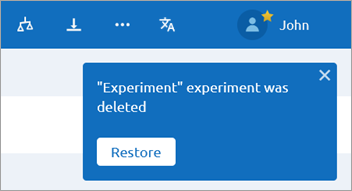
When an experiment is deleted, it is simply marked as such in the database of AnyLogic Cloud. This operation does not remove any files from the server.
-
How can we improve this article?
-