

The electrodes used in the battery production are formed from rolls of lead. The lead alloy differs depending on whether the electrode is positive or negative.
During this phase we will use the elements of the
 Fluid Library to model the electrodes production from the rolls of lead. With the help of this library you can model storage and transfer of fluids, bulk matter, or large amounts of discrete items, which you don’t want to model as separate objects.
The
 FluidToAgent block of this library also provides an opportunity to transit from the modeling of fluids to the modeling of discrete agents.
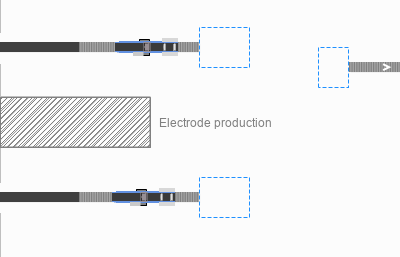
As usual, we will start with preparing the layout.
Draw the layout
- Double-click the
 Bulk Conveyor Belt element in the Space Markup section of the
Fluid Library palette to switch to the drawing mode.
Bulk Conveyor Belt element in the Space Markup section of the
Fluid Library palette to switch to the drawing mode. - In the
 Main graphical diagram, draw a section of the bulk conveyor belt in front of the
 conveyor according to the layout.
 - Name it leadMetalConveyor.
- In its properties specify the Z: 20.
- In the same manner, draw another section of the bulk conveyor belt in front of the
cathodeConveyor.
- Name it leadDioxideMetalConveyor.
-
In its properties specify the Z: 20.
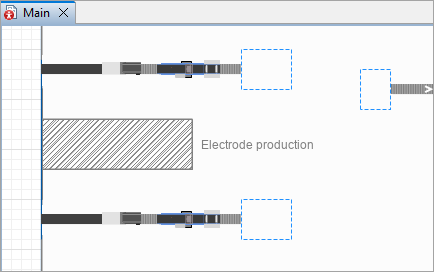
Add the 3D animation
- From the CNC Machines section of the
 3D Objects palette, drag the CNC Cutter 3 State 1 3D object to the
Main diagram and place it over the connection between the leadMetalConveyor and
conveyor.
3D Objects palette, drag the CNC Cutter 3 State 1 3D object to the
Main diagram and place it over the connection between the leadMetalConveyor and
conveyor. - In the Auto scale 3D object dialog that appears, click No.
- In the object’s properties specify the Additional scale: 50% and Z: 18.
-
Hold Ctrl key and drag the object to the second conveyor and place accordingly.
Next, let’s modify the properties of our custom block PrepareElectrode so that it can differentiate between two bulk conveyor belts.
Modify the PrepareElectrode block
- Add a
 Parameter to the
PrepareElectrode agent.
Parameter to the
PrepareElectrode agent. - Name it metalBulkConveyor.
- In its properties specify the Type: Other... and in the edit box next to it type BulkConveyorBelt.
- Specify the Label: Metal bulk conveyor and in the Control type parameter select Element chooser.
- In the properties of the prepareAnode block specify the Metal bulk conveyor: leadMetalConveyor.
- In the properties of the prepareCathode block specify the Metal bulk conveyor: leadDioxideMetalConveyor.
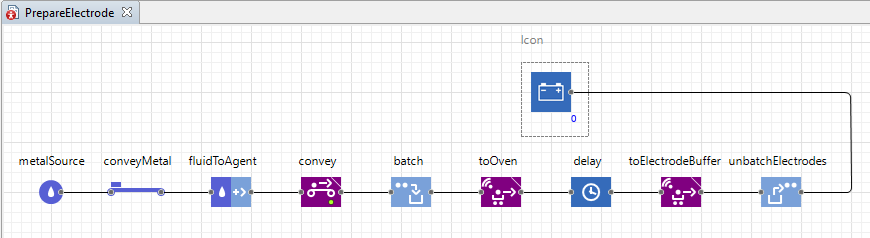
Now, we have to add the logic behind the metal handling process to our flowchart.
Add the logic
- Drag the
 FluidSource block from the
Fluid Library palette to the
PrepareElectrode graphical diagram.
FluidSource block from the
Fluid Library palette to the
PrepareElectrode graphical diagram. - Name it metalSource.
-
In its properties specify the following:
- Rate: 5 cubic meters / s
- Mode: Limited amount, call inject() to refill
- Initial amount: 0.075 cubic meters
- Select the Custom batch option in the metalSource block properties.
-
Among the options that have become visible, select the Custom batch color option and specify any color you like in the Batch color parameter.
In our reference model, we will use the default color: deepSkyBlue.
Now, let’s move on and define how the metal is moved along the line in its fluid state.
- Drag the
 BulkConveyor block from the
Fluid Library palette and place it after the metalSource block. Make sure the connection is properly established.
BulkConveyor block from the
Fluid Library palette and place it after the metalSource block. Make sure the connection is properly established. -
Name the new block conveyMetal. In its properties specify the following:
- Length: 10 meter
- Speed: 1 meters per second
- Maximum input rate at speed: 0.0001 cubic meters / s
- Bulk conveyor belt: metalBulkConveyor
- Drag the
FluidToAgent block from the
Fluid Library palette and place it after the conveyMetal block.
- In the new block’s properties specify the Fluid in agent: 0.0002 cubic meters and the New agent:
Electrode.
- Delete the source block from the main flowchart, which describes the processing of electrodes, and replace it with the sequence of blocks you have just created.
-
Select the text element that represents the agent counter for the PrepareElectrode block and in the Text edit-field change the line of code to this: fluidToAgent.out.count()
Since we’ve deleted the source block which we queried for the number of electrodes, we have to specify a different block for this query. In our case, this block is fluidToAgent that converts the rolls of lead to electrodes.
Now, we need to make sure that a new roll of lead will be added to the production line in the specified time. For this purpose we will use the Event element.
- Drag the
Event element from the
 Agent palette to the
PrepareElectrode graphical diagram.
Agent palette to the
PrepareElectrode graphical diagram. - Name it addRoll.
-
In its properties, specify the following:
- Mode: Cyclic
- First occurrence time: 2 hours
- Recurrence time: 2 hours
- In the Action field type the following line of code: metalSource.inject(0.075).
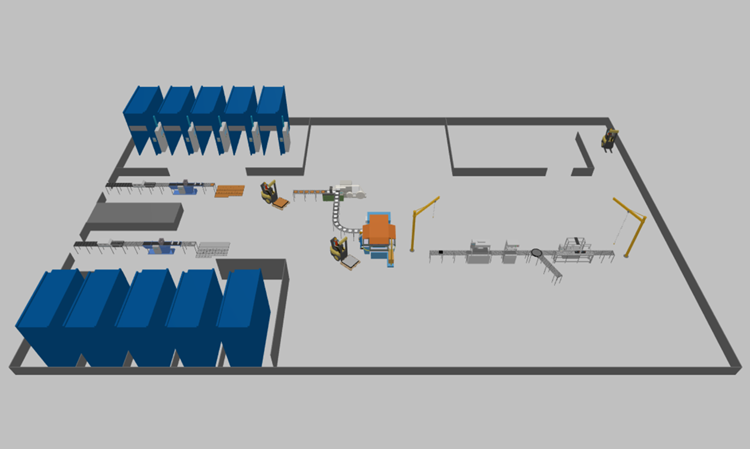
-
Run the model and enjoy the completed version!
-
How can we improve this article?
-