

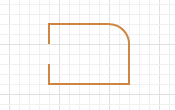
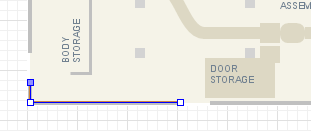
A Wall is a space markup shape used to define exterior and interior walls in pedestrian simulation models. To draw some enclosed areas inside, use Rectangular wall and Circular wall elements.
You can draw a wall of any shape. Wall can contain either linear and curved segments.
Available only in Professional and University Researcher editions.
To draw a wall
- Double-click the
 Wall element in the Space Markup section of the
  Pedestrian Library palette.
 - The icon of the element should turn into
 . It means that the drawing mode is activated and now you can draw wall in the graphical editor point by point.
 - Click in the graphical editor to put the first point of the wall. Do more clicks to add more points.
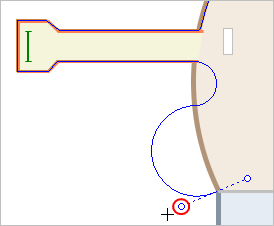
- To draw a curved segment, do not release the mouse button while clicking, but move the mouse with the left mouse button pressed.
- Finally put the final point with the double-click.
- General
-
Name — The name of the wall. The name is used to identify the wall.
Ignore — If selected, the wall is excluded from the model.
Visible on upper agent — If selected, the wall is also visible on the upper agent where this agent lives.
Lock — If selected, the wall shape is locked. Locked shapes do not react to mouse clicks — it is impossible to select them in the graphical editor until you unlock them.
Visible — Here you specify whether the shape is visible on animation at model runtime, or not. Using the control, choose yes or no.
Closed — If selected, the wall is closed, i.e. its begin and end point are connected with extra segment.
- Appearance
-
Color — The color of the shape. Used as the outline color. If the Fill type is other than No fill, also used as the fill color.
Line width — The width of the wall.
Fill type — The fill style. From the drop-down list, select No fill, Solid area, or Hatched area.
- Position and size
-
Level — The level to which this wall belongs.
X — The X-coordinate of the wall’s start point.
Y — The Y-coordinate of the wall’s start point.
Z — [Enabled if Show in 3D option is selected] The Z-coordinate of the wall’s start point.
Z-Height — [Enabled if Show in 3D option is selected].The height of the wall, in meters. The value is relative to the Z-coordinate of the wall’s level.
- Points
-
The table located in the Points property section allows you to view and set the coordinates of the wall’s turning points.
The coordinates are relative, not absolute. The first point always has coordinates (0, 0, 0) that cannot be changed.
Other rows of the table define relative coordinates of the successive points. The coordinates of each point are actually offsets of the corresponding point from the start point along the X, Y (and optionally Z) axes correspondingly.
- Advanced
-
Show in — Here you can choose whether you want the shape to be shown both In 2D and 3D animation, or in 2D only, or in 3D only.
Show name — If selected, the wall’s name is displayed on the graphical diagram.
To add a linear segment while drawing a wall
-
Simply click and drag to achieve the desired length.
To add a curved segment while drawing a wall
- Press and hold down the left mouse button. Move the mouse while holding the button down.
-
Release the left mouse button when you have the segment of the desired shape.
You can dynamically modify the wall properties at model runtime using the API.
- Size
-
Function Description double length() Returns the length of the wall (in pixels) calculated in 3D space. double getZHeight() Returns the Z-height of the wall (in pixels). void setZHeight(double zHeight) Sets the Z-height of the wall.
zHeight — the new height of the wall (in pixels) - Points
-
Function Description double getNearestPoint(double x, double y, Point out) Calculates the point in this wall nearest to the given (x, y) point and writes the result to the output Point object. Returns the square of the distance to the point. All calculations are performed in the horizontal XY-projection (that is, z-coordinates are treated as zeros).
x — the x coordinate of the point
y — the y coordinate of the point
out — the output point to write result todouble getNearestPoint(double x, double y, double z, Point out) Calculates the point in this wall nearest to the given (x, y, z) point and writes the result to the output Point object. Returns the square of the distance to the point.
x — the x coordinate of the point
y — the y coordinate of the point
z — the z coordinate of the point
out — the output point to write result to - Segments
-
Function Description int getSegmentCount() Returns the number of the wall’s segments. MarkupSegment getSegment(int index) Returns the segment by the provided index.
index — the segment index, starting from zero up until the number of segments -1 - Visibility
-
Function Description boolean isVisible() Returns true if the wall is visible; returns false otherwise. void setVisible(boolean v) Sets the visibility of the wall.
v — visibility. If v is true — the wall is set to be visible, if it is false — not visible. - Color and texture
-
Function Description Color getColor() Returns the color of the wall, or null if the wall has no color or uses a texture (in this case use getTexture() to get the wall’s texture). Texture getTexture() Returns the texture of the wall or null if the wall has no texture but uses a color (in this case use getColor() to get the wall’s color). void setColor(Color color) Sets the color of the wall.
color — the new colorvoid setColor(Paint color) Sets the color (or texture) of the wall.
color — the new texture - Appearance
-
Function Description double getLineWidth() Returns the width of the wall outline. void setLineWidth(double width) Sets the width of the wall outline; 0 means the thinnest possible outline.
width — the new width of the wall outlineWallFillingType getFillingType() Returns the filling type of the wall.
Valid values:
WallFillingType.WALL_FILL_NONE — No fill
WallFillingType.WALL_FILL_SOLID — Solid fill
WallFillingType.WALL_FILL_HATCHED — Hatched areavoid setFillingType(WallFillingType fillingType) Sets the filling type of the wall.
fillingType — new filling type
Valid values:
WallFillingType.WALL_FILL_NONE — No fill
WallFillingType.WALL_FILL_SOLID — Solid fill
WallFillingType.WALL_FILL_HATCHED — Hatched area - Level
-
Function Description Level getLevel() Returns the level where this wall is located. - Removal
-
Function Description void remove() Removes the wall from the presentation. If the wall is not a part of presentation, the function does nothing. Note, that removal from the presentation does not necessarily mean removing from the model logic, since logical networks and routes may have been created before the removal and survive it.
-
How can we improve this article?
-