

Applies to AnyLogic Cloud 2.8.1. Last modified on July 08, 2026.
The model screen displays information about your model and its versions.
To open the model screen
-
While working with the model’s experiments, navigate to the model screen by clicking the name of the model in the experiment toolbar:

The model screen page also opens up automatically when you upload a model to AnyLogic Cloud.
The model screen consists of the following tabs:
-
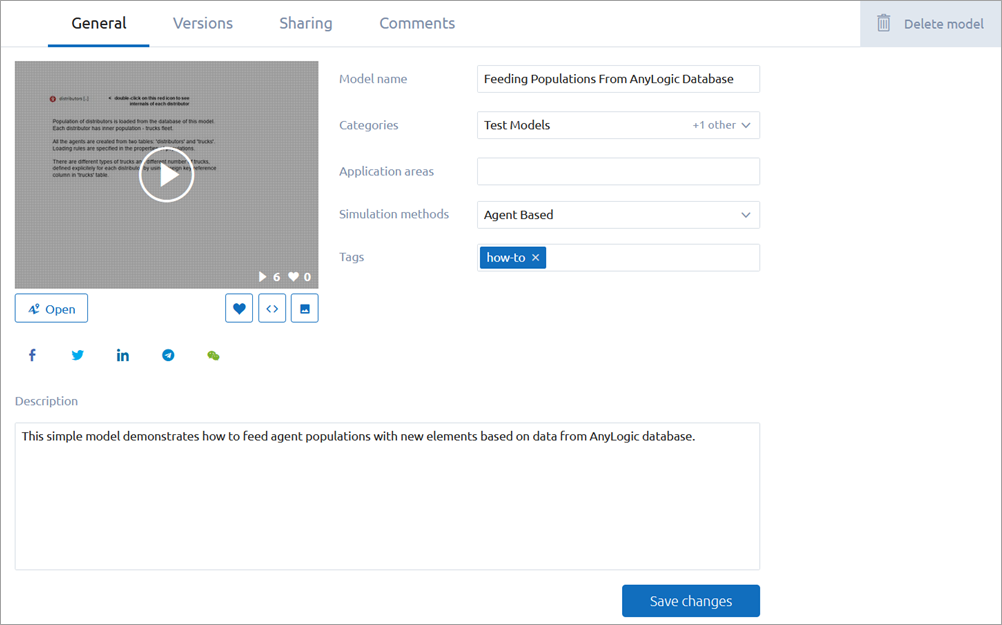
General tab — Provides general information about the model: its name, description, thumbnail image, categories, application areas, simulation methods, and tags. If you are a developer of the model, you can modify this information there, as well.
The footer of the thumbnail image shows the number of model runs and likes. You can like the model by clicking the number of likes.Users with the User role can see only this tab. They can download the model’s source files here only if the model owner has uploaded them to AnyLogic Cloud. In addition, a model developer must enable the Allow to download sources of the latest model version option in the Publish model section of the Sharing tab.Below the model thumbnail, the following buttons are available:
Other tabs are available to the users with the Developer role. Administrators of Private Cloud environments also have access to all settings of the models that users published in these environments.
Under these, the social network sharing buttons are available, allowing you to quickly post the model on Facebook, Twitter, LinkedIn, Telegram, or WeChat. In Private Cloud, this functionality can be disabled in configuration files.Run Runs the model and opens its animation in the dialog. Edit Opens the web editor for the last version of the model. Embed Opens the form with the embedding code for the model (works for Public models only). Change thumbnail Opens the drop-down menu with the following options: -
Change image — Opens the dialog for changing the model image on the General tab and the model tile (visible on the title screen of Cloud).
Click the option. In the subsequent dialog, select an image file. To do that, you can either drag and drop the desired file directly into the dialog space, or click Upload an image, locate the desired file, then double-click the file or select it and click Open.The following image formats are supported: GIF, PNG, and JPG. -
Delete image — Deletes the thumbnail image.
Click the option, then confirm the action in the subsequent dialog.
If no image is attached to the model, a thumbnail is automatically generated using the initials of the model name.
For the model’s developer, the following fields are available for editing:- Model name — The name of the model.
-
Categories — Lists categories this model belongs to, for better sorting on the Public models screen.
In Private Cloud, the instance administrators can modify the list of categories on the administrator panel.
- Application areas — Can be entered manually; a short excerpt describing the application area for this model. When the field is empty, the drop-down lists suggests application areas already used in this instance, sorted by popularity in descending order.
- Simulation methods — Specifies the modeling approach used when building this model.
- Tags — Lists the tags of this model which can be used for search and filtering. When the edit box is empty, the drop-down list suggests tags already used in this instance, sorted by popularity in descending order.
-
Description — The arbitrary description of the model.
Model developers can include an external link in the description.
When posting a link, make sure that it does not direct users to content that violates the laws of your country, is fraudulent or misleading, or may be considered offensive by other Cloud users. In public Cloud (https://cloud.anylogic.com), AnyLogic support team reviews and moderates these links, so if the content to which the link refers is considered fraudulent, the content may be deleted and your user account may be suspended.
-
Change image — Opens the dialog for changing the model image on the General tab and the model tile (visible on the title screen of Cloud).
- Versions tab — Lists the existing versions of the model. Switch to this tab to manage them or work with a specific model version.
- Sharing Settings tab — Switch to this tab to set up the model’s sharing settings.
-
Custom UI tab — From this tab, experienced users can upload a custom web UI designed for their model to host it in a Private Cloud environment.
This feature is available to Private Cloud users only.
- Upload custom UI — Drag a ZIP file containing your custom UI for the model there, or click … and select a file from your machine.
-
Link access — Contains a link pointing at the already-uploaded Custom UI for the model.
To copy the link to the clipboard, click Copy link. -
Card in Public models gallery — Contains additional settings for the model with custom UI.
With the Redirect to Custom UI option enabled, the model tile in the Public section of the title screen will open Custom UI for the model instead of the default UI.
-
Comments tab — Contains comments that users left for this model. If your assigned role is User, comments will be available directly beneath the model description on the General tab.
- Regular users can delete their comments,
- Model owners and the users with the Developer role can delete all comments left to their models,
- Administrators of Private Cloud environments can delete any comments in these environments.
Anyone can include an external link in the comments.
When posting a link, make sure that it does not direct users to content that violates the laws of your country, is fraudulent or misleading, or may be considered offensive by other Cloud users. In public Cloud (https://cloud.anylogic.com), AnyLogic support team reviews and moderates these links, so if the content to which the link refers is considered fraudulent, the content may be deleted and your user account may be suspended.
To delete the model
- Click the Delete model button in the top-right corner of the model screen.
To restore the model you have deleted accidentally, click the Restore button that appears in the notification box.
For Private Cloud administrators: After the model is deleted, its files (ALP/ALPX and auxiliary files) and stored run data in the database are not removed immediately. Instead, they are deleted after the preconfigured grace period. The default value for this period is 1 week, but you can configure it as an environment variable. Take this behavior into account when managing storage space for the instance.
-
How can we improve this article?
-