You can set the Source block to generate agents according to the timestamps read from the database.
Source can generate one agent per one database record, or multiple agents per record.
If you want to learn how to generate agents with certain parameters read from the database, see Source generates agents with parameters read from DB.
Demo model: Source With Arrivals From Database Table Open the model page in AnyLogic Cloud. There you can run the model or download it (by clicking Model source files). Demo model: Source With Arrivals From Database TableOpen the model in your AnyLogic desktop installation.Assume we have data on arrivals and all agent attributes stored in an external database:
To make Source block generate agents according to the database records, one agent per one record
- Import the data from the external database into AnyLogic built-in database.
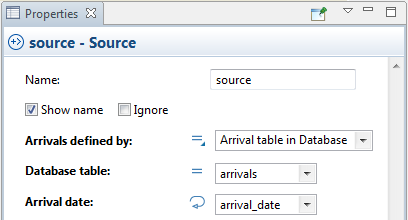
- In the Source properties, choose Arrivals defined by: Arrival table in Database.
- In the Database table field, choose the name of the internal AnyLogic database table that contains the data on agent arrivals.
-
In the Arrival date field, choose the column of this database
table that contains agent arrival timestamps.

- If you want to create agents with custom attributes, you need to create a custom agent type in your model. If you have agent attribute values defined in a database, we recommend to create a new agent type using this database table as the template.
- To create a new agent type with parameters corresponding to the columns of a database table, in the Projects view, right-click this table and choose New > Agent type from the popup menu. Follow the steps of the New agent wizard, specify the Agent type name, choose animation shape, and set up the agent parameters on the next wizard page.
- Now you have created a custom agent type with the attributes that we need. Open the properties of the Source block again and let it generate agents of this custom type. In the New agent property, choose the custom agent type name. In the table below, you can set the mapping of agent parameters to the columns of the database table you have specified earlier.
- Now this Source block will generate agents according to the records in the database. Each record defines one agent arrival. Agent attributes will be read and stored in the corresponding agent parameters.
You may need to set the Source block to generate multiple agents per one arrival. For example, a shuttle bus arrives at the airport terminal, and multiple new passengers appear in the model, or a delivery truck arrives, and a number of pallets appear.
Let’s use the same example we used above, but assume now we are not defining the process for the truck, but for the cargo, so on every truck arrival our Source block should generate the specified number of agents (pallets).
To make Source generate multiple agents per one database record
- Do the steps 1-8 of the previous scenario.
-
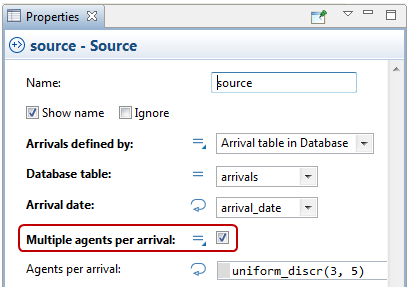
In the Source properties, select the checkbox
Multiple agents per arrival.

- In the Agents per arrival field below, you can define the number of agents that should be generated per one database table record. If you do not have data, you can generate agents randomly, specifying here a stochastic expression. By default it is set to generate a random number from 3 to 5: uniform_discr(3,5). You can substitute it with some other probability function call, just delete the existing line, and click the Choose Probability Distribution toolbar button that will open the wizard with the list of all probability distribution functions supported by AnyLogic.
-
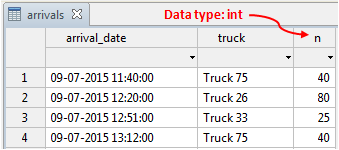
If you have the data on the number of agents to be generated per
arrival, use the data. Assume we have one more column in our database
table, named n. This column stores the
number of pallets delivered by the truck. Let's set the
Source block to use the data from there.

-
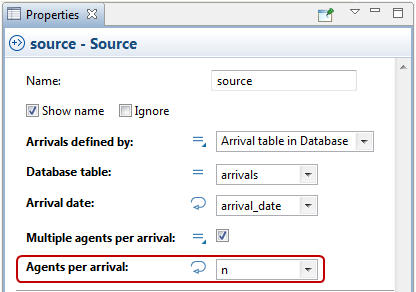
Click the
 icon to the right of the Agents per arrival field, and select
Table column from the list. Now you should just
select the name of the required column (n)
from the Agents per arrival list.

-
How can we improve this article?
-

