

In this part of our tutorial, we’ll add the trucks that deliver the pallets to the job shop. Let’s start by creating an agent type to represent them.
- On the
 Process Modeling Library palette, drag the
 Agent Type element onto the
Main diagram.
Agent Type element onto the
Main diagram. -
In the New agent wizard, do the following:
- In the Agent type name box, type Truck.
- Click Next.
- On the next page of the wizard, expand the Road Transport section in the list on the left, and then click the 3D animation figure Truck.
- Click Finish.
- Open the
Main diagram.
-
Under the
 Space Markup palette, click the
 Point Node element and drag it on to the driveway entry.
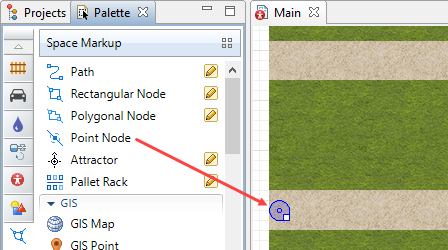
- Name the node exitNode.
-
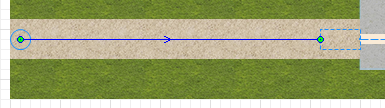
Draw a
 Path to connect the exitNode to the receivingDock.
-
Create another process flowchart to define the truck movement logic by connecting the
Process Modeling Library blocks in the following order:
 Source —
 MoveTo —
 Delay —
MoveTo —
Delay —
MoveTo —
 Sink.
Sink.

- The
Source block generates a truck.
-
The first
MoveTo block drives the truck to the job shop entrance.
MoveTo flowchart blocks move agents to new locations in the network. If resources are attached to the agent, they will move with it.
- The
Delay block simulates pallet unloading.
- The second
MoveTo block drives the truck away.
- The
Sink block removes the truck from the model.
- The
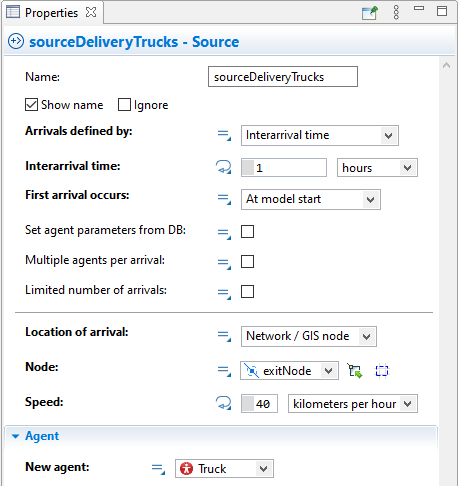
- Name the
Source block sourceDeliveryTrucks.
-
In the sourceDeliveryTrucks block’s
 Properties view, do the following to have a new agent of the custom Truck type arrive to the driveway entry once per hour at a specific speed:
- In the Arrivals defined by list, click Interarrival time.
- In the Interarrival time box, type 1, and select hours from the list on the right.
- In the First arrival occurs list, click At model start. The first truck will appear right at the model start, and we will not have to wait for it for one hour of model time.
- In the Location of arrival list, click Network/GIS node.
- In the Node list, click exitNode.
- In the Speed box, type 40, and select kilometers per hour from the list on the right.
- In the New agent list inside the Agent section, click Truck.
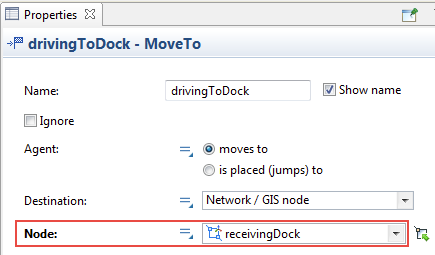
- Name the first
MoveTo block drivingToDock.
-
In the drivingToDock block’s
Properties view, in the Node list, click receivingDock to set the agent’s destination.
- Rename the
Delay block to unloading.
-
In the unloading block’s
Properties view, do the following:
- In the Type area, click Until stopDelay() is called.
- In the Agent location list, click receivingDock.
The operation’s duration depends on how quickly the pallets are unloaded and removed by forklift trucks. We’ll consider this operation complete when the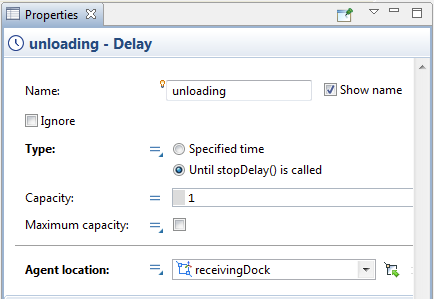
 Store block has finished storing pallets, and we’ll model this by changing the
Delay block’s operating mode.
Store block has finished storing pallets, and we’ll model this by changing the
Delay block’s operating mode.
Programmatically controlling the delay time
You’ll typically specify a Delay time for the
Delay block’s operation. It can be a fixed duration such as five minutes or a stochastic expression that produces a delay time such as triangular(1, 2, 6).You can also programmatically control the operation’s duration and stop the delay when necessary by calling the block’s corresponding function. If you need to stop waiting for all agents that are in the
Delay block, call the block’s function stopDelayForAll(). Another function — stopDelay(agent) — ends the operation and releases the specified agent. - Name the second
MoveTo block drivingToExit.
-
In the drivingToExit block’s
Properties view, in the Node list, click exitNode to set the destination node.
Our model’s two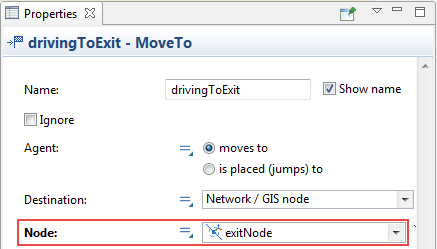 Source blocks generate agents of two types: the trucks that appear each hour and the pallet that is generated every five minutes. Since we want pallets to appear when the truck unloads, we’ll change the arrival mode for the
Source block that generates them.
Source blocks generate agents of two types: the trucks that appear each hour and the pallet that is generated every five minutes. Since we want pallets to appear when the truck unloads, we’ll change the arrival mode for the
Source block that generates them.
Controlling agent generation
You can have the
Source block generate agents at set intervals by setting the block’s Arrivals defined by parameter to Calls of inject() function. You’ll be able to control the agent creation at runtime by calling the block’s function inject(int n).This function generates the given number of agents at the time the call occurs. You set the number of agents that the block will generate by using a function argument such as sourcePallets.inject(12);.
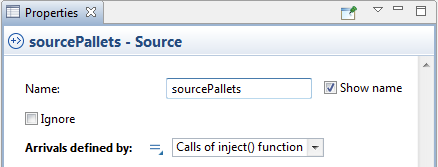
-
In the sourcePallets block’s
Properties view, in the Arrivals defined by list, click Calls of inject() function.
-
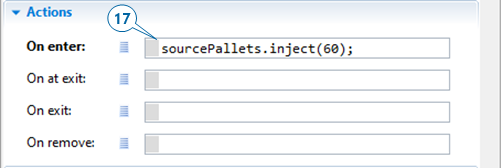
Do the following to have the sourcePallets block generate pallets when a truck enters the unloading block:
- In the unloading block’s
Properties view, expand the Actions section.
-
In the On enter box, type the following:
sourcePallets.inject(60);
This Java function will ensure our model generates 60 pallets each time a truck starts to unload.
- In the unloading block’s
-
In the storeRawMaterial block’s
Properties view, expand the Actions section, and in the On exit box, type the following:
In this example, self is a shortcut we use to refer to the block storeRawMaterial from its own action.if( self.nWaitingForResource() == 0 ) unloading.stopDelayForAll();
If there are no pallets waiting for resources to perform the delivery to the storage, the unloading block’s delay time ends (in other words, stopDelayForAll() is called), and the truck leaves the unloading block and enters the next flowchart block, drivingToExit.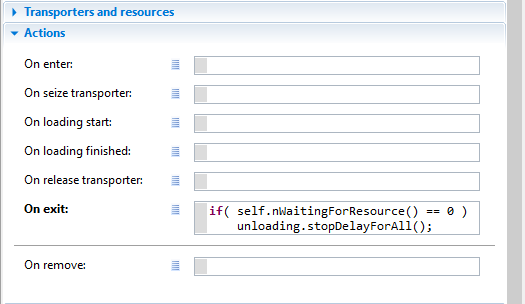
- Run the model.
-
If the truck is aligned incorrectly as in the figure below, do the following to fix it.
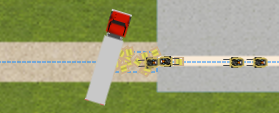
- In the
 Projects view, double-click the Truck agent type to open its diagram and view the truck animation figure.
 -
In the graphical editor, select the truck shape and then use the round handle or the Rotation Z property in the shape’s Position properties section to rotate the truck to -180 degrees.
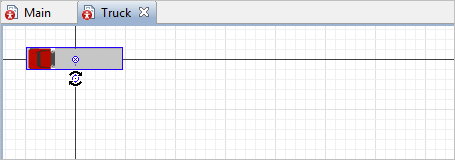

- In the
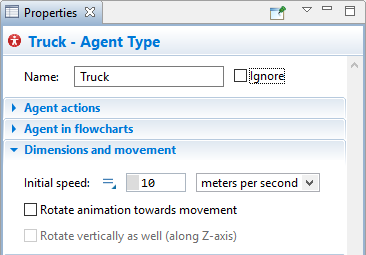
-
Do the following to change AnyLogic default settings:
- In the
Projects view, click Truck.
- On the Truck agent type’s
Properties view, expand the Dimensions and movement section.
-
Clear the Rotate animation towards movement check box.
- In the
- Open the
Main diagram.
-
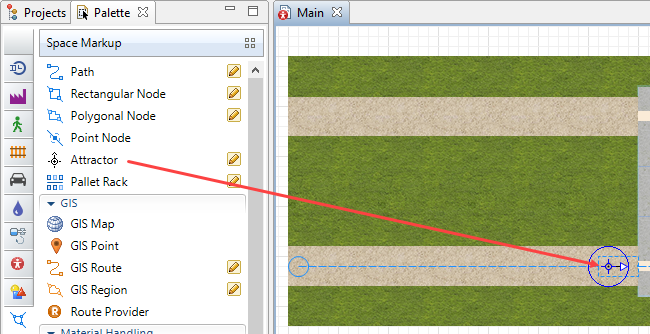
To ensure the pallets are correctly positioned in the receivingDock network node, open the
Space Markup palette, and drag an
 Attractor into receivingDock. Let it face the entrance.
Attractors in nodes
Attractors allow us to control agent location inside a node.
- If the node defines the destination that our agents move toward, attractors define the exact target points inside the node.
- If the node defines the waiting location, attractors define the exact points where agents will wait inside the node.
Attractors also define the agent animation’s orientation while the agent waits inside the node. Here we use attractor for this particular purpose. You can add attractors by dragging them individually onto the
Main diagram, but if attractors form a regular structure, you should use the special wizard to add several attractors at the same time. The wizard offers several different creation modes as well as the option to clear all attractors, and you can display it by clicking the Attractors button in a node’s
Properties view. -
Run the model to check the truck behavior.
The animation should work as we expect.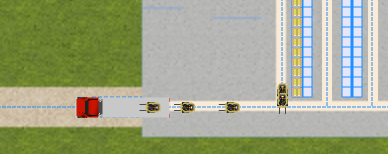
-
How can we improve this article?
-