

AnyLogic provides ready-to-use routes for you to use with GIS maps. In your model if you want an agent to travel only along the existing roads of a GIS map, defining its route is simple: you only have to specify the route’s start and end points. AnyLogic will then download an existing route (i.e., roads) from an online map service. Because such existing routes are requested from an online service, you must stay online while developing your model. But, to make it easier to develop and run your model, and to improve its performance, its routes will be cached (i.e., saved) in the model’s folder. To obtain the necessary routes from an online map service and then cache them as GIS Routes, follow the instructions below.
If a transportation network you want to model is not available for download from an online map service, you can use GIS space markup elements to explicitly define its individual routes. You can also join individual routes together with GIS points to create a route network.
Alternatively, you can upload a file to create routes for the model, or use straight-line routes for movement between map locations.
To use existing routes
- Select the GIS map in the graphical editor and navigate to its Properties view.
- Expand the Routing properties section. Select the Routes are: requested from OSM server option to obtain the routing data from the AnyLogic OSM online server.
- You can choose if you want the routes to be the shortest or the fastest.
- Then, you can select a road type that fits your needs with each of the servers. By default, the car type is suggested. The bike and foot road types are also available.
- Now you only need to define locations on the map with GIS points or regions. If you send an agent from one location to another, it will be moving along the routes that it will receive from the route provider.
To save and edit a GIS route
- Double-click the map to enter its edit mode, then pan and zoom it to display the area where you need the route to start or end.
-
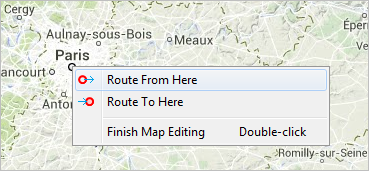
Right-click the map and select
 Route from here or
  Route to here from the context menu. Then, move to another location and select the other option.
-
Special marks will appear in these locations on the map.
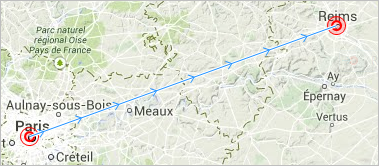
-
You will see the GIS Route
 element appear on the map.
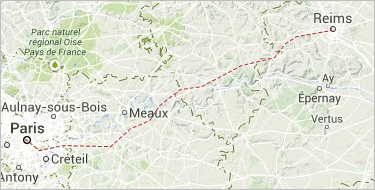
- The route’s appearance and type depend are defined in the Routing section of the GIS Map shape’s properties. If you use an online routing service or create routes from an OSM file, a route of the specified road type between two indicated points will be provided for you. If AnyLogic cannot find an appropriate route through an online service or a routing graph, it will create the route as a straight line or show the error message. (AnyLogic will also create the route as a straight line if you indicate the Straight lines mode in the Routing section.)
- After the route is created, you can edit it as you would edit any other manually-drawn GIS route. You can also fix its points on the map using the Lock the position route property.
- If you connect two or more routes with GIS points, altogether they form a network.
Alternatively, you can manually draw a route using the GIS Route markup element.
There are multiple ways to create a route programmatically:
- By using one of the getRoute() functions available for the GIS map.
- By using one of the getRoute() functions available for the IGISRouteProvider interface. This interface is specifically designed for creating routes in the GIS space.
- By creating a new GISRoute object using one of the available constructors.
All methods that create new routes allow creating one-way routes and bidirectional routes.
For details, see the API documentation for the corresponding objects.
To select the routing method
AnyLogic supports different routing options which define the routes that you request from the routing servers.
- Select the GIS map in the graphical editor and go to its Properties view.
- Expand the Routing properties section and find the Routing method option. This option is available for routes that are requested from the routing server, and routes that are obtained from a routing graph.
- Here you can choose if you want agents to take Shortest or Fastest routes in the GIS network.
- When you choose to build the Shortest routes, then only the length of routes is considered.
- When you use the Fastest routes option, the speed limitations on different segments of the route are taken into account.
To select the road type
- Select the GIS map in the graphical editor and go to its Properties view.
- Expand the Routing properties section. You can choose between the following road types for your routes: for car, bike, or foot.
- If the routes in your model are requested from OSM server, you can define Road type for the routes right in this properties section.
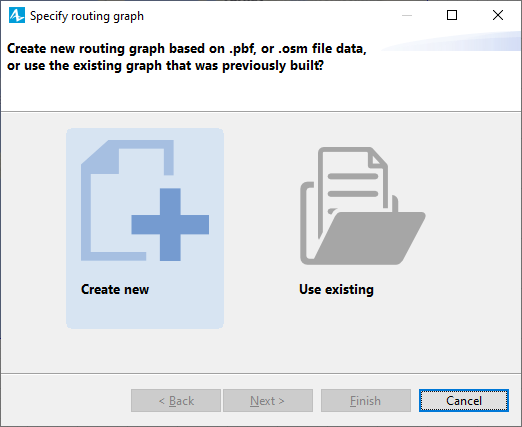
- When you load the routes from PBF file, you can choose the Road type in the wizard for creating a routing graph. First click the Specify routing graph button, then choose Create new.
To define a route that is not available
- Select the GIS map in the graphical editor and go to its Properties view.
- Expand the Routing section and find the If route not found parameter. Here you can indicate what you want AnyLogic to do if a route cannot be created (because, for instance, a route cannot be found in the online service’s database or in a file you selected as a routing graph file).
- Select one of the two options: Create straight route or Show error dialog.
- Select the Create straight route option if you want an unavailable route to be drawn as a straight line. Then at runtime if AnyLogic encounters a route that is unavailable, it will fill in a straight line and your model will run without interruption.
- Select the Show error dialog option if you want AnyLogic to notify you about the unavailable route and pause.
The default is to download routes using an online routing service. Instead, you can import routes from a routing file on your hard drive. For this purpose, you can download OSM (an XML format of open street map data) or PBF files (highly compressed, optimized binary format of OSM) from libraries on the Internet (for instance, from the GeoFabric.de or BBBike.org). You may find the PBF format files more convenient because their size is smaller, and they will be processed by AnyLogic more quickly.
GraphHopper is an efficient routing library based on OpenStreetMap data (see the GraphHopper website).
To create a new routing graph
- Select the GIS map in the graphical editor and go to its Properties view.
- Expand the Routing section, find the parameter Routes and select the option Loaded from PBF file.
- You can select here which routing method should be used: shortest or fastest, and also define the pathfinding algorithm before or after you create the routing graph.
-
In the properties section, click the button Specify routing graph that opens the wizard for adding routing graphs. Choose the option Create new on the first page of the wizard.
- On the second page, specify the file name in the File field. You can click the Browse button to choose the file. The supported file types are PBF and OSM.
- Next, specify the Folder for storing routing graph. By default, this folder is called Routing graph. Click Browse to choose the folder where the files of created routes are stored. If you type the name of the folder in the edit field, this folder will be used if it exists in the model folder; otherwise, it will be created in the model folder with the specified name. If the specified folder already contains a routing graph, you will see a warning next to the folder name, you can still use the folder to create a graph in it, but the existing graph will be deleted.
-
And last, select the road type (car, bike, or foot) and level of detail for your routes if the Road type is Car.
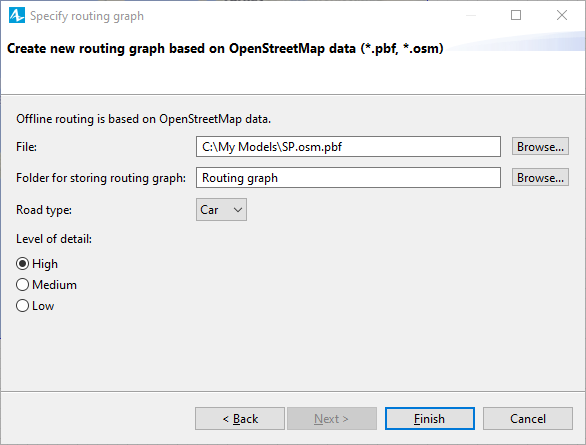
- Low level of detail — motorways, trunk, primary, secondary roads, and link roads between them.
- Medium — all of the low level, and also tertiary (and tertiary link roads), unclassified, and residential roads.
- High — all of the above, and also living street, service roads, and tracks.
- Click Finish to start creating routes. This process may take some time depending on the file size. You may click the Run in Background button in the Creating routing graph dialog window to hide it. You need to wait until the process of creating the routing graph is finished before you can use any routes it provides.
- After the routing graph is created, you can always choose a different file and rewrite the graph: click the Specify routing graph button in the map properties and repeat the process.
To use an existing routing graph
- Select the GIS map in the graphical editor and go to its Properties view.
- Go to the Routing section, find the Routes parameter and switch to the Loaded from PBF file option.
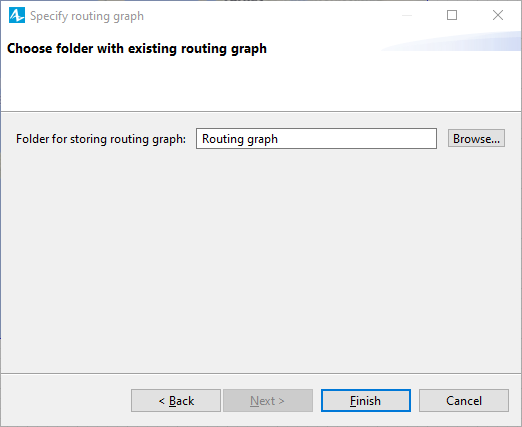
- In the properties section, click the Specify routing graph button that opens the wizard for adding routing graphs. Choose the Use existing option on the first page of the wizard.
-
Choose a folder that contains routing graph files by clicking the Browse button or typing the name of the folder in the Folder for storing routing graph field and click Next.
-
The routing graph folder should contain the following files:
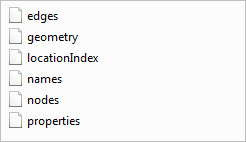
- You will see a warning if the specified folder does not contain a routing graph.
- If necessary, you can go to the map properties to select which routing method should be used: shortest or fastest, and also define the pathfinding algorithm before or after you choose a routing graph in the wizard.
If none of the above options satisfies your needs, you can use a custom online routing service.
To use a custom online routing service
- Select the GIS map in the graphical editor and go to its Properties view.
- Open the Advanced section. Select the check box next to the Use custom route provider option.
- The Custom route provider edit box will appear with sample code you can use to specify a custom online routing service. You can find the API that you need to use to define a custom route provider in the AnyLogic API reference.
- When you select this advanced option, the supported providers are grayed out and unavailable.
-
How can we improve this article?
-