

This article describes how to export data from the AnyLogic model database to an Excel file using the user interface and code.
To export data from AnyLogic database tables to a Microsoft Excel file
- In the Projects view, click the model’s
 Database element.
 -
In the Properties view, expand the Export section.
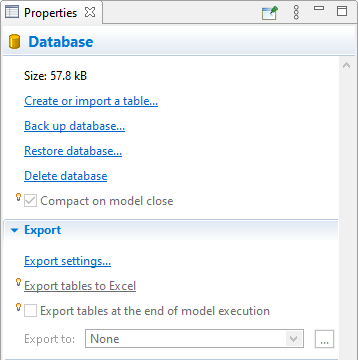
- Before you can export, you must set up the export. If you have not already done so, click the Export settings… label.
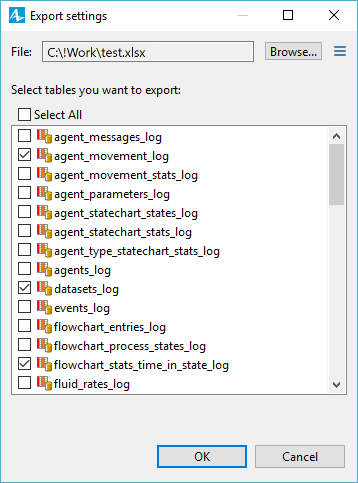
- The Export settings dialog appears. Click the Browse… button and select the Microsoft Excel file where you want to write the information. The
 button toggles the path between absolute and relative. The path to the file is displayed in the Export to field of the Export section of the database properties.
 - Below, in the Select tables you want to export list, select the check boxes corresponding to the database tables you want to export to the Microsoft Excel workbook.
-
You have finished defining the export settings. Click the OK button.
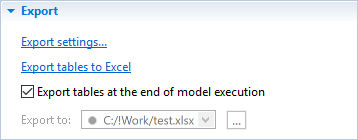
- When you are ready to export the data, click the Export tables to Excel label in the database properties.
-
If you want the data to be exported each time when the model execution is finished or the user terminates it, select the Export tables at the end of model execution check box.
If the selected Microsoft Excel file is currently open, you will see the error message. Close the Microsoft Excel application and retry the export.
If the export was successful, you can open the Microsoft Excel file, and see that AnyLogic has added one or more new worksheets (one for each exported database table) and written the data to them.
To export data from the model’s database into an external Excel file programmatically
You can command AnyLogic to export data from its internal database to an external Excel file, using any of the available code fields, for example, a function body or an agent action.
Demo model: Saving Database Table in Excel File Open the model page in AnyLogic Cloud. There you can run the model or download it (by clicking Model source files). Demo model: Saving Database Table in Excel FileOpen the model in your AnyLogic desktop installation.To do that:
-
Use the Database class constructor to specify the location of the Excel file you need, for example:
Database myFile = new Database(this, "A DB from Excel", "D:\Files\myDBFile.xls")
In the Database constructor, the first argument (this) specifies the database owner (an agent or an experiment), the second ("A DB from Excel") is the flavor text (an arbitrary name of the database for your convenience), and the last one is the file name.
You don’t have to specify the absolute path all the time — the relative path will do as well. In addition, you can use various UI elements to allow users to specify different files. Consider using File Chooser for this purpose. -
To access the model’s database, create an instance of the ModelDatabase object:
ModelDatabase modelDB = getEngine().getModelDatabase();
-
Finally, call the exportToExternalDB() function:
modelDB.exportToExternalDB("Database table to export", myFile.getConnection(), "Sheet 1", false, false);
- The first argument ("Database table to export") specifies the name of the internal database table you want to export.
- The second argument specifies a database Connection, which is retrieved by the getConnection() function call.
- The third argument ("Sheet 1") specifies the name of the target table within the external data source (the Excel file). Note that the table (sheet) must exist within the database file and have the specified name, and its header row must name the columns in the same way they are named within the table in the AnyLogic model database.
- The fourth argument can be used to command AnyLogic to wipe the existing contents from the target table before executing the call, although this functionality is not currently supported for the Excel table. In our case, we specify false so that the new records will add to the existing content of the external database rather than overwrite it.
- false as the fifth argument indicates that the copy action is not considered a proper database transaction (which can cause performance issues in some cases).
For more information about this function and the other internal database functions, see the following reference: Database functions. -
That’s it — after executing the code described above, the Excel sheet is populated with values.
Consider adding the myFile.disconnect() function to terminate the database connection and proceed with the model as usual.
-
How can we improve this article?
-