

We have finished defining the model structure: we created the distributor, retailers, and trucks. It is time to add logic. Let our retailers occasionally request products from the distributor.
Retailers will order products by sending product orders to the distributors.
It requires us creating a new agent type to represent an order.
Create order as an agent
-
Drag the
 Agent element from the
 Agent palette onto the
Main diagram. Select Agent type only in the New agent wizard.
Agent palette onto the
Main diagram. Select Agent type only in the New agent wizard.
This time we are using this option of the wizard because we will not create any agents of this type initially and therefore we do not need to create an agent population. Agent-orders will be created dynamically by retailers at model runtime, so we are creating just the agent type where we will define the agent’s data structure. Agents — instances of this type (orders) will be created while the model will run. - Define the Agent type name: ProductOrder, and click Next.
- More often, we need to create agents to represent things that have animation, but this time choose animation: None. Click Next.
-
This time we will use the New agent wizard to create parameters for the agent. On the left, you can see the Parameters section. Click <add new...> there to add a parameter. The parameters’ properties will appear on the right side of the wizard page.
Specify the name in the Parameter field: amount, and then choose the Type below: int (an integer number).
We will use this parameter to hold the number of products a retailer requests from the distributor.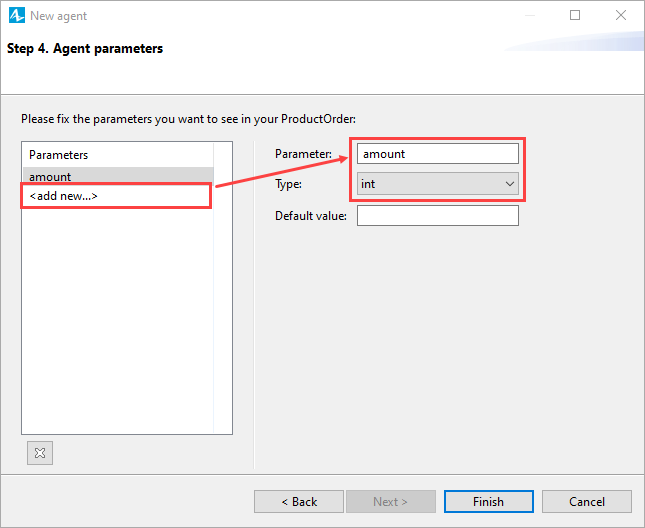
-
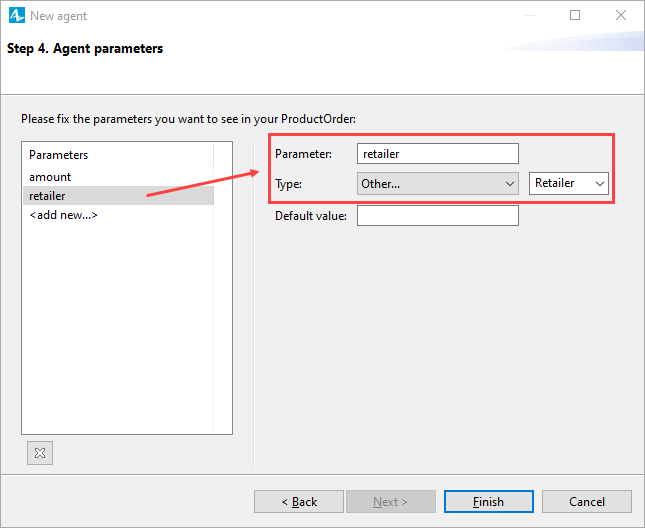
Add one more parameter. Again, click <add new...> in the Parameters section. This time, we will create a parameter that will store the retailer who created this product order, so let us name it retailer and define its type correspondingly: Retailer. This is a custom agent type in our model, and to use it as a parameter type, we first choose Other... in the Type drop-down list, then we select Retailer from the drop-down list on the right.
-
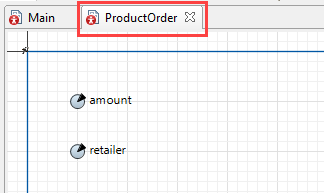
Click Finish. The
ProductOrder agent diagram will open, and we can see what we have created in the wizard.
Retailers do not order the product delivery just once, but do it periodically with some rate. To schedule repeating actions in the model, we will use an event.
Create an event generating product requests
-
In the
 Projects view, double-click the
Retailer agent type to open its diagram.
Projects view, double-click the
Retailer agent type to open its diagram.
-
Drag the
 Event element from the
Agent palette onto the
Retailer diagram. Name the event requestDelivery.
Event element from the
Agent palette onto the
Retailer diagram. Name the event requestDelivery.
- We want retailers to order products stochastically with some rate. So change the event’s Trigger type from Timeout to Rate. Let’s assume that on average one request is sent per day, so set the Rate below to be 1 per day.
-
We have defined when the event should occur. Now let us tell AnyLogic what to do when the event occurs. Expand the Action properties section. It contains the edit box where we can type the code that will be called. Type there the following Java code:
Let us explain the code. First of all, we create an order of theProductOrder order = new ProductOrder(uniform_discr(10,20), this); Vehicle truck = getNearestAgentByRoute(filter(main.vehicles, v -> v.inState(Vehicle.AtDistributor))); send (order, truck); ProductOrder agent type by calling the constructor of this type of agent. We use the parameters we have created before for the
ProductOrder to define what kind of order it is.
We pass the parameter values in the same order we have defined them: first, amount (number of requested products), and then the reference to the retailer who sends this request.Here we access the retailer with the Java keyword this. It returns the reference to the agent where we define this code. Since we are currently in the action of the event that lives on the Retailer diagram, this returns this particular retailer.
The second statement searches for a nearest free truck.
The function getNearestAgentByRoute(population) returns the nearest agent from the specified population. We do not consider all the population, but we filter the population using the filter() function, and search for the nearest truck only from the subpopulation, containing only the trucks that are currently idle.
The first argument of filter() function takes the agent population, in this case main.vehicles. Then you specify the name for the current agent (v ->), and then you may specify the filter condition(s), in the form: v.<condition>. The function will return the subpopulation containing the agents satisfying the condition(s).
The function inState(state) checks whether the specified state of the agent’s is currently active. This way we filter the results and consider only idle trucks (that are currently located at distributor).
The final statement sends the order that has been created to a truck that was chosen to fulfill the order. The first argument of the send() function is the message that is sent by the function, and the second is the message recipient (truck).
One more thing we want to consider in our model: store information about the current order in a
![]() Vehicle agent.
Vehicle agent.
Enable access to orders
-
Open the
Vehicle agent type diagram from the Projects view.
-
Drag the
 Variable element from the
Agent palette onto the
Vehicle agent diagram. Name the variable order.
Variable element from the
Agent palette onto the
Vehicle agent diagram. Name the variable order.
- Choose its Type: ProductOrder. We will use this variable to access the current orders from a vehicle.
Now let’s define how a truck handles the order message when it receives it.
Modify the truck’s statechart
-
In the Projects view, double-click the
Vehicle agent type to open its diagram.
-
Currently a vehicle starts its movement to a retailer according to the trigger type of the transition leading from the
 AtDistributor to
MovingToRetailer state. The transition is set to be triggered with the specified rate: once per day. We want to change the logic — now a truck will start its movement on the order message reception.
AtDistributor to
MovingToRetailer state. The transition is set to be triggered with the specified rate: once per day. We want to change the logic — now a truck will start its movement on the order message reception.
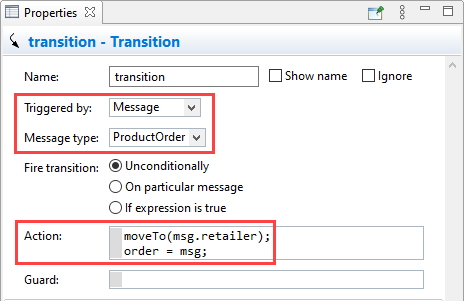
- Set the transition to be Triggered by: Message.
- Specify the Message type: ProductOrder. This way we tell AnyLogic that only the messages of the ProductOrder agent type will trigger this transition.
-
Modify the transition’s Action. Now the truck will not randomly select the retailer to move to. Instead of this, we will send the truck to the particular retailer who sent this product order. Here we use the msg variable in Java code. This way we access the just received message. msg is a local variable available in the given context. To see a list of local variables click in the field and then hover the mouse over the bulb shown to the left of the field.
The second line stores the received order in the vehicle’s variable order.
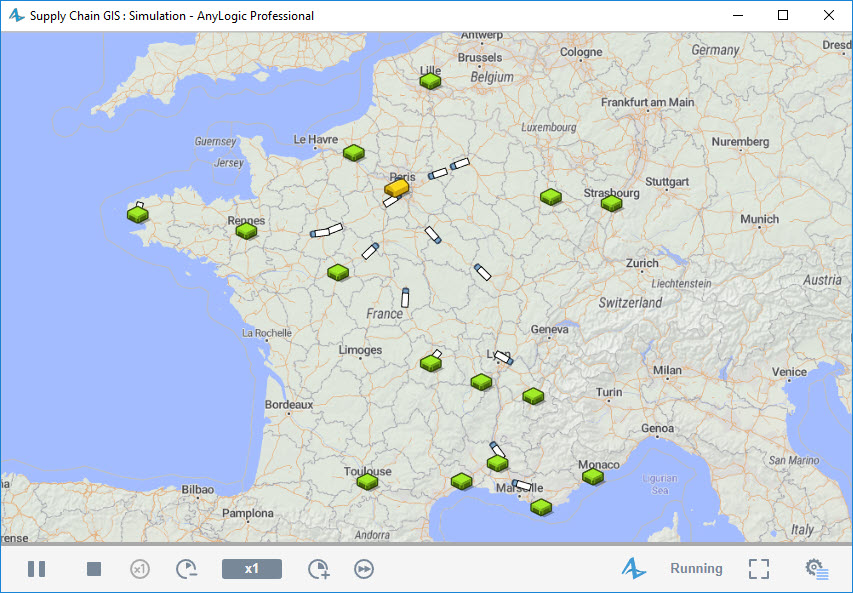
Now we have defined the message sending and receiving logic. Let’s run the model and see how it works now.
You will see that trucks move to fulfill the orders they receive. But eventually you will get the error message as shown in the figure below:
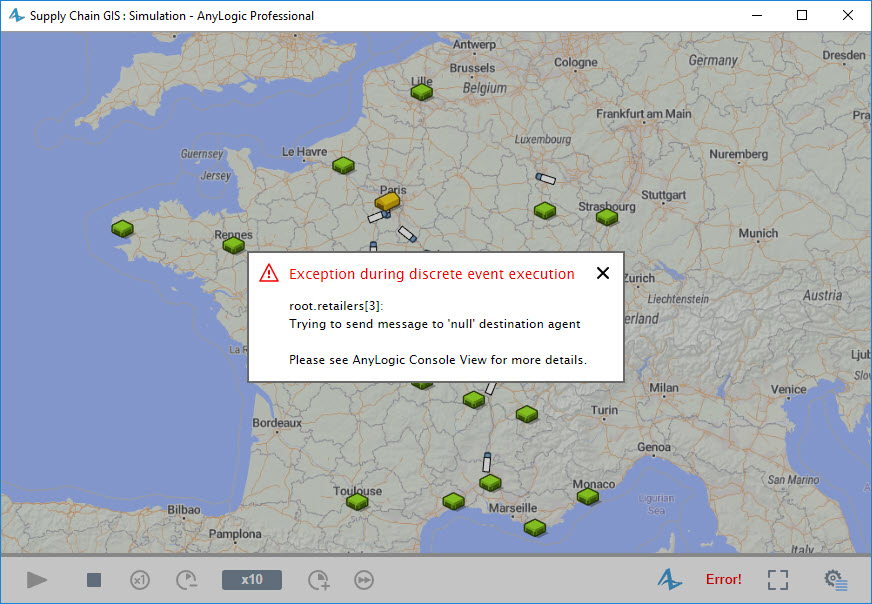
The error description informs that the destination agent is "null". null is Java keyword that means that the referenced Java object does not exist. In our case it means that we have finally met the case when all the trucks are busy with delivering products, and the second statement of the requestDelivery event’s action returned and assigned null value to the truck variable. This value was used by the send() function as the destination for the message we send, so AnyLogic could not assign a new order to a truck since all the trucks were busy at the moment, and informed us about this error.
Let’s handle this situation by modifying the event’s action.
Modify the event’s action
-
Select the
.gif) requestDelivery event and open its Action section of the properties.
requestDelivery event and open its Action section of the properties.
-
Modify the Action code as shown in the figure below.
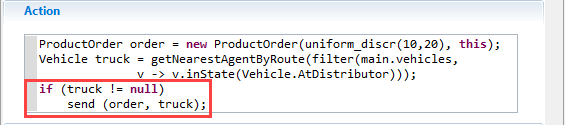
Now we first check whether there is an idle truck to receive the order, an only if it exists, we send the order message to this truck.
Run the model again. You will see that trucks deliver products successfully and no error messages are shown anymore.
-
How can we improve this article?
-