

If needed, you can create a conveyor network programmatically.
In this article we look at the code example of the following model:
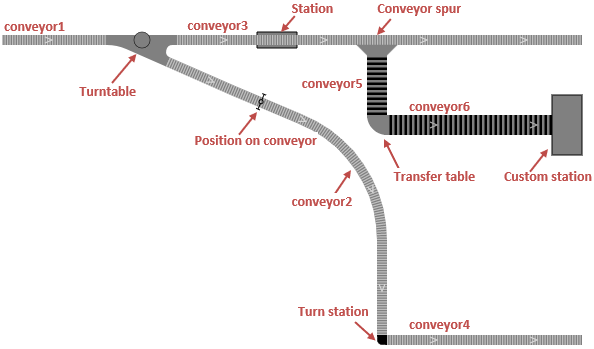
Demo model: Create Conveyor Network by Code Open the model page in AnyLogic Cloud. There you can run the model or download it (by clicking Model source files). Demo model: Create Conveyor Network by CodeOpen the model in your AnyLogic desktop installation.We create a conveyor network that is shown in the figure below.
To create this conveyor network programmatically, we type the following Java code in the On startup action of the Main agent (located in the Agent actions properties section):
- Expand to see Java code
-
// create conveyor1
conveyor1 = new ConveyorPath<Box>();
conveyor1.setOwner(this);
conveyor1.setObstacle(true);
conveyor1.setWidth(1.0, METER);
conveyor1.setLineColor(gray);
MarkupSegmentLine segment1 = new MarkupSegmentLine(20, 100, 0, 125, 100, 0);
conveyor1.addSegment(segment1);

// create conveyor2
conveyor2 = new ConveyorPath<Box>();
conveyor2.setOwner(this);
conveyor2.setObstacle(true);
conveyor2.setWidth(1.0, METER);
MarkupSegment[] segments2 = new MarkupSegment[] {
  new MarkupSegmentArc(186, 122, 0, 400, 300, 0, 1.9856, 0, 6.705),
  new MarkupSegmentLine(400, 300, 0, 400, 395, 0)};
Arrays.stream(segments2).forEach(conveyor2::addSegment);
conveyor2.setLineColor(gray);

// create conveyor3
conveyor3 = new ConveyorPath<Box>();
conveyor3.setOwner( this );
conveyor3.setObstacle( true );
conveyor3.setWidth( 1.0, METER );
MarkupSegmentLine segment3 = new MarkupSegmentLine(195, 100, 0, 600, 100, 0);
conveyor3.addSegment(segment3);
conveyor3.setLineColor(gray);

// create conveyor4
conveyor4 = new ConveyorPath<Box>();
conveyor4.setOwner(this);
conveyor4.setObstacle(true);
conveyor4.setWidth(1.0, METER);
MarkupSegmentLine segment4 = new MarkupSegmentLine(405, 400, 0, 600, 400, 0);
conveyor4.addSegment(segment4);
conveyor4.setLineColor(gray);

// create conveyor5
conveyor5 = new ConveyorPath<Box>();
conveyor5.setOwner(this);
conveyor5.setObstacle(true);
conveyor5.setWidth(2.0, METER);
MarkupSegmentLine segment5 = new MarkupSegmentLine(395, 115, 0, 395, 175, 0);
conveyor5.addSegment(segment5);
conveyor5.setLineColor(black);

// create conveyor6
conveyor6 = new ConveyorPath<Box>();
conveyor6.setOwner(this);
conveyor6.setObstacle(true );
conveyor6.setWidth(2.0, METER);
MarkupSegmentLine segment6 = new MarkupSegmentLine(405, 185, 0, 570, 185, 0);
conveyor6.addSegment(segment6);
conveyor6.setLineColor(black);

// create turntable
turnTable = new ConveyorTurntable<Box>();
turnTable.setOwner(this);
turnTable.setObstacle(true);
turnTable.setXYZ(160, 100, 0);
turnTable.setLineColor(black);
turnTable.setFillColor(gray);

conveyor1.setTarget(turnTable);
conveyor2.setSource(turnTable);
conveyor3.setSource(turnTable);

// create station
ConveyorSimpleStation station = new ConveyorSimpleStation(conveyor3) {
  @Override
    public double processTime(Agent agent, List allAgents, TimeUnits tu) {
        return triangular(5, 10, 15);
    }
};
station.setCapacity(1);
station.setOffset(120);
station.setLength(4, METER);
station.setFillColor(gray);
station.setLineColor(black);

// create conveyor spur
ConveyorSpur spur = new ConveyorSpur(conveyor3, SHAPE_DRAW_2D3D, true, 200, true, gray, gray);

// create transfer table
ConveyorTransferTable transferTable = new ConveyorTransferTable();
transferTable.setFillColor(gray);
transferTable.setLineColor(black);
transferTable.setOwner(this);
transferTable.setSwitchingDelay(5, SECOND);
transferTable.setXYZ(400, 180, 0);
transferTable.addConnection(conveyor5, PathEndType.END);
transferTable.addConnection(conveyor6, PathEndType.BEGIN);

// create turn station
ConveyorTurnStation turnStation = new ConveyorTurnStation();
turnStation.setOwner(this);
turnStation.setFillColor(black);
turnStation.setLineColor(black);
turnStation.setMode(ConveyorTurnStationMode.TURN_STATION_MODE_ORIENTATION);
turnStation.setSpeed(0.1, SpeedUnits.MPS);
turnStation.setRotationSpeed(1, RotationSpeedUnits.RPM);
turnStation.setXYZ(400, 400, 0);
turnStation.addConnection(conveyor2, PathEndType.END);
turnStation.addConnection(conveyor4, PathEndType.BEGIN);

// create custom station
customStation = new ConveyorCustomStation();
customStation.setOwner(this);
customStation.setFillColor(gray);
customStation.setLineColor(black);
customStation.addVertex(600, 155);
customStation.addVertex(570, 155);
customStation.addVertex(570, 215);
customStation.addVertex(600, 215);
customStation.addConnection(conveyor6, PathEndType.END);

// create position on conveyor
PositionOnConveyor positionOnConveyor = new PositionOnConveyor(conveyor2, 100){
  //overriding PositionOnConveyor function
  @Override
  public void onLeadingEdgeEnter(Agent agent){
    traceln("Agent enters position on conveyor");
  }
};
positionOnConveyor.setOwner(this);

// create conveyor network
ConveyorNetwork conveyorNetwork = new ConveyorNetwork( this, "codeNetwork" );
conveyorNetwork.addAll(conveyor1, conveyor2, conveyor3, conveyor4, conveyor5, conveyor6,
  spur, positionOnConveyor, transferTable, turnTable, station, turnStation, customStation);

// create level
Level level = new Level(this, "myLevel", SHAPE_DRAW_2D3D, 0);
level.add(conveyorNetwork);
level.initialize(); // cannot be changed after initialization!

// add port for conveyor after its initialization
conveyor5.createPort(PathEndType.BEGIN, spur);

// add space markup shapes to presentation
presentation.insert(0, positionOnConveyor);
presentation.insert(0, spur);
level.getConveyorNetworks().get(0).paths().forEach( r -> presentation.insert(0, r));
level.getConveyorNetworks().get(0).nodes().forEach( r -> presentation.insert(0, r));
level.getConveyorNetworks().get(0).getStations().forEach( r -> presentation.insert(0, r));
We start with creating six conveyors. Each conveyor is created in a similar manner, so we will describe how the first two of them are created in more detail.
First, we use the ConveyorPath class constructor. Note that it accepts generic parameter that is the type of material items that will be placed on this conveyor. If you do not use custom material item types, it will be simply Agent, and the code line will be new ConveyorPath<Agent>(). In our model we use material items of type Box, so we specify Box as generic parameter each time we create a conveyor: conveyor1 = new ConveyorPath<Box>();.
The next line of code conveyor1.setOwner(this); sets the conveyor to belong to Main agent (accessible here as this) - we need to do this step for each space markup shape, so you will meet this line of code for every shape we create.
Next, we specify that the conveyor will act as an obstacle for transporters: conveyor1.setObstacle(true);. It is common setting for conveyor network elements and we will call the same function for each conveyor network element we create later on.
The next two lines set the conveyor's width (the default value is 1 meter) and its color. When we set the width, we also specify the corresponding length unit constant, in our case it is METER.
This conveyor consists of only one linear segment. The linear segment is created via the MarkupSegmentLine constructor. This constructor accepts six arguments: X, Y, Z coordinates of the starting point of the segment followed by X, Y, Z coordinates of its ending point (all Z-coordinates in our model will be zeros for simplicity). Finally, we add this segment to the conveyor we are creating here: conveyor1.addSegment(segment1);
// create conveyor1
conveyor1 = new ConveyorPath<Box>();
conveyor1.setOwner(this);
conveyor1.setObstacle(true);
conveyor1.setWidth(1.0, METER);
conveyor1.setLineColor(gray);
MarkupSegmentLine segment1 = new MarkupSegmentLine(20, 100, 0, 125, 100, 0);
conveyor1.addSegment(segment1);
Now let's see how the next conveyor, conveyor2 is created.
Each conveyor consists of a combination of arc and/or linear segments. This conveyor will have two segments.
The first segment is arc-shaped, so we create it using the MarkupSegmentArc constructor. The first six arguments are the same as we saw above: X, Y, Z coordinates of the starting point of the segment followed by X, Y, Z coordinates of its ending point. Next, we define the start angle, the end angle, and the start to end ratio. The start angle is the angle of the tangent to the segment at its starting point defined in radians (in our case it is 1.9856), the end angle is the angle of the tangent to the segment at its ending point. The start to end ratio defines the ratio of the arc adjoining the starting point to the arc adjoining the ending point of the segment.
The second segment of the conveyor is linear, and we are already familiar with its MarkupSegmentLine constructor.
We put both created segments into the segments2 array. Then we use Java stream to add all segments contained in this array to conveyor2 at once.
// create conveyor2
conveyor2 = new ConveyorPath<Box>();
conveyor2.setOwner(this);
conveyor2.setObstacle(true);
conveyor2.setWidth(1.0, METER);
MarkupSegment[] segments2 = new MarkupSegment[] {
  new MarkupSegmentArc(186, 122, 0, 400, 300, 0, 1.9856, 0, 6.705),
  new MarkupSegmentLine(400, 300, 0, 400, 395, 0)};
Arrays.stream(segments2).forEach(conveyor2::addSegment);
conveyor2.setLineColor(gray);
The other conveyors are created in the same way, so we can go further and explain how other conveyor network elements are created.
// create conveyor3
conveyor3 = new ConveyorPath<Box>();
conveyor3.setOwner( this );
conveyor3.setObstacle( true );
conveyor3.setWidth( 1.0, METER );
MarkupSegmentLine segment3 = new MarkupSegmentLine(160, 100, 0, 600, 100, 0);
conveyor3.addSegment(segment3);
conveyor3.setLineColor(gray);

// create conveyor4
conveyor4 = new ConveyorPath<Box>();
conveyor4.setOwner(this);
conveyor4.setObstacle(true);
conveyor4.setWidth(1.0, METER);
MarkupSegmentLine segment4 = new MarkupSegmentLine(405, 400, 0, 600, 400, 0);
conveyor4.addSegment(segment4);
conveyor4.setLineColor(gray);

// create conveyor5
conveyor5 = new ConveyorPath<Box>();
conveyor5.setOwner(this);
conveyor5.setObstacle(true);
conveyor5.setWidth(2.0, METER);
MarkupSegmentLine segment5 = new MarkupSegmentLine(395, 115, 0, 395, 175, 0);
conveyor5.addSegment(segment5);
conveyor5.setLineColor(black);

// create conveyor6
conveyor6 = new ConveyorPath<Box>();
conveyor6.setOwner(this);
conveyor6.setObstacle(true );
conveyor6.setWidth(2.0, METER);
MarkupSegmentLine segment6 = new MarkupSegmentLine(405, 185, 0, 570, 185, 0);
conveyor6.addSegment(segment6);
conveyor6.setLineColor(black);Next, we create a turntable. We place it at the (160, 100) point using the turnTable.setXYZ(160, 100, 0); line of code.
Note how the turntable is connected to conveyors at the end of the code snippet. We have previously created conveyor1 so that its ending point is located at the place where we want to create the turntable, and therefore we set this turntable as the target for conveyor1. As for the conveyor2 and conveyor3, their starting points are located at the turntable, and so the turntable is set as the source for these two conveyors.
// create turntable
turnTable = new ConveyorTurntable<Box>();
turnTable.setOwner(this);
turnTable.setObstacle(true);
turnTable.setXYZ(160, 100, 0);
turnTable.setLineColor(black);
turnTable.setFillColor(gray);

conveyor1.setTarget(turnTable);
conveyor2.setSource(turnTable);
conveyor3.setSource(turnTable);
Next we create a station. Note the name of the Java class: ConveyorSimpleStation. The location (conveyor3) is passed to the constructor, the offset from the starting point of the conveyor is defined here: station.setOffset(120);.
Since stations do not provide methods for setting the processing time, we show how to override the station's processTime() function inside the constructor. In our example the process time will follow the triangular distribution.
After the constructor call, we set the station's capacity (1) and length.
// create station
ConveyorSimpleStation station = new ConveyorSimpleStation(conveyor3) {
  @Override
    public double processTime(Agent agent, List allAgents, TimeUnits tu) {
        return triangular(5, 10, 15);
    }
};
station.setCapacity(1);
station.setOffset(120);
station.setLength(4, METER);
station.setFillColor(gray);
station.setLineColor(black);Next, we create a conveyor spur. Here we specify the conveyor where the spur should be placed (conveyor3) and set it to be visible both at 2D and 3D animation by passing the SHAPE_DRAW_2D3D constant as the second argument value and then passing true value. The next argument defines that the conveyor spur is located at a distance of 200 pixels from the beginning of the conveyor. By passing true as the next argument we place the spur on the right side of the conveyor. Finally, we define the spur's outline color and fill color.
// create conveyor spur
ConveyorSpur spur = new ConveyorSpur(conveyor3, SHAPE_DRAW_2D3D, true, 200, true, gray, gray);The transfer table's location is defined using the setXYZ() function. Transfer table also requires you to establish connection to conveyors. Here we connect the transfer table to conveyor5 and conveyor6. For each addConnection() function call, you specify the conveyor and whether its starting point (PathEndType.BEGIN) or ending point (PathEndType.END) should be connected to the transfer table.
// create transfer table
ConveyorTransferTable transferTable = new ConveyorTransferTable();
transferTable.setFillColor(gray);
transferTable.setLineColor(black);
transferTable.setOwner(this);
transferTable.setSwitchingDelay(5, SECOND);
transferTable.setXYZ(400, 180, 0);
transferTable.addConnection(conveyor5, PathEndType.END);
transferTable.addConnection(conveyor6, PathEndType.BEGIN);Here most of the functions are intuitive. The setMode() function defines whether the turn station rotates the incoming material item by the specified angle (TURN_STATION_MODE_ANGLE) or rotates it so that one of its four sides faces the conveyor (TURN_STATION_MODE_ORIENTATION). We use the latter mode.
When you define speed and rotation speed, you should specify the corresponding unit constants.
// create turn station
ConveyorTurnStation turnStation = new ConveyorTurnStation();
turnStation.setOwner(this);
turnStation.setFillColor(black);
turnStation.setLineColor(black);
turnStation.setMode(ConveyorTurnStationMode.TURN_STATION_MODE_ORIENTATION);
turnStation.setSpeed(0.1, SpeedUnits.MPS);
turnStation.setRotationSpeed(1, RotationSpeedUnits.RPM);
turnStation.setXYZ(400, 400, 0);
turnStation.addConnection(conveyor2, PathEndType.END);
turnStation.addConnection(conveyor4, PathEndType.BEGIN);Next, we create a custom station. Custom station can have arbitrary polygonal shape, and you define each its vertex using the addVertex() function. In our case it is a rectangle, so we define four vertices. Finally we connect the custom station to the ending point of conveyor6.
// create custom station
customStation = new ConveyorCustomStation();
customStation.setOwner(this);
customStation.setFillColor(gray);
customStation.setLineColor(black);
customStation.addVertex(600, 155);
customStation.addVertex(570, 155);
customStation.addVertex(570, 215);
customStation.addVertex(600, 215);
customStation.addConnection(conveyor6, PathEndType.END);Next, we will show how to create a position on conveyor. We set its location right in the constructor: it will be placed on conveyor2, and will have the offset of 100 pixels from the conveyor's starting point. We also show how to override the element's functions. In this example we define a custom action that will be executed when the leading edge of the material item reaches this position on conveyor. Please note that we use general Agent class name here: onLeadingEdgeEnter(Agent agent), not the name of our custom agent type Box.
// create position on conveyor
PositionOnConveyor positionOnConveyor = new PositionOnConveyor(conveyor2, 100){
  //overriding PositionOnConveyor function
  @Override
  public void onLeadingEdgeEnter(Agent agent){
    traceln("Agent enters position on conveyor");
  }
};
positionOnConveyor.setOwner(this);We now have all the elements that are needed to create our conveyor network. In the ConveyorNetwork constructor, we set the network's owner (again, Main is accessed using this keyword) and pass the conveyor network name. Finally, we add to the conveyor network all the space markup elements that compose it.
// create conveyor network
ConveyorNetwork conveyorNetwork = new ConveyorNetwork( this, "codeNetwork" );
conveyorNetwork.addAll(conveyor1, conveyor2, conveyor3, conveyor4, conveyor5, conveyor6,
spur, positionOnConveyor, transferTable, turnTable, station, turnStation, customStation);On the last step we create a level, add our conveyor network there, and then initialize the level via its initialize() function. Please note that initialization is the ultimate step, and you cannot modify the conveyor network after it.
When the initialization is complete, you can finalize the connection of the conveyor spur to the conveyor. You can call this function only at this stage, after the level initialization.
// create level
Level level = new Level(this, "myLevel", SHAPE_DRAW_2D3D, 0);
level.add(conveyorNetwork);
level.initialize(); // cannot be changed after initialization!

// add port for conveyor after its initialization
conveyor5.createPort(PathEndType.BEGIN, spur);Finally all space markup shapes should be added to presentation. We demonstrate two alternative approaches how you can do it.
First, you can add shapes one by one as we do for positionOnConveyor and spur. Here we call the insert() method for each shape. You can simply pass 0 as the first argument value.
Another way is to add all shapes of the same type at once, like we do for paths (including all conveyors), nodes (including turntables, custom stations, etc.) and stations.
// add space markup shapes to presentation
presentation.insert(0, positionOnConveyor);
presentation.insert(0, spur);
level.getConveyorNetworks().get(0).paths().forEach( r -> presentation.insert(0, r));
level.getConveyorNetworks().get(0).nodes().forEach( r -> presentation.insert(0, r));
level.getConveyorNetworks().get(0).getStations().forEach( r -> presentation.insert(0, r));-
How can we improve this article?
-