

Use the Week view when your schedule has weekly recurrence, e.g. if you need to define a weekly schedule for office men.
If you need to define a schedule as a sequence of calendar dates and times, but with non-weekly recurrence, please use the Days/Weeks view.
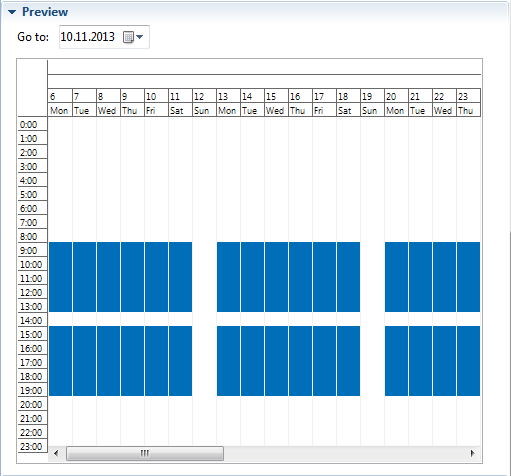
Let’s study how to define a simple weekly schedule of a bank office. Bank office works from Monday till Saturday, from 9 AM till 8 PM, with a dinner hour from 2 PM to 3 PM. Sunday is day off.
To create a schedule
-
Drag the
 Schedule element from the
  Agent palette on the graphical diagram of the agent.
- Go to the Properties view.
- Specify the name of the element in the Name field. This name will be used later on for accessing the schedule from AnyLogic block(s) properties or code.
- Go to the Data section of the schedule properties. Choose the type of the value that will be controlled by this schedule from the Type group of buttons: on/off, integer, or real. Since we want to define only how the availability status for the resources controlled by this schedule changes in time (workers are either working (on state), or not (off)), leave the option on/off selected.
- Since we want to define values not for some discrete moments, but for time intervals, choose Intervals (Start, End) option from the group of buttons The schedule defines.
- Choose the most suitable Duration type for your task: Week, Days/Weeks, or Custom (no calendar mapping) and define the schedule in the chosen view. Since our schedule has weekly recurrence, we choose the most suitable view — Week.
- In the Default value field you can specify the default value for the schedule — the value that will be used for the intervals not defined in the schedule. In our case we want to define only work intervals and to assume that the staff is not working in other times, so leave the default off choice selected here.
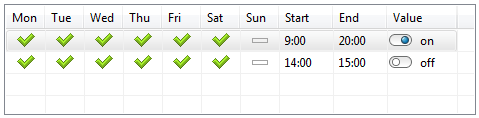
Now you can complete the schedule definition by defining its intervals. In our case we can mark out two intervals: morning work time before lunch from 9 AM to 2 PM and after-lunch time from 3 PM to 8 PM.
To define schedule intervals
- Intervals are defined in the table in the Data section of the schedule properties. Each interval is defined in a separate row of the table.
-
To add a new interval, click the
 button to the right of the table. You will see a new row added in the table.
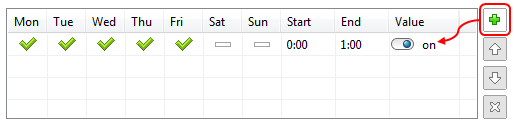
- By default five work days (from Monday till Friday) are selected in the row — the corresponding cells have ticked off checks inside. These checks mean that the interval defined in this row will be applied to these particular days.
-
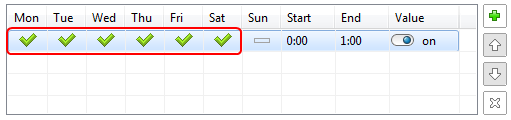
We need to define the interval for the Saturday too, so tick off the cell in the Sat column also. To change the state of some day of the week, just click in the corresponding cell of the table.
 Until you choose any day(s) in the row, you are not able to add more rows to the table.
 -
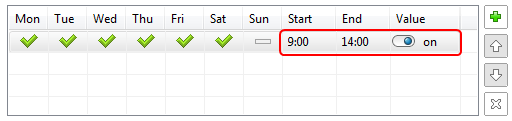
Now we need to specify the work interval that corresponds to the time before lunch for these days. Choose 09:00 in the Start cell and 14:00 in the End cell of this table row.
-
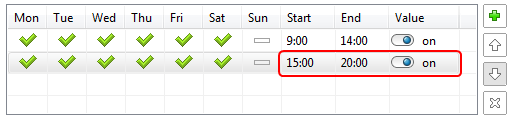
Now let’s define the after-lunch work time for the same days. Thereto we will add one more row into the table. You will see that the same days as in the previous row are automatically selected, so Saturday is already selected and all
you need is to define start and end times for this interval: 15:00 and 20:00 correspondingly.
Please note that here we defined only work intervals. There is no necessity in explicit definition of the lunch time since we have chosen off as the default value, so this particular value will be used in the 2 PM–3 PM interval that is not explicitly defined.
If several intervals refer to the same time (overlap each other), the one that is defined later has greater priority and overrides values of the intervals defined above.
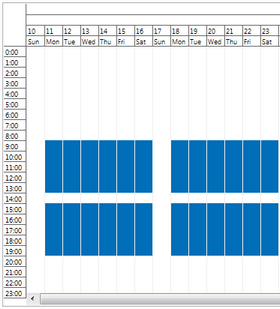
For example, we could define the same schedule in another way (see the figure below).
Since here the interval 14:00–15:00 is defined after the interval 09:00–20:00, it overrides the on value for this time interval with off value, and as the result we get the required pattern (you can check how the schedule looks like on the Preview properties page of the schedule):
However, if the intervals are defined in another order (see the figure below), they will define quite a different pattern:
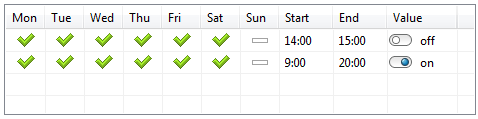
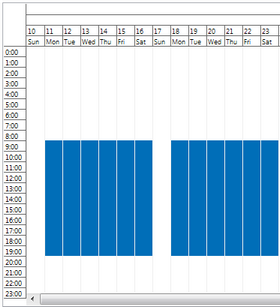
In conclusion, we can recommend you to use the approach from the scenario described above (all intervals are defined explicitly in the natural sequence (09:00–14:00, 15:00–20:00)) if you are not sure how intervals in the table override each other.
You may delete any intervals from the table and move them in the table up and down (in this case you should contain the schedule integrity by yourself). This can be done by selecting the row in the table and using the corresponding buttons  ,
,  and
and  to the right of the table.
Schedules defined in the modes mapped to calendar (Week and Days/Weeks) may have exceptions — particular time intervals when the value defined by this schedule should have other values, differing from the ones defined in the schedule. This is the way you can e.g. consider national holidays in your schedule. You can find more information on defining exceptions in the Exceptions section.
If your schedule defines work timetable for some resources, you should tell your ResourcePool block that it should use this schedule as a work timetable for the resources it defines.
To specify the schedule in ResourcePool
- Select the required ResourcePool block and go to the Properties view.
- Choose the option By "on/off" schedule from the Capacity defined drop-down list.
- Type the name of the schedule in the property Schedule below (you may use code completion assistant here).
Now you can preview a schedule in the convenient way that is commonly used in digital diaries, organizers, and office software tools. This may help you to check whether the schedule was defined correctly and the resulting picture is the one you have expected to see.
To preview the schedule
-
Go to the Preview section of the schedule properties. You will see the calendar for several days shown in the tabular form. Columns of this table correspond to days. Schedule intervals are drawn with stripes of different colors. In our case there are intervals of two types: work intervals are marked with blue stripes, “off” intervals — with white ones:
- In case you have defined holidays for the schedule, you may use the Go to date chooser control to scroll the calendar e.g. to the beginning of the year and check that the New Year day is day off in this schedule.
-
How can we improve this article?
-