

Each AnyLogic model is basically a Java application, meaning you have full freedom to customize its behavior using Java code. At the same time, Python can be used as a supporting language in certain workflows.
Starting from version 8.9.7, AnyLogic provides a set of Python functions that allow you to connect to a model during development and automatically generate elements in its graphical and logical structure. This is particularly useful when you need to programmatically create things like the spatial layout of equipment or production lines. Although these functions execute at runtime on the Python side, they modify the model while it is being built; as such, this capability is considered design-time automation in AnyLogic.
This feature is implemented with the help of the Python py4j library.
With the help of the graphical editor API connector, you can create a custom Python script that interacts with the AnyLogic workspace through a dedicated listener. It receives commands sent via the Python API and applies the corresponding changes directly in the graphical editor, updating the model markup in real time as the script executes.
- AnyLogic 8.9.7+ Professional or University Researcher edition.
- Latest version of Python (the feature is tested on Python 3.13).
- Make sure your Python installation works from the command line (python command); for this, the location of the Python executable should be specified in the PATH environment variable.
- py4j installed in the system; can be added via the pip package manager — see below.
- The port you want to use to connect the Python runtime to AnyLogic must be open. The default port is 25333, but you can configure another port in AnyLogic preferences (the Graphical editor section).
The helper files and the pre-generated functions are located in the anylogic_design_time_api package, obtainable from the pip package manager.
The directory contains the following:
- generated/GeneratedClasses — Functions used to create graphical markup elements and to set or retrieve their properties. This folder can also serve as a reference for function names and argument types.
- generated/GeneratedEnums — Enumerations used by the Python API.
- Utils — A set of helper functions simplifying the usage of the Python API:
- createStraightPointsList() — Converts an array of coordinates into a list of AnyLogic Point objects that define segments of conveyors, paths, or tracks.
- toggleArcSegment() — Converts a straight segment into an arc, equivalent to the Make Segment Arc-based command in the graphical editor.
- getIntFromRGB() — Converts an RGB-formatted color into the integer format used by the Python API.
- Workspace — Functions required to establish a connection to the AnyLogic workspace.
- Agent — Provides a wrapper for working with agents in the AnyLogic workspace, including access to their animation levels and basic properties.
- Model — Provides access to model-level elements, including listing existing agents and creating new ones in the workspace.
To start using the Python DT API:
- Install Python (the official installation is recommended; the Microsoft Store version may behave unexpectedly due to architectural limitations).
-
Install the py4j package using the pip package installer in the Python command line:
pip install py4j
-
Install the AnyLogic design time API package using the pip package installer in the Python command line:
pip install anylogic_design_time_api
- Start AnyLogic.
-
On the AnyLogic toolbar, click
 Start graphical editor API connector:
-
AnyLogic then generates a dialog which shows you the connection token. You will use this token to later communicate your custom Python script with AnyLogic workspace.
In the dialog, the following buttons are available: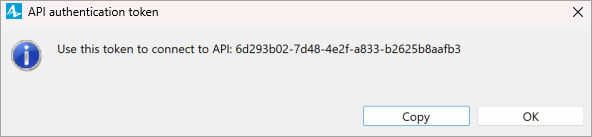
- Copy — Copy the connection token to the clipboard.
- OK — Close the dialog.
Graphical editor API connector button on the toolbar will appear active: this means the connector is currently working.
The generated token is one-time use only. Each time you disable the connector or restart AnyLogic, the token becomes obsolete, meaning you will need to update it in your custom script. - As soon as the model is opened in AnyLogic and the connector is launched, you can execute your custom script. For more information on how to compose the script itself, see below.
A custom script is simply your own Python script that issues commands to AnyLogic to build or adjust parts of the model automatically.
To interact with AnyLogic API, you need at least the Workspace and GeneratedClasses files imported:
from anylogic_design_time_api import *
from anylogic_design_time_api.generated import *
Import other modules from the list above if you need their functions.
To connect to the model from your script
-
Specify the workspace and provide the token you received in the AnyLogic UI:
ws = Workspace('aaaa1111-bbbb-2222-cccc-333333dddddd') # replace with the actual ID copied from AnyLogic
-
Specify the particular model and agent whose diagram you will edit with the script:
modelName = "My model" # The name of the model in AnyLogic in which the markup will be generated
model = ws.getModel(modelName) # The model where you want to create the markup
agent = model.getAgent('Main') # The agent where you want to create the markup
level = agent.getLevels()[0] # The level
To start creating markup elements, get the model, agent, and animation level:
from anylogic_design_time_api import *
from anylogic_design_time_api.generated import *

ws = Workspace('aaaa1111-bbbb-2222-cccc-333333dddddd')
model = ws.getModel('MyModel')
agent = model.getAgent('Main')
level = agent.getLevels()[0]
To create markup elements on this level:
rSwitch = RailroadSwitch.create(level)
r1 = RailTrack.create(level)
r2 = RailTrack.create(level)
r3 = RailTrack.create(level)
Some markup shapes cannot exist on their own and must be created inside another element (a parent). For those, call MarkupName.create(parentElement) instead of passing the level. If you pass an invalid parent, the create() call fails at script runtime.
To connect markup elements to each other, use the setSource and setTarget function calls.
Assuming you have already created the layout using setX(), setY(), and other relevant functions:
r1.setTarget(rSwitch)
r2.setSource(rSwitch)
r3.setTarget(rSwitch)
If elements cannot be connected (wrong coordinates, incompatible endpoints), setSource() and setTarget() throw a runtime error. In that case, fix the geometry and run the script again.
To set properties, use the element’s own setters where available:
r1.setX(0)
r1.setY(0)
For specific properties, use the property manager helper:
pm = ws.workspace.getPropertyManager()

# write
pm.setPropertyValue(r1.item, "Name", "InboundTrack")

# read
name = pm.getPropertyValue(r1.item, "Name")
See the example for reference:
Try now: Railway network generated with Python- Wrapper classes
-
Wrapper classes are Python representations of AnyLogic model elements. They provide a high-level, type-specific API on top of the raw workspace functions, allowing you to create, access, and modify model elements in a more convenient and structured way.
Class Description Workspace Provides the entry point for interacting with AnyLogic from Python. Allows you to open existing models, create new ones, access models and experiments, and invoke low-level workspace functions. Model Represents a single AnyLogic model in the workspace. Used to access agent types, create agents, and work with model-level elements required to generate space markup and other elements. Agent Represents a specific agent instance in the model. Provides access to its animation levels and basic properties, and is required when generating space markup or placing elements inside an agent diagram. Various wrapper classes Wrapper classes for various model elements (for instance, space markup shapes). Each wrapper provides a static create() function that creates an object in the model. - Helpful functions
-
These are additional helper functions that simplify common workspace operations.
This is not a complete list of all available API calls; you can inspect the module in your IDE or rely on autocompletion to explore everything.Function Description javaDoubleArray(arr) Converts a Python sequence of numeric values into a Java double[] array that can be passed to AnyLogic.
arr — A Python list or iterable of numbers.getModel(name) Returns the model with the specified name from the workspace. Can be used from the raw workspace when you do not use the higher-level Workspace wrapper.
name — The name of the model in the AnyLogic workspace.Workspace(authToken) Connects to the AnyLogic graphical editor service and initializes a Python workspace session.
authToken — the authentication token for the running AnyLogic instance.getAgent() Returns the top-level agent of the model, usually Main, where the markup is created. getLevels()[0] Accesses the first animation level of an agent. This is the level where most space markup networks (tracks, conveyors, paths) are built. To access another level, specify its zero-based index. Utils.createStraightPointsList(markup, arr) Builds a polyline point list (using Java double[]) for markup geometry on the diagram.
markup — the type of polyline markup you want to create.
arr — a flat list of coordinates [x1, y1, z1, x2, y2, z2, …].setPointList(points) Applies a generated point list to a markup element. Typically used after createStraightPointsList.
points — A point list to use.toggleArcSegment(path: 'BaseWorkspaceElement', index) Converts a straight polyline segment into an arc segment.
path — The polyline element. index — The index of the segment in the markup point list you want to arch.getIntFromRGB(r, g, b) Returns an integer color value (RGB-compatible) that can be assigned to markup properties. setSource(sourceMarkup) Sets the source connection of a markup element (for example, a track pointing towards another).
If elements cannot be connected (wrong coordinates, incompatible endpoints), throws a runtime error.
sourceMarkup — The source markup element.setTarget(targetMarkup) Sets the incoming connection of a target markup element.
If elements cannot be connected (wrong coordinates, incompatible endpoints), throws a runtime error.
targetMarkup — The target markup element.
In most cases, the names of classes and enums in the Python wrapper match the corresponding names in the AnyLogic Java API. However, for some elements the names differ. This is because the Python wrapper is generated from internal model element identifiers, whereas the Java API uses a public naming scheme.
Only these mismatches are listed below. For all other elements, refer to the AnyLogic Java API documentation.
- Mapping
-
Python Java RoadJunction Intersection RectangleNode RectangularNode RectangleWall RectangularWall Conveyor ConveyorMarkupElement CustomStation ConveyorCustomStation EnumLineStyle LineStyle JibCraneType JibCraneDrawingType LiftPlatformDrawingTypeEnum LiftPlatformDrawingType ParkingTypeEnum ParkingLotType PolygonNode PolygonalNode RackConfigurationTypeEnum RackPlacement RackStorage Storage RackTypeEnum RackType RailStopline PositionOnTrack RailTrack RailwayTrack RailroadSwitch RailwaySwitch RoadDrivingDirectionEnum RoadDrivingDirection RoadLineStyleEnum RoadLineStyle RoadStopline StopLine ShapeDrawModeEnum ShapeDrawMode SlopeTypeEnum SlopeType TransferTable ConveyorTransferTable TurnStation ConveyorTurnStation Turntable ConveyorTurntable WallFillingTypeEnum WallFillingType
This example demonstrates how to generate space markup in AnyLogic from external data using the Python design-time API. It reads markup definitions from an Excel file using the third-party openpyxl (can be installed from pip) library and then programmatically creates the corresponding elements on an agent diagram.
The script illustrates how wrapper are used together with helper functions from Utils, including createStraightPointsList() for polyline conversion, toggleArcSegment() for curved geometry, and getIntFromRGB() for color formatting.
Most of the logic in the example relies on the high-level Python wrappers.
The example can be downloaded and run as a ZIP archive.
Try now: Python design-time APIExpand the section below to see the commented example.
- Example
-
import openpyxl

from anylogic_design_time_api import *
from anylogic_design_time_api.generated import *

def gen_conveyors_from_excel(excel_file_path, excel_sheet, level):

    conveyors = []
    wb = openpyxl.load_workbook(excel_file_path)

    conv_sheet = wb[excel_sheet]
    for r in conv_sheet.iter_rows(min_row = 2):
        # Create the conveyor markup
        conveyor = Conveyor.create(level)

        # Set the coordinates of the conveyor's start
        conveyor.setX(r[0].value)
        conveyor.setY(r[1].value)
        conveyor.setZ(r[2].value)

        # Read and create a set of points for conveyor segments
        points_data = r[3].value
        points = [float(num) for num in points_data.strip('{} ').split(',')]
        pointList = Utils.createStraightPointsList(conveyor, points)
        conveyor.setPointList(pointList)

        # Set the conveyor markup properties
        conveyor.setWidth(float(r[5].value), LengthUnits.METER) # The float argument is used for the static field
        conveyor.setMaxSpeed(str(r[6].value), SpeedUnits.MPS)
        conveyor.setGap(str(r[7].value), LengthUnits.METER) # The string argument is used for the code field

        conveyors.append(conveyor)

    return conveyors

def gen_paths_from_excel(excel_file_path, excel_sheet, level):

    paths = []
    wb = openpyxl.load_workbook(excel_file_path)

    path_sheet = wb[excel_sheet]

    for r in path_sheet.iter_rows(min_row = 2):
        # Create paths
        path = Path.create(level)

        # Set the coordinates of the path's start
        path.setX(r[0].value)
        path.setY(r[1].value)
        path.setZ(r[2].value)

        # Read and create a set of points for conveyor segments
        points_data = r[3].value
        points = [float(num) for num in points_data.strip('{} ').split(',')]
        pointList = Utils.createStraightPointsList(path, points)
        path.setPointList(pointList)

        paths.append(path)

    return paths

def gen_nodes_from_excel(excel_file_path, excel_sheet, level, paths):

    nodes = []
    wb = openpyxl.load_workbook(excel_file_path)

    node_sheet = wb[excel_sheet]

    for r in node_sheet.iter_rows(min_row = 2):
        # create nodes
        node = PointNode.create(level)

        # Set the coordinates of the node
        node.setX(r[0].value)
        node.setY(r[1].value)
        node.setZ(r[2].value)

        # Connect outgoing paths to the node
        if (r[3].value is not None):
            paths[int(r[3].value)].setSource(node)

        # Connect incoming paths to the node
        if (r[4].value is not None):
            inpaths_data = r[4].value
            inpaths_id = [path_id for path_id in str(inpaths_data).strip('').split(',')]
            for path_id in inpaths_id:
                paths[int(path_id)].setTarget(node)

        nodes.append(node)

    return nodes

ws = Workspace('f73d9bda-01aa-4944-81c7-d0d0c49c43b4') # Connect to the AnyLogic installation using a token that was copied from AnyLogic
modelName = 'Model' # The name of the model in AnyLogic for which the markup is generated
model = ws.getModel(modelName) # The model for which markup is created
agent = model.getAgent('Main') # The agent for which markup is created
level = agent.getLevels()[0] # The level for which the markup is created

# Space markup
# Add conveyors
conveyors = gen_conveyors_from_excel('network_data.xlsx', 'conveyors', level)

# Add paths
paths = gen_paths_from_excel('network_data.xlsx', 'paths', level)

# Add nodes
nodes = gen_nodes_from_excel('network_data.xlsx', 'nodes', level, paths)

# Add a turn station
turnStation = TurnStation.create(agent)
turnStation.setX(210)
turnStation.setY(200)
conveyors[0].setTarget(turnStation)
conveyors[1].setSource(turnStation)

# Add a station
station = ConveyorSimpleStation.create(conveyors[2])

# Curve the conveyor segment
Utils.toggleArcSegment(conveyors[0], 1)

# Add a robot
robot = Robot.create(agent)
robot.setX(315.0)
robot.setY(200.0)
robot.setInitialEndEffectorX(295)
robot.setInitialEndEffectorY(200)
robot.setMaximumArmReach(3.0, LengthUnits.METER)
robot.setLinksColor(Utils.getIntFromRGB(218, 165, 32))
-
How can we improve this article?
-