

Agent may have parameters. Parameters are frequently used for representing some characteristics of the modeled object. They are helpful when object instances have the same behavior described in agent type, but differ in some parameter values. There is a clear difference between variables and parameters. A variable represents a model state, and may change during simulation. A parameter is commonly used to describe objects statically. A parameter is normally a constant in a single simulation, and is changed only when you need to adjust your model behavior.
All parameters are visible and changeable throughout the model execution. Thus, you can simply adjust your model by changing parameters at runtime. If you need, you can define action to be executed on a parameter change.
Top-level agent parameters can serve as inputs for the models that are exported to AnyLogic Cloud. Model inputs are set up using the Run Configuration editor. The Label defined for the parameter in the Value editor section will be used as a default name of the corresponding input. If a certain Control type is set for the parameter in the Value editor section, it will be used as the default control type for the corresponding input in the cloud model version. Note that you can use only Static parameters (defined in the Advanced section) of the int, double, boolean and string value types for the exporting model inputs. If a parameter is set up to retrieve its value by calling a function, this value will be retrieved prior to exporting and it will be exported with the model as the fixed value.
Alike other simulation tools AnyLogic supports parameters of primitive types: double, int, boolean. But only AnyLogic gives you infinite possibilities to parameterize your objects by supporting parameters of any Java class..
You can define parameters of common Java classes — e.g., a parameter of String class to represent character strings. You can create a parameter of the Object class (the base class for all Java classes) and assign an instance of any Java class to this parameter. Later on you will need to check the actual type of this parameter and cast it explicitly to the original Java class. For details on Java classes, see Java SDK documentation.
Since all AnyLogic objects are instances of Java classes, you can define parameters of these classes and thus use AnyLogic objects as parameters.
You can define parameters of your own classes, defined elsewhere in your model.
So long as parameters are frequently used in system dynamics models, and sometimes these models operate with arrays, AnyLogic supports creating parameters of array type.
To create a parameter
- Drag the
 Parameter element from the
  Agent palette onto the graphical diagram.
 - Go to the Properties view.
- Type the name of the parameter in the Name edit box. The name is used to identify and access the parameter.
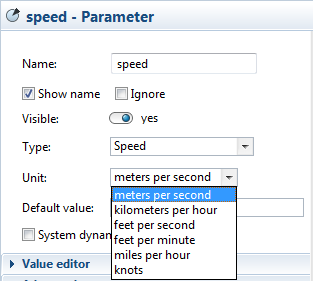
- If your parameter defines one of the following: time, speed, length, acceleration, rate, or area, specify this explicitly by choosing the corresponding Type for this parameter. Then choose the Unit from the drop-down list below.
- Otherwise, specify the Java type for the parameter. You can choose one of the most-used types (int, double, boolean, String) using the corresponding option from the Type buttons group. If you need to define a parameter of some other Java class, choose Other option and type the required class name in the edit box to the right.
- Specify the parameter’s default value in the Default value edit box. The value of the parameter can be changed afterwards during the model simulation using the set_parameterName(new value) function. If default value is not specified, Java rules apply, for example a parameter of type double is set to 0, a parameter of type boolean is false.
- If you want to make the parameter a hyperarray used in system dynamics, select the System dynamics array check box, then go to the Dimensions table and select the dimensions of this array. To define default values of array elements, click the Edit... button and initialize the array as described here.
- General
-
Name — The name of the parameter. The name is used to identify and access the parameter.
Show name — If selected, the name of the parameter is displayed on a presentation diagram.
Ignore — If selected, the parameter is excluded from the model.
Visible — If selected, the event is visible at runtime.
Type — [Visible if the advanced option Static or Dynamic is selected] The type of the parameter. Choose a measurable type (Time, Rate, Length, Speed, Acceleration, Area, Amount, Flow Rate or Angle) or one of the Java primitive types (int, double, boolean, String) using the corresponding option from the Type list. You can select here any agent type that is defined in this model. If you need a parameter of some other Java class, choose the Other option and type the required class name in the edit box to the right.
If the System dynamics array option is enabled below, type is automatically defined as HyperArray.Unit — [Visible if the Type parameter is set to one of the measurable types (Time, Rate, Length, Speed, Acceleration, Area, Amount, Flow Rate or Angle)] The measurement units of the parameter value. The set of available units depends on the selected Type. For example, if Length is set as the parameter type, length units (inch, mile, meter, etc.) will be available for selection.
Default value — You can define the default value for the parameter here. The value of the parameter can be changed afterwards during the model simulation. If default value is not specified, Java rules apply, for example, a parameter of type double is set to 0, a parameter of type boolean is set to false.
If System dynamics array is enabled, the button Edit is available for editing array values.System dynamics array — [Visible if the parameter is not Action] If selected, the parameter is of array type. Properties for array parameters look slightly different.
Dimensions — [Visible if System dynamics array is enabled] The list of dimensions that will act as dimensions of this array variable. Click the "plus" button to add a dimension. The dialog window Edit dimensions will appear. You can select a dimension from the list of all available dimensions defined in this model or create a new dimension for this goal. Use the “cross” button to remove a dimension from the list of Dimensions.
Please refer to the Defining an array variable section for details.Parameter arguments — [Visible if the parameter is Dynamic or Action] Here you can define some optional arguments for your dynamic or action parameter to enable passing some additional input data necessary for parameter calculations.
Each row of the table specifies one particular argument. To remove argument, select the corresponding row in the table and click the “cross” button. Rearrange arguments in the table using “arrow” buttons.Default action — [Visible if the parameter is Action] — You can define the default action for the parameter here.
- Value editor
-
In this section of the properties you can customize the control that will be used to define the actual value of the parameter in the model.
Here is the list of places where this control may appear instead of the default value editor:
- In the properties of the embedded agent (or population) owning this parameter.
- In the Parameters preview properties section of the agent type where the parameter is defined.
- In the Parameters properties section of a simulation experiment, if the parameter is defined in the agent type that acts as a top-level agent (usually it is Main) for this experiment.
Some value editors are supported only in the first use case (embedded agent properties). In other cases, a simple text field may appear instead of a complex control. If you do not see the expected control, you can specify the Default value in the parameter's properties, it may help.Label — The label of the parameter, which will be shown instead of parameter name to the left of the control. If this agent type is used as a top-level agent in a multi-iteration experiment, this label is also used in the Default UI that AnyLogic generates for this experiment.
Control type — Choose the control type that enables the user to specify a parameter value.
- Text — a text field enabling to specify a value or Java expression.
- Check Button — [Visible if the Type is boolean] a check box.
- Slider — [Visible if the Type is int or double] a slider. Minimum and maximum values of the slider are defined using the min and max edit boxes.
- Radio Button — a group of radio buttons. Radio buttons (option names and values assigned to these choices) are specified in the table.
- Combo — a combo box. Combo box items (item names and values assigned to these choices) are specified in the table.
- Editable Combo — editable combo box. Combo box items (item names and values assigned to these choices) are specified in the table. In the cloud, Editable Combo acts as a Combo (see above).
- Unit editor — [Visible if the parameter is defined in some units: Time, Rate, Length, Speed, Acceleration, Area, Amount, Flow Rate, or Angle] If the parameter is defined in units, the user will use the custom Unit editor to specify the actual parameter value. The unit editor consists of the text field enabling the user to specify the value and the drop-down list to the right, enabling to select the required measurement unit from the list. For example, for the parameter of type Speed the options are: meters per second, kilometers per hour, etc. The unit that is selected by default is set in the general Unit property of the parameter.
- Color Picker — [Visible if the Type is Color] a color picker (described here). If your parameter defines a color, it is the only supported control type.
- Days/Weeks — [Visible if the Type is Date] a date picker. If your parameter defines a date, it is the only supported control type. If you see a common text editor instead of a date picker, switch it to the Value editor mode and define the default value.

- Rotation editor — [Visible if the Type is double] a rotation editor which visualizes the specified angle with an icon.

- File Chooser — [Visible if the Type is String] a file chooser with the Browse button.
- Element chooser — [Visible if the Type is Other, Object or some agent type, or the System dynamics array option is enabled] a complex control designed to select elements of the specified type only. In the example below, the type of the parameter is set to Other, PalletRack, and the control enables to select any of the existing pallet racks from the drop-down list. The buttons to the right of the list allow to select the element manually in the graphical editor, and to center the selected element in the graphical editor (the last button is visible only when the value is already selected).

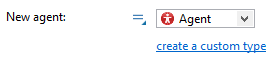
- Agent creator — [Visible if the Type is Agent] the complex control, enabling not only to choose one of the existing agent types from drop-down list, but also to create a custom agent type (example: the New agent property of the Source block).
- Hyper Array Editor — [Visible if the System dynamics array option is enabled] A specific editor for initializing hyper arrays (described here).
Hide conditions — The list of conditions defining when the actual parameter is hidden. Specify the Parameter, the Condition and Value.
- Advanced
-
Static — If selected, the parameter is static, i.e. it is evaluated once, but may be changed during the model execution. In the field of a static parameter you can define its value (that can be cast to the type of the parameter).
Dynamic — If selected, the parameter is dynamic, i.e. its value is recalculated each time you assess the parameter and it acts as a function. Dynamic parameters are accessed using function-call notation: myParameter(), not myParameter.
Action — Dynamically executed code piece, evaluated each time a certain event occurs at the object.
System dynamics units — If selected, you will be able to specify units of measurements for this parameter as system dynamics modelers do. Say, you define people as the SD units for this parameter in the edit box to the right of this option. Having specified units for all system dynamics elements of your model, you may perform unit checking to find out dimension inconsistencies in your model.
Save in snapshot — [Visible if the parameter is Static] If selected, the parameter will be saved in the model snapshot.
On change — [Visible if the parameter is Static] The code that will be executed on every parameter change. Please note that this code will be called only on set_<parameter name>() function calls (simple assignment like parameter=5; will not invoke the change handler). And the handler is also not executed in the case set_<parameter name>() function assigns the value equal to the actual parameter value.
Here in the code you can use the variable oldValue that stores the old value of the parameter (the value this parameter had before this particular change of the value).
If your parameter defines one of the following: Time, Rate, Length, Speed, Acceleration, Area, Amount, Flow Rate or Angle, you can specify this explicitly and define units for this parameter in a handy way.
For example, the following units are supported for Time and Speed:
- Time: milliseconds, seconds, minutes, hours, days, weeks, months, years.
- Speed: meters per second, kilometers per hour, feet per second, feet per minute, miles per hour, knots.
Just choose the corresponding Type, and then choose the Unit from the drop-down list below. Finally you have just to type the parameter’s value in the Default value property.
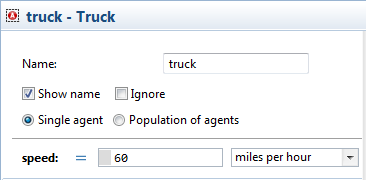
If you specify the actual value for the parameter from the agent, or experiment properties, you will also see the parameter’s units to the right of the field where you define the parameter’s actual value. In the figure above, speed parameter has the value of 60 miles per hour.
If some upper-level agent contains other agents, its parameters can be linked to parameters of these agents. In this case, parameter changes are propagated down the agent tree along the parameter dependencies. This mechanism is called parameter propagation. Propagate values of parameters down the agent tree in the following cases:
- You need to change parameters of several agents (perhaps of different types). You can do this by creating a single parameter of the top-level agent and propagating its value to several parameters you need to change.
- You need to perform an experiment varying, optimizing, or calibrating some parameters of an agent which is not a top-level agent of the experiment. In this case, you also need parameter propagation since you can optimize the model by changing only its top-level agent's parameters.
You can define a parameter change handler and specify any actions you want to be performed on parameter change. For instance, you can store the changed parameter value in the database or send a notification message as a reaction on the parameter change.
To define a parameter change handler
- Select the parameter in the graphical editor or in the Projects view.
-
In the Advanced section of the Properties view, define the code that needs to be executed on parameter change in the On change field. Please note that this code will be called only on set_<parametername>() function calls (a simple assignment like parameter=5; will not invoke the change handler). The handler is also not executed in the case the set_<parametername>() function assigns the value that is equal to the current parameter value.
In the code you can use the oldValue variable that stores the old value of the parameter (the value this parameter had before this particular change of the value).
-
How can we improve this article?
-