

Use Days/Weeks duration type when you define a schedule as a sequence of calendar dates and times, but with non-weekly recurrence — when the schedule has recurrence of several days or weeks.
For instance, you define a daily pattern of pedestrian arrival rate. One more example — you define a shift schedule, e.g. 48 hours on, 48 hours off — such schedule has 4-day recurrence.
Let’s study how to define a schedule with N days/weeks recurrence by this example of shifts. Assume that the working time lasts from 10 AM to 6 PM, without lunch time.
To define a shift schedule
- Drag the
 Schedule element from the
  Agent palette onto the graphical diagram of the agent.
 - Go to the Properties view.
- Specify the name of the element in the Name field. This name will be used later on for accessing the schedule from AnyLogic block(s) properties or code.
- Go to the Data section of the schedule properties. Choose the type of the value that will be controlled by this schedule from the Type group of buttons: on/off, integer, or real. In our case we should define the number of workers, so choose integer here.
- Choose the schedule mode — whether it defines intervals or discrete time moments. Choose the option Intervals (Start, End) from the group of buttons The schedule defines.
- Choose the most convenient Duration type for your task — in our case it is Days/Weeks.
- Specify the recurrence time for the cyclic pattern you have defined using the control Repeat every.... In our case the schedule has 4-day recurrence, so type 4 here and leave day(s) in the control to the right.
-
In the Default value field you can specify the default value for the schedule - the value that will be used for the intervals not defined in the schedule. Let’s leave 0 there.

-
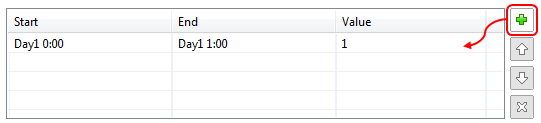
Leave List of ranges selected and define intervals in the table below. To add a new interval, click the
 button to the right of the table. You will see new row added in the table.
-
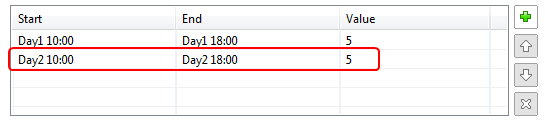
Specify the Start and the End for this interval using the date chooser control and then specify the value corresponding to this interval in the Value cell of this table row. Let’s assume that the shift composes of 5
men, so type 5 in the Value cell.

-
Add one more interval to define work time for the second workday. Please note that Start and End times should be defined for Day 2 here.
You may delete any intervals from the table and move them in the table up and down (in this case you should contain the schedule integrity by yourself). This can be done by selecting the row in the table and using the corresponding buttons  ,
,  and
and  to the right of the table.
That’s all — we have finished defining this very simple schedule! Now we will pay attention to some advanced features of the Days/Weeks schedule that enable users to configure schedules for their needs.
First, you may define exceptions — particular time intervals when the value defined by this schedule should have other values, differing from the values specified in the schedule. The most frequent use cases of exceptions are national holidays and workday transfers caused by the holidays.
Actually it is evident that there should be one more shift that works in the complementary schedule: when the first shift is working, the second one is off and vice versa. This can be easily implemented by creating a copy of the existing schedule and setting that it should start working not from the first day of the simulation, but from the third one.
This can be done with the Snap to option: just go to the Snap to option of the cloned schedule and choose there the day that is two days after the day specified in the Snap to option of the original schedule.
If you define a work schedule for some resources, you should tell your ResourcePool block that it should use this specific schedule as a work timetable.
Go to the properties of the required ResourcePool block and choose By schedule from the Capacity defined drop-down list. This is the way we tell the block that the number of available resources will be defined by the schedule. Type the name of your schedule in the Capacity schedule field below (you can use code completion).
Usually this option (Capacity schedule) is used when the number of available resources changes in time (there are more options than just 0 and 5 as in our example). In case the number of resources is always constant and only the status changes (i.e. all resources are either available or not), you may explicitly define the number of resources once in the Capacity parameter of ResourcePool and use on/off Type of value in your schedule. In this case you will need to choose the option By "on/off" schedule from the Capacity defined drop-down list and specify the name of the schedule in the On/off schedule parameter of ResourcePool.
Please note that when you choose weeks in the Repeat every control, the option Week starts from is shown to the right. This option makes sense only in the case the schedule duration is several weeks.
The reason is that in some countries (e.g. USA) the first day of the week is Sunday, while in some other (e.g. Russia) — Monday. Therefore if you will define a schedule with N-weekly recurrence considering that the first day of the week is Sunday and then send the model to the user from some other country, where the week starts from Monday, the schedule will be misinterpreted.
So if you expect that your model will be used in other countries too, please define explicitly the first day of the week in your schedule so that this schedule will be locale-independent. And please do it before defining the schedule intervals, because all interval data in the table are deleted when you change the Weeks start from setting.
-
How can we improve this article?
-