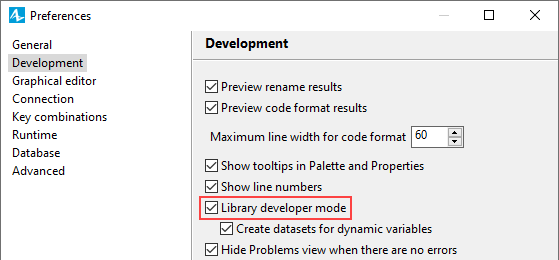
If turned on, the Library Developer Mode unhides specific properties that may be useful only when developing custom libraries in AnyLogic.
To turn on the library developer mode
- Select Tools > Preferences… from the main menu. You will see the AnyLogic Preferences dialog box.
- Open the Development page.
-
Select the Library developer mode option.

Below, we list the functionality exposed by the library developer mode.
When you develop your own library in AnyLogic, you define flowchart blocks as agents. In library developer mode, you can mark the agents that will become flowchart blocks in your library by selecting the Flowchart block option in the Advanced properties section of the corresponding agent types. It will remove the redundant fields from the properties of the correspondent agents (namely, Dimensions and movement, Initial location and Statistics properties sections).
For ports, the library developer mode exposes:
- The complete properties Message handling actions section, containing: On send and On receive fields.
- In the Advanced properties section: Custom port, In message type, Out message type, Constructor code.
This functionality enables users to create ports of custom classes and also to restrict the messages that can be sent or received by the ports.
You can find the description of all properties in Ports.
If an agent has any public shapes (that are not marked as ignored), AnyLogic automatically creates agent presentation and displays it on the presentation of the owner agent.
However, the model developer might want to remove agents from their current space and place them dynamically in some other space. In this case the developer should omit drawing agent presentation at model design time and create shapes programmatically by writing the code in the agent's On startup field, e.g.:
ShapeRectangle r = new ShapeRectangle();
presentation.add( r );
The code listed above creates a rectangle and adds it onto the agent’s presentation. The last thing that should be done for agents migrating between various spaces is selecting the Force to be animated by space checkbox in the Advanced properties section of the agent type defining the space. This advanced option (available only in the library developer mode) will automatically add agent animation onto the presentation of the space agent when this agent migrates to this particular space.
In library developer mode, the following elements expose the Custom modifiers field in the Advanced section of the properties: function, variable, parameter, collection, agent population and single agent.
As you probably know, AnyLogic automatically adds the static modifier when you select the element's Static option. The final modifier is added when you mark a variable as Constant. The public, private, protected, or default access type is set in the advanced Access property of a variable/collection.
Using the Custom modifiers field, you can add any other modifiers (synchronized, volatile) for the elements listed above. The most typical use case is adding annotations (e.g.: @LibrarySerialization).
In library developer mode, an embedded agent (it can be a single agent, or an agent population) has the additional Additional class code field in the Advanced properties section. Here you can write Java code for the specific agent instance. Typically library developers use this field to override functions defined for the corresponding agent type.
By default AnyLogic creates one view area for each agent type. It defines the top left corner of the area and is placed into the point with the (0,0) coordinates on the agent diagram. This view area can be very useful for navigating to the diagram origin both at design time (using the toolbar button  View areas > Go to point of origin) and at the model runtime. It is the simplest way to navigate to the part of the presentation canvas that is shown in the model window by default.
However, you may want to disable default view areas. When in the library developer mode, you can do it by clearing the Create view area at origin checkbox in the Advanced properties section of the agent type.
-
How can we improve this article?
-

