To make working with Omniverse easier, AnyLogic has a feature to render the base USDUniversal Scene Description (USD) is the basic representation for assets in Omniverse. scene based on an agent; this scene is then immediately uploaded to Omniverse. During the rendering process, the model is run several times and a scene file is generated with JavaScript, using the standard AnyLogic animation engine. The model is run to render the agent and stops before the first step.
The resulting scene is by no means a finished solution; it is simply a tool for creating a basic layout that must be customized and configured using the graphical object properties and the API.
This article uses the Distribution center example model, included in the basic shipment of AnyLogic, for demonstration.
Demo model: Distribution center Open the model page in AnyLogic Cloud. There you can run the model or download it (by clicking Model source files). Demo model: Distribution centerOpen the model in your AnyLogic desktop installation.The agent used for rendering must have a 3D window element in its diagram.
To generate the basic 3D scene for the model, use the Render model dialog.
- In the main menu of AnyLogic, select Model > Render Model.
-
In the dialog that appears, select the top-level agent that will be used for rendering from the Top-level agent to be rendered drop-down list.
This agent should have the 3D window element on its diagram.
-
In the Omniverse destination path, specify the path to the resulting USD scene on the Omniverse server, for example:
omniverse://localhost/scenes/DCenter.usd
The easiest way to get the path to a folder in Omniverse is to find it in the Nucleus server, select it in the tree, then click the Copy URL button.
The path should start with the omniverse:// protocol and end with the .usd file extension, otherwise the Finish button will not become active. The path should not contain any symbols or spaces. -
With the Export the 3D objects separately option selected, the 3D objects that exist in the model are rendered into separate files and bound to specific objects, such as the shapes of the moving agents that are not present on the main scene. The 3D objects that already exist on the specified top-level agent of the models at startup are not rendered in this way because they are considered the part of the main scene.
If you intend to use some other shapes (for example, those provided by NVIDIA), you can choose to disable the use of pre-generated 3D objects later in the model development process. To do this for the entire model, clear the Use rendered 3D objects option in the properties of the Omniverse connector element. For individual 3D objects, select Ignore rendered 3D object in the properties of that object. - Select the Open the scene in Composer after rendering option to open the scene in ComposerAn Omniverse application which is used to assemble, light, simulate, and render 3D scenes in Omniverse. immediately after export. This works only if Composer and AnyLogic are running on the same computer.
- Before you start rendering, make sure Omniverse Launcher is running on the target platform, even if it’s on a different machine, otherwise an error may occur.
- Click Finish to start the actual rendering.
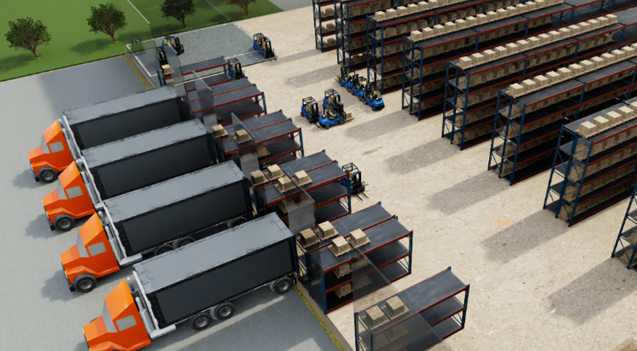
When the rendering process is finished, the USD scene will be generated with the basic layout. You can view it in ComposerAn Omniverse application which is used to assemble, light, simulate, and render 3D scenes in Omniverse. .
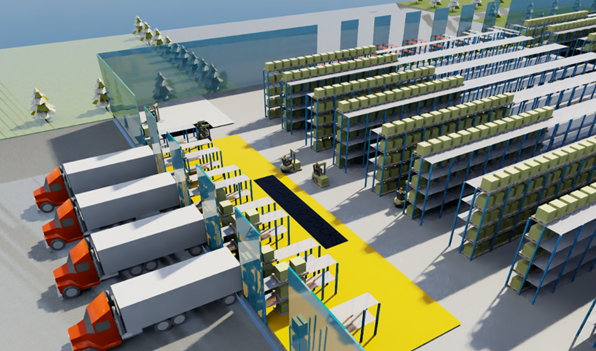 The scene after basic render in Omniverse
To configure the connection between the model and the USD scene, drag and drop the Omniverse connector element from the Presentation palette onto the graphical diagram of any agent of the model. Do not add the connector element to the experiment diagram, it won’t work that way.
After adding the element, open its properties to set it up:
-
Scene path — The full path to the Omniverse USD containing the scene. Should include both the protocol (omniverse://) and the .usd file extension.
If the connector was added to the model after the actual rendering, the path should be set up automatically. If this is not the case, make sure the path points to the USD file of the pre-rendered base scene, not to one of various 3D shapes that were rendered at the time. - Start connector at model startup — With this option enabled, AnyLogic will establish the connection to Omniverse scene at model startup.
- Use rendered 3D objects — If selected, AnyLogic will automatically bind the animation of elements to the USD prims that we created during rendering, and the model will use the 3D models for objects pre-rendered separately.
- Open scene in Composer at model startup — With this option enabled, AnyLogic will attempt to launch the Omniverse scene in a Composer window immediately upon model startup. For this to work, ComposerAn Omniverse application which is used to assemble, light, simulate, and render 3D scenes in Omniverse. must be installed on the current computer. It is also not necessary if you have already launched the Composer, and the target scene is already open there.
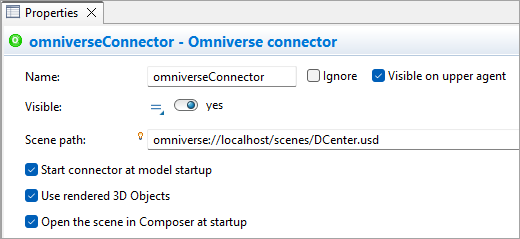
These are the basic options for the Omniverse connector element. For a complete reference on the element properties, see the corresponding article.
Note that even if both the Start connector at model startup and Open scene in Composer at model setup options are enabled in the connector properties, you must manually join the live session to view the running model in Composer:
- Make sure that the model with the connector is running in AnyLogic, even if it is paused or stopped.
- Once the model is running, open the scene in Composer. This is not necessary if the automatic startup of Composer has been enabled.
- In the Omniverse Composer window, expand the Live drop-down list and select Join session.
- In the dialog that appears, select the session identified as AnyLogic Omniverse Connector.
- Click Join.
Once the USD scene is connected to the model, you will see the live session in the layer tab, and the session participants in the upper right corner.
After configuring the connector, you can associate each required element of the model with its primShort for “primitive”, the prim is the basic unit of Omniverse. Everything that is imported or created into a USD scene is a prim. This includes cameras, sounds, lights, meshes, and so on. Technically, a primitive is a container of metadata and properties that can also contain other prims. in the USD scene. During the experiment run, the model will generate and relay the state of the elements to the connector. By default, it only relays the position and visibility of the elements, but you can pass additional information using the API.
After the initial render, the prims are automatically bound to moving elements of the model, such as agents, if the option to export exporting the additional 3D objects was selected during initial rendering. Without a prim bound to such an element, AnyLogic cannot automatically redraw it in the running scene.
In order to animate the element, a prim must be bound to it. You can either use the automatically bound pre-rendered prim, or you can choose an an external prim, such as those available in Omniverse or provided by the community.
There are several ways to bind a prim: either through the UI or programmatically using code. You can bind a prim to the entire agent type or to a specific shape within the agent type. The latter is useful if the shape’s representation changes dynamically during the model runtime. For example, if your model contains a moving truck whose orientation changes at runtime, Composer needs to get the position and orientation data from the specific 3D shape, not from the agent type as a whole.
-
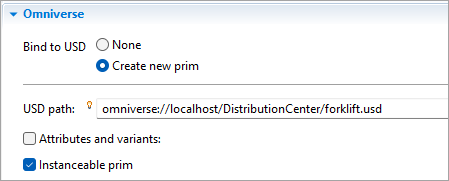
To bind a prim to an entire agent type, first select the agent in the Projects view and open its properties. There, in the Omniverse section, select Bind to USD: Create new prim. Specify the URL of the USD model stored in the
NucleusA collection of Omniverse services used to share and modify the state of the 3D representation.
that will be used to visualize and animate the agent. Make sure that the URL includes both the protocol (omniverse://) and the .usd file extension. Once configured, the connector will create and position a
primShort for “primitive”, the prim is the basic unit of Omniverse. Everything that is imported or created into a USD scene is a prim. This includes cameras, sounds, lights, meshes, and so on. Technically, a primitive is a container of metadata and properties that can also contain other prims.
for each instance of the agent at scene runtime using the specified USD file. You can verify that the setup was successful by checking the live session.
-
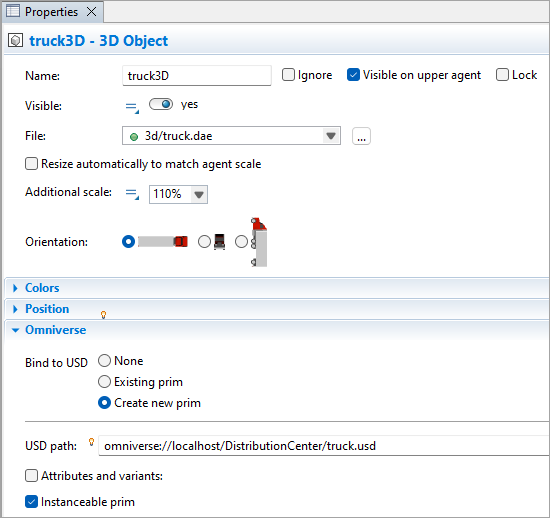
To bind a prim to a specific shape, open the diagram of the agent type by selecting it in the Projects view, then locate and select the 3D object element within the agent to access its properties. In the same manner as above, select Bind to USD: Create new prim, and specify the path to the appropriate USD file in Omniverse to complete the configuration. Repeat these steps for any additional agents that require similar settings. Once the model is run, the animated 3D objects will appear in the scene as they interact with the environment.
See below for more information on using code to bind elements to prims.
To further enhance the visual quality of your model, you can use the features of Omniverse to replace textures on static objects, add more decorative elements, adjust light sources, and more. Omniverse allows you to swap out assets, whether they are individual USD files or components within the main scene generated during rendering. You can replace them with different assets directly in the UI. Pay close attention to scale, position, and orientation, and make adjustments as needed. Once configured, these custom elements will be consistently applied whenever the model is launched with the connector.
Each individual element of the 3D scene that has a graphical representation can be configured to use a specific USD primShort for “primitive”, the prim is the basic unit of Omniverse. Everything that is imported or created into a USD scene is a prim. This includes cameras, sounds, lights, meshes, and so on. Technically, a primitive is a container of metadata and properties that can also contain other prims. . Select the element in the graphical diagram to open its properties, then expand the Omniverse section. If the element does not have one in its properties, it means that it does not have a graphical representation, or an Omniverse connector element has not been added to the model.
Use one of the following options of the Bind to USD property to associate the element with a prim:
-
Existing prim — You have several options to do this by specifying the USD path:
- Specify the absolute path to the prim in the scene specified in Omniverse connector, for example: /World/Gate1
- Specify the relative path to the prim that is placed inside the top-level agent, for example: /officeworker.
-
Create new prim — If selected, the specified prim from outside the base scene will be used to graphically represent the agent during model runtime. For example, this can be used when an agent is not present during the initial state of the model (before startup) and does not have anything linking to it from a top-level agent (such as a presentation), but is generated and appears there at runtime (such as a pedestrian from the PedSource block). Since the graphical representation of the agent is not present in the initial scene, it should be rendered separately and included in the model using this setting.
In USD path, specify the NucleusA collection of Omniverse services used to share and modify the state of the 3D representation. URL of the USD file you want to use to visualize the element, for example: omniverse://localhost/DistributionCenter/forklift.usd. Make sure to include the omniverse:// protocol and the .usd file extension.
Whichever approach you choose, at runtime the specified primShort for “primitive”, the prim is the basic unit of Omniverse. Everything that is imported or created into a USD scene is a prim. This includes cameras, sounds, lights, meshes, and so on. Technically, a primitive is a container of metadata and properties that can also contain other prims. will be positioned in the scene according to the state of the associated model element.
In some cases, the information about the graphical representation of elements is not passed from AnyLogic to Omniverse. However, you can pass data about such elements using code to ensure that their representations and properties are correctly conveyed to Omniverse during the model runtime.
Consider the following example model:
Demo model: Distribution center Open the model page in AnyLogic Cloud. There you can run the model or download it (by clicking Model source files). Demo model: Distribution centerOpen the model in your AnyLogic desktop installation.Let’s assume you have successfully rendered the model and have the base scene set up and the bindings configured between the moving agents and relevant prims.
In the Main agent of Distribution center there are rack systems. Note that animating all the pallets located in the racks can take a lot of resources, so if the resources of your graphics card are not sufficient, try to reduce the number of boxes and apply the visualization only to the selected part of rack system (for example, unloadingDocks and loadingDocks).
- In the Advanced section of properties of the RackSystem block, select Draw stored agents: At the center of the cell.
-
Next, we will use code to connect the Pallet agent to its USD representation. We will use UsdContext Java object, which can be obtained from any agent with the getUsdContext() function.
Our boxes will use the cargo.usd scene that exists in Nucleus.
In the On startup action of Main, put the following:PopulationUsdRepresentation<Pallet> boxRepresentation = new PopulationUsdRepresentation( getUsdContext(), pallets, // The population to be represented "omniverse://localhost/DistributionCenter/cargo.usd", // The USD scene that contains representation of agent "/World/CargoGroup" // The prim that will represent the agent in the static USD scene ); getUsdContext().addUsdRepresentation(boxRepresentation); // Adding the representation into the context
Now the USD scene will also have an animation of boxes while it is connected to live session of the running model.
For more information on the Omniverse integration API, see the corresponding section.
Sometimes it may be necessary to use different graphical representation of the same agent depending on the value of its attributes. You may want to change the animation for the Pallet agent of the AnyLogic model. Say, the cargo.usd scene contains the CargoGroup prim, which contains four different animations of the pallets, and by default only one of them is used.
The behavior is determined by the configuration of the Omniverse variant set; see the official documentation on the Variant updater to learn more.
You can, however, apply certain variant to the running scene using both AnyLogic UI and API.
Consider the example above, where the representation of pallets in Omniverse is added with code. To modify the appearance of a certain prim according to the attribute value on the model, you can make use of the addVariantUpdater() function. This function accepts another function as a parameter, so to use it, we need such function prepared.
- On the Pallet agent diagram, drag and drop the Function element from the Agent pallette.
- Name the function getOmniAnim.
-
Set it properties to the following:
Returns value
Type: String -
This function should return a name of a specific variant of the Omniverse variant set. To that effect, its Function body can look like this:
switch (typeID) {
    case 0:
        return "blueLidPallet";
    case 1:
        return "blockPallet";
    case 2:
        return "filmWrappedPallet";
    case 3:
        return "yellowLidPallet";
}
return "blockPallet";
If the variants used by your element have different names, you must adjust the function accordingly. You can check the names of the variants in Composer, by clicking the World component on the Stage tree and selecting Edit Variants.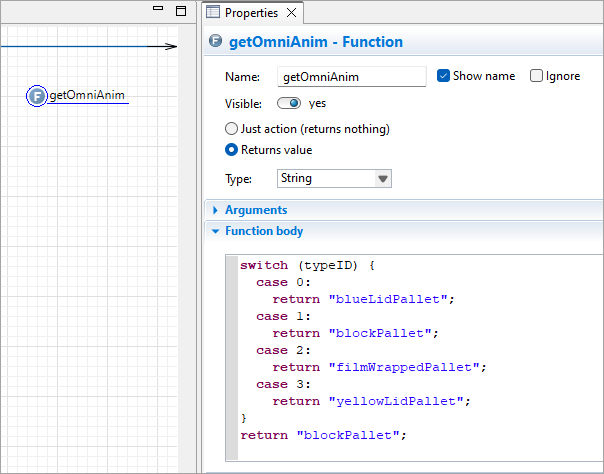
-
Then, go to the On startup action of Main where we have previously put the code that bound the agent to the representation. After the initialization code added then, add the following:
boxRepresentation.addVariantUpdater("CargoType", // The variant set within the cargo.usd scene that represents pallets
    p -> p.getOmniAnim() // The function that returns the name of the selected variant for each pallet
);
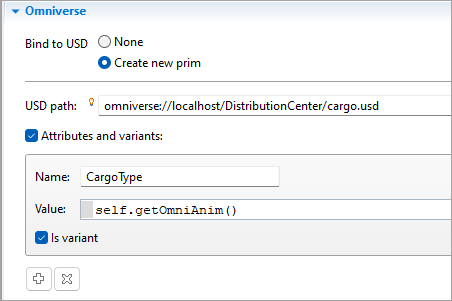
For other cases, you may consider bind some attributes of the USD prims to a parameter or variable of the agent in the UI. In the Omniverse section of an individual object’s properties, select the Specify attributes and variants option. Add a new rule, specify the name of the variant set and the code that returns the name of the variant. So, for our case it may look like this:
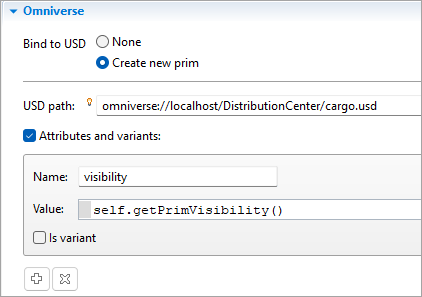
It is also possible to set some attributes of USD prims representing an agent or 3D shape in the running model. However, for it to work properly you need to know the structure of attributes and what values they should take. To set the attribute, remove the selection from the Is variant option and fill in the Name and Value fields, while adding the code that returns the value that Omniverse uses for its attributes. For example, on the figure below, the getPrimVisibility function will return the string values invisible or inherited, which can be interpreted by Omniverse, instead of the usual Boolean values used by AnyLogic.
When rendering a base scene on a macOS computer, you have the option of specifying a local directory path instead of an Omniverse path in the Render Model dialog:
After rendering, the resulting USDZ files will be placed in the specified directory. To work with them afterwards:
- Move the rendered files to the platform that hosts Omniverse.
- Upload them to the local NucleusA collection of Omniverse services used to share and modify the state of the 3D representation. .
-
Open each exported file and save it as USD by selecting File > Save Flattened As.
When saving, make sure to remove the .usdz extension from the resulting filename.
After this operation, you can work with this file as a regular primShort for “primitive”, the prim is the basic unit of Omniverse. Everything that is imported or created into a USD scene is a prim. This includes cameras, sounds, lights, meshes, and so on. Technically, a primitive is a container of metadata and properties that can also contain other prims. from AnyLogic.
The model that contains the Omniverse connector can be launched from another computer using the AnyLogic Omniverse connector utility which is located in the omniverse-connector folder within the AnyLogic installation directory on Windows and Linux computers.
Alternatively, you can download the connector utilities from the AnyLogic website (use these direct download links for Windows or Linux). In this case, navigate to the directory where you downloaded and extracted them.
- On the computer hosting the model, open the model in AnyLogic and navigate to the properties of the Omniverse connector element.
- Clear the Start connector at model startup option.
- (Optional) Set a password for the connection in the Connector password edit box.
- Configure the network and firewall so that the computer hosting the model can be reached at the specified port.
- Next, on the computer which you want to use to run the model remotely, navigate to the AnyLogic installation directory/omniverse-connector in the console or Linux terminal, or to the location containing the utility you have downloaded from the website.
-
To run the model, execute the following command:
Windows: AnyLogicOmniverseConnector.exe -H %the address of the computer that hosts the model% -P %the port specified in the Connector properties% [--password %the arbitrary password set on step 3%]
Linux: .\AnyLogicOmniverseConnector -H %the address of the computer that hosts the model% -P %the port specified in the Connector properties% [--password %the arbitrary password set on step 3%]
After that, the model and the connector should start remotely, and the scene should be launched in ComposerAn Omniverse application which is used to assemble, light, simulate, and render 3D scenes in Omniverse. .
Sometimes, when you try to use your own asset to represent a particular agent in the static scene, the scale and rotation of this asset do not match those of the model. To fix this, open the USD scene of the asset in Composer and do the following:
-
Make sure that the World Axis in the root layer is the same as for the static USD scene.
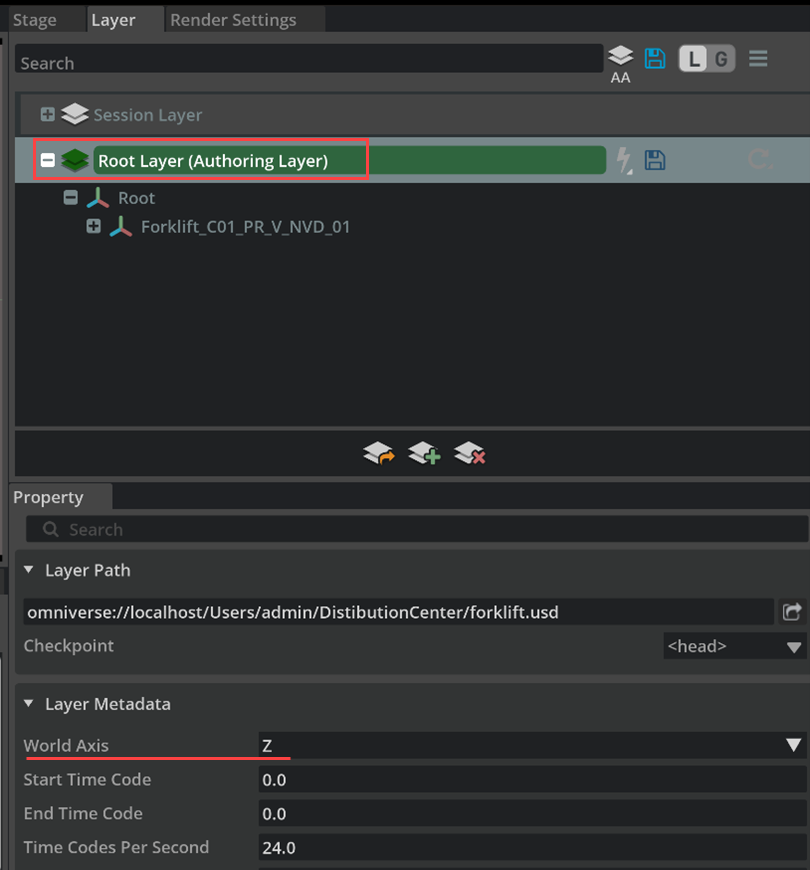
-
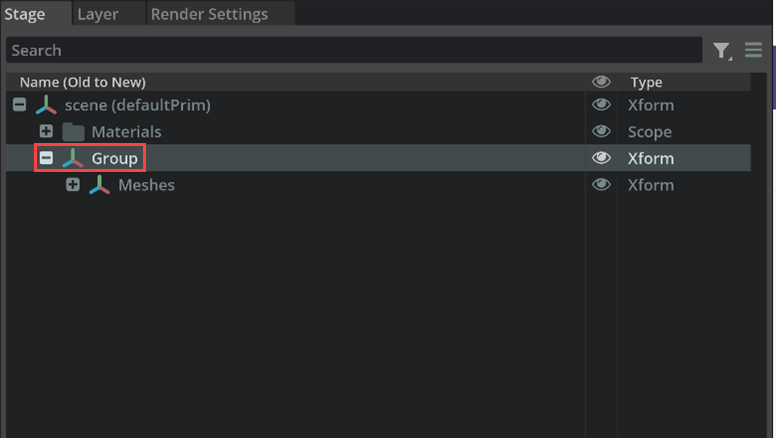
Select all the animation elements in the Stage tab and group them to create a grouped prim between the elements and the root (defaultPrim).
-
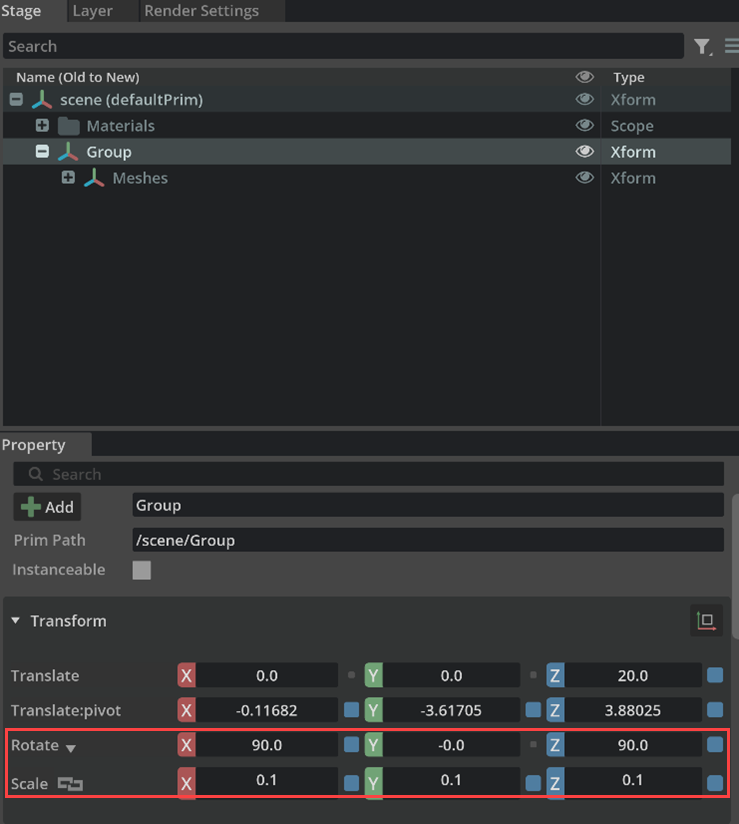
Change the scale and rotation of this grouped prim; it is important to use this intermediate step instead of changing the parameters of the root prim because the root prim takes the values from the agent in AnyLogic.
- USD scenes must have the up axis equal to Z.
- Try to avoid setting scale and rotation transformations for prims connected to model elements and their parent prims.
- When rendering, the model produces two files: USDZ and USD, due to ComposerAn Omniverse application which is used to assemble, light, simulate, and render 3D scenes in Omniverse. limitations.
- Vertical rotation is not automatically updated on USD prims.
-
How can we improve this article?
-

