

The Reinforcement Learning experiment is a special type of experiment designed to integrate RL-ready AnyLogic models into platforms that specialize in the AI agent training.
Currently, the RL experiment allows for exporting AnyLogic models to both Microsoft’s Azure Machine Learning (AML) platform (enabled by Plato Toolkit) and AnyLogic’s Alpyne library. More options will be added in the future.
The RL experiment is not currently designed to run RL-driven experiments directly within your AnyLogic installation. Rather, it serves as an interface definition for your exported AnyLogic model to be used with a supported platform.
To learn more about integrating AnyLogic into the AI agent training process, visit the Artificial Intelligence page on the AnyLogic website.
To prepare a model for reinforcement learning, that is, to make it a valid environment for an RL experiment, you have to make sure that it meets certain requirements:
- The model has a tunable configuration at the initial state of each simulation run.
- The model is able to communicate its current state to the AI.
- The model can implement the action that the AI decides to take.
Supported platforms assume that the model’s logic contains certain points (in time) at which the AI agent must decide what action to take. If you decide to use these platforms for your RL process, you need to keep in mind that a model should contain such decision points. We need to associate these decision points with events that trigger the AI to take action on the model. Examples of events that can be treated as decision points include:
- Events that occur at specific time intervals (for example, every 2 days of model time),
- Events that correspond to specific triggers that occur during the model run (think statechart transitions, condition-based events, the actions implemented by the flowchart blocks).
In these events, you call a single function that creates a decision point to be executed in the next model step, after zero model time. When the function is executed, the model pauses to allow the platform to query the current state and submit an action to be performed, after which the model resumes normal execution. For more information, see Creating a decision point below.
To properly configure your RL experiment, you need to understand 3 primary concepts behind the implementation of the RL experiment in AnyLogic (sometimes referred to as “spaces” in RL contexts). Each concept describes a set of data fields that are used in the process of training the AI agent. Note that the allowed data types will depend on the specific platform.
- The observation consists of key values that are passed to the AI agent as an input during a decision point. These can be static values used by the model, the results of some calculations — raw or transformed model outputs, and so on.
- The action contains the definition of what the AI agent should output for the model to act on at each step. The code field is where you apply this received action to the model’s variables (or functions that perform the action), after which the model will proceed with the next step in the simulation.
- The configuration contains a set of values that define the initial state of the model before the simulation run begins. This code is executed on the model setup and initializes each simulation run of the RL training. At this point, the top-level agent of the model has already been created, but the model has not yet been started: so the code should only set the values of static parameters.
In the internal structure of the RL experiment in AnyLogic, all these values are represented as Java classes.
The RL experiment allows you to set up and manipulate these values within the model before starting the actual process of AI training.
To create an RL experiment
- In the Projects view, right-click (macOS: Ctrl + click) the model element and select New >
 Experiment from the context menu.
 -
The New Experiment dialog box opens up.
Select the Reinforcement Learning option from the Experiment Type list.
 - Type the name of the experiment in the Name edit box.
- Select the top-level agent of the experiment from the Top-level agent drop-down list.
- If you want to apply model time settings from another experiment, leave the Copy model time settings from check box selected and select the experiment from the drop-down list on the right.
- When finished, click Finish.
The resulting experiment appears in the Projects view. It has no graphical representation. To access the properties of the experiment, select it in the Projects view.
At this time, you can only define one RL experiment per model.
To export the RL-ready model and experiment
After you have prepared the RL experiment to your specifications, follow these steps to export the model and experiment:
-
Open the export dialog by doing one of the following:
-
Select the model in the Projects view and choose File >
 Export > Reinforcement learning from the main menu.
-
Right-click the model in the Projects view and select Export > Reinforcement learning from the context menu. If the menu item is inactive, make sure the model contains the Reinforcement Learning experiment.
- Select the RL experiment you created. At the top of its properties, click Export for Reinforcement Learning.
-
Select the model in the Projects view and choose File >
-
In the resulting dialog box, in the Destination ZIP file edit box, specify the path where you want to save the ZIP file containing the RL experiment, or
Click Browse... and navigate to the desired folder. Next, type the name of the resulting ZIP file in the File name edit box, and then click Save.If the Browse exported model folder option is enabled, the folder containing the exported archive is automatically opened in the default file explorer. - Click Finish.
- A message appears when the export is complete. Click OK to close it and the export dialog box.
- Continue by uploading the model and training the AI on the RL platform of your choice.
- General
-
Name — The name of the experiment.
Since AnyLogic generates a Java class for each experiment, follow Java naming conventions and start the experiment’s name with a capital letter.Ignore — If selected, the experiment will be excluded from the model.
Export for Reinforcement Learning — Click this link to begin preparing the model for export to an external AI training platform.
Top-level agent — Use this drop-down list to select the top-level agent type for the experiment. The agent of this type will serve as the root for the hierarchical tree of agents in your model.
- Observation
-
Data fields passed to the Learning Platform on each step — Declares the variables that define the observation space.
By default, the following variable types are provided in the drop-down list: int, double, double[]. If your platform supports other types, you can specify them by typing them into the field. To assign model values to these variables, use the Fill 'observation' data fields from 'root' using code edit box below.
Avoid using AnyLogic-specific types such as Agent, as this can cause conversion errors and result in excessive data being transferred. As a rule of thumb, use either primitive Java types or custom DTO (Data Transfer Object) classes that are guaranteed to be free of cyclic dependencies.Fill 'observation' data fields from 'root' using code — Specifies the code that associates numeric values from the model with the data fields specified above. Fields can either be assigned values directly in the model or point to functions that return values.
The edit box allows values to be retrieved from the top-level agent of your model (using the root keyword). Fields can be referenced through the observation keyword or, for convenience, directly.
Simulation run stop condition — Specifies the condition that will stop the execution of the simulation if it evaluates to true.
If supported by the platform, this can be used to handle situations where the model starts in an undesirable state, or to stop a run when continuing the simulation will not add any value to the learning process. When the stop condition is triggered, the simulation ends.
On platforms that can’t use this field (they need you to specify this condition on the platform), like Azure ML, keep this field as false by default.
This code field allows the contents of the top-level agent to be addressed using the root keyword.
- Action
-
Action data returned from Learning Platform on each step — Specifies the variables that will be passed to the model after the AI agent decides on an action.
By default, the following variable types are provided in the drop-down list: int, double, double[]. If your platform supports other types, you can specify them by typing them into the field. To assign model values to these variables, use the Fill 'observation' data fields from 'root' using code edit box below.
Avoid using AnyLogic-specific types such as Agent, as this can cause conversion errors and result in excessive data being transferred. As a rule of thumb, use either primitive Java types or custom DTO (Data Transfer Object) classes that are guaranteed to be free of cyclic dependencies.Apply 'action' data fields to the 'root' using code — Specifies the code that associates the values provided by the AI agent with the associated model elements. You can assign model values directly or call functions to do so. You can can also perform any other desired action (for example, resetting statistics).
This code field allows to interact with the top-level agent of your model (using the root keyword). Fields can be referenced through the action keyword or, for convenience, directly.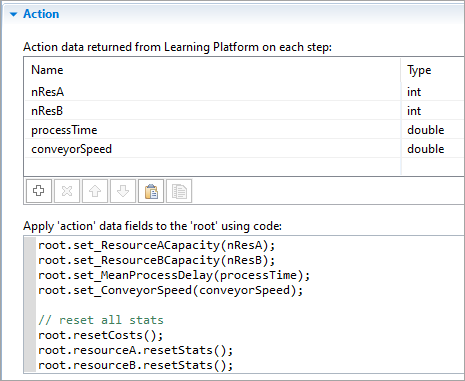
- Configuration
-
Configuration data returned from Learning Platform for new simulation run — Declares the variables that will be passed to the model before the simulation starts.
By default, the following variable types are provided in the drop-down list: int, double, double[]. If your platform supports other types, you can specify them by typing them into the field. To assign parameters to these variables, use the Apply 'configuration' data fields to the 'root' using code edit box below.Apply 'configuration' data fields to the 'root' using code — Specifies the code that assigns the parameter values provided by the AI platform, to the model. Note that the model is not necessarily initialized when the configuration is invoked; you should only assign values using direct assignment (through the equals operator), not an auto-generated “set” function. You may also want to assign other parameters not included in the configuration space.
This code field allows to interact with the top-level agent of your model (using the root keyword). Fields can be referenced through the observation keyword or, for convenience, directly. - Model time
-
Stop — Specifies whether the model will Stop at specified time, Stop at specified date, or Never stop. In the first two cases, the stop time is set using the Stop time/Stop date controls.
Note that some platforms, such as Azure ML, expect you to define any conditions for stopping the simulation run on the platform itself. In these cases, you should set the stop mode to Never. If time is a factor in your stop condition, you may want to provide it as part of your observation space.Start time — The initial time for the simulation time horizon.
Start date — The initial calendar date for the simulation time horizon.
Stop time — The final time for the simulation time horizon (the number of model time units the model must run before it is stopped).
Stop date — The initial calendar date for the simulation time horizon.
- Randomness
-
Random number generator — Specify whether you want to initialize a random number generator for this model at random or with some fixed seed. This is useful for stochastic models. Stochastic models require a random seed value for the pseudorandom number generator. In this case, model runs cannot be reproduced because the model random number generator is initialized with different values for each model run.
By specifying the fixed seed value, you initialize the model random number generator with the same value for each model run, making the model runs reproducible. You can also replace the AnyLogic RNG with a custom RNG.
In most RL training scenarios, it would make more sense to use the Random seed so that the AI can gain experience from an environment that exhibits its random nature. Fixed seed may be useful for testing purposes in a simplified scenario, but may lack the variability that is needed for an approach that considers the real-world examples.- Random seed (unique simulation runs) — If selected, the seed value of the random number generator is random. In this case, the random number generator is initialized with the same value for each model run, and the model runs are unique (non-reproducible).
- Fixed seed (reproducible simulation runs) — If selected, the seed value of the random number generator is fixed (specified in the Seed value field). In this case, the random number generator is initialized with the same value for each model run, and the model runs are reproducible.
-
Custom generator (subclass of Random) — If for some reason you are not satisfied with the quality of the default random number generator Random, you can replace it with your own one. Just prepare your custom RNG (it should be a subclass of the Java class Random, for example, MyRandom), select this option, and enter the expression that returns an instance of your RNG in the field to the right, for example: new MyRandom() or new MyRandom( 1234 ).
For more information, see Custom random number generator.
- Description
- Use the edit box in this section to enter an arbitrary description of the experiment.
- Decision point triggering
-
Function Description void takeAction(Agent agent) Schedules an event in zero model time to pause the model and allow the AI agent to query the model state and submit an action.
Calling this function multiple times from the same code field has no additional effect.
agent — Any valid agent in the model. - Testing
-
These functions are used by supported RL platforms when executing your model. They are provided to help you test your code before you export your model. For more information, see Testing the space types.
Function Description boolean checkEpisodeStopCondition(Agent root) Checks the current expression value of the stop condition field. Returning true indicates the intended end of the run (or “episode”).
root — The instance of your agent that you specified as the top-level agent.Configuration createConfiguration() Creates and returns an instance of the Configuration object with fields uninitialized, that is, set to their default Java values (0 for numeric types, false for boolean types, null for object or array types). void applyConfiguration(Agent root, Configuration configuration) Executes the code defined in the Configuration section of your RL experiment. Returns nothing.
root — The instance of your agent that you specified as the top-level agent.
configuration — An instance of the Configuration object to set the values of.Observation createObservation() Creates and returns an instance of the Observation object with fields uninitialized, that is, set to their default Java values (0 for numeric types, false for boolean types, null for object or array types). void getObservation(Agent root, Observation observation) Executes the code defined in the Observation section of your RL experiment, setting the fields of the provided Observation object. Returns nothing.
root — The instance of your agent that you specified as the top-level agent.
observation — An instance of the Observation object to set the values of.Action createAction() Creates and returns an instance of the Action object with fields uninitialized, that is, set to their default Java values (0 for numeric types, false for boolean types, null for object or array types). void applyAction(Agent root, Action action) Executes the code defined in the Action section of your RL experiment, setting the fields of the provided Action object. Returns nothing.
root — The instance of your agent that you specified as the top-level agent.
action — An instance of the Action object to set the values of.
To declare that a particular event triggers a decision point for the AI agent (and the episode step should be performed), call the takeAction(agent) function provided statically by the ExperimentReinforcementLearning class or by your specifically named RL experiment. agent is any valid model agent. Note that the agent argument is only passed for validity to the live AnyLogic engine and has no effect on how the observation or action is performed.
For example, any of the four takeAction() calls shown in the screenshot below are valid and equivalent. Note that the code shown below is intended to demonstrate the options and only one is required (subsequent calls in the same code field have no additional effect).

Unlike the other experiment types, the RL experiment can only be run on a compatible platform. This may make it difficult to verify that the code you write for it works as expected. As of AnyLogic 8.8.6, the RL experiment provides the same functions it provides to the platform to the end user, so that the user can query or apply the RL spaces within the model. These functions are purely intended for testing or verification purposes only. For models that you intend to train on a desired platform, the functions in this section should not be used.
Testing the configuration, observation, and action is a two-step process:
- You call a function to create an object of the desired type. Doing so initializes the fields with some default or empty values. For the configuration and action, you can then assign the desired values to be tested.
- You call a function to execute the RL experiment’s code fields on your objects. For the observation, this fills the object you created in step 1 with the model’s values; for the configuration and action, this applies their respective code to your model based on the values you assigned in step 1.
Note that when importing the classes for each space type, use the option from your model, not the generic AnyLogic one.

Here are examples for each space type, including the Stop condition field:
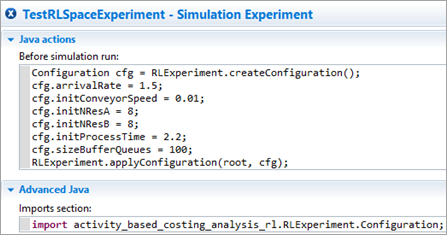 Assigning a configuration before starting the run
(this will override any values set in the experiment properties)
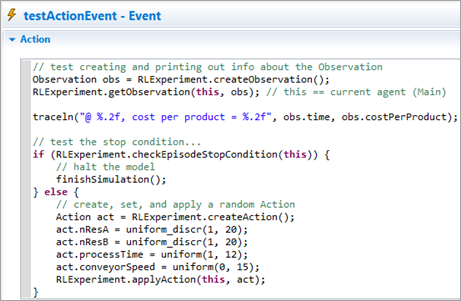 Testing the other spaces and stop condition in a cyclic event
(specific details about the event are intentionally omitted)
-
How can we improve this article?
-