

Applies to AnyLogic Cloud 2.5.3. Last modified on July 01, 2025.
Use the administrator panel of Private Cloud to get a quick overview of your license information, check how various Cloud services perform in different situations, manage user profiles and their permissions, and customize the appearance of your Private Cloud instance.
To access the administrator panel
-
Go to
 the user menu >
  Admin panel.

-
On the next screen, switch between tabs to get to the functionality you need.
- Status — Provides a breakdown of the current state of Cloud services.
- Users — Contains a list of users registered in your Private Cloud instance, as well as all the tools necessary to manage the user records.
- Customization — Provides a selection of means to modify how your Private Cloud instance looks, allowing for a better reflection of your company’s chosen brand design.
- Nodes, Services & Tasks — Contains multiple sections that let you review the current state of various Cloud service components.
To open the Status tab
- While on the administrator panel, select Status in the left navigation bar.
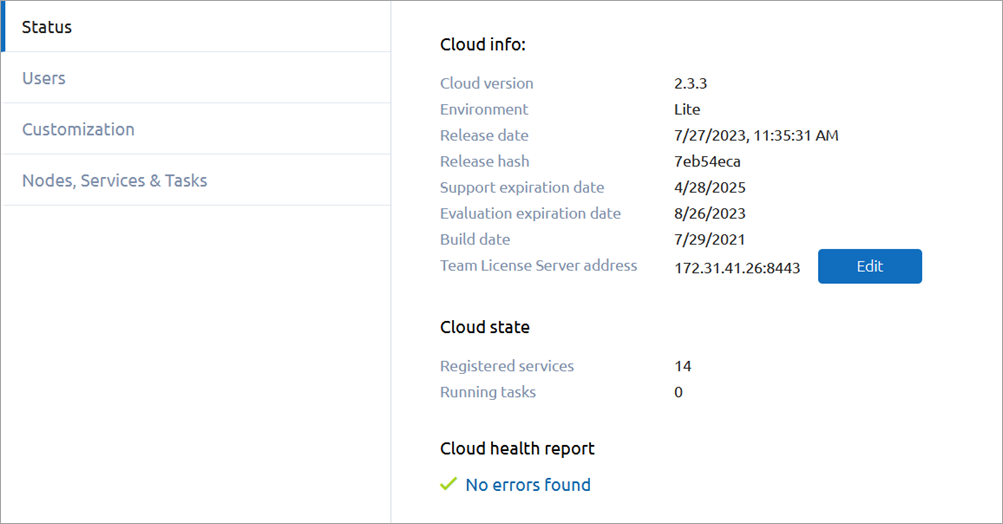
The Status tab contains the following panels:
-
Cloud info — Information regarding your Private Cloud license.
Cloud version The version of your Private Cloud instance.
To learn more about the features of different Private Cloud versions, check the release notes.Environment Specifies the installed edition of Private Cloud: either Lite, Pro, or Enterprise.
For more information about different editions of Private Cloud, see Private Cloud.Release date The date and time your shipment of Private Cloud was released. This information might be requested from you by our support team. Release hash The hash of your shipment of Private Cloud. This information might be requested from you by our support team. Support expiration date
The date when your Private Cloud support license expires.
To learn how to renew your license, contact our support team.Evaluation expiration date The date when your evaluation period ends.
To learn how to purchase a license, contact our support team.Build date The date when your Private Cloud shipment was built. This information might be requested from you by our support team. Team License Server address The address and port of your Team License Server. -
Cloud state — Information regarding the current state of Private Cloud service components and tasks currently running.
Registered services The number of service components associated with your Private Cloud instance.
To learn more about the state of individual components, go to the Services section of the Nodes, Services & Tasks tab.Running tasks The number of tasks currently in progress.
To learn more about individual tasks, go to the Running tasks section of the Nodes, Services & Tasks tab. - Cloud health report — Contains a short excerpt describing the current state of your Private Cloud instance.
To specify the address of a different instance of Team License Server
- Click Edit on the Cloud info panel, next to the Team License Server address field.
-
The Edit Team License Server address dialog appears.
In the Team License Server address field, specify the IP address and port of the new instance of Team License Server, in the following format: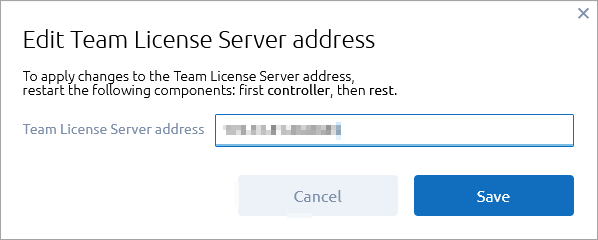
0.0.0.0:0
You must specify the appropriate port after the address. -
Click Save.
The successful modification of the Team License Server address will be confirmed in the notification dialog that appears in the top right corner of the screen. -
To ensure the changes are applied, you need to restart two service components.
Go to the Services section of the Nodes, Services & Tasks tab. - Select the checkboxes next to the controller component.
- Click Restart service.
- Upon successful restart of the controller, select the checkbox next to the rest service.
-
Click Restart service.
During the restart of the rest service, your Private Cloud instance will be unavailable, and you will need to authenticate once again after restart.
Upon completing the rest service restart, your Private Cloud instance will connect to the new instance of Team License Server.
Contact our support team in case you have any questions regarding licensing issues.
To open the Users tab
- While on the administrator panel, select Users in the left navigation bar.
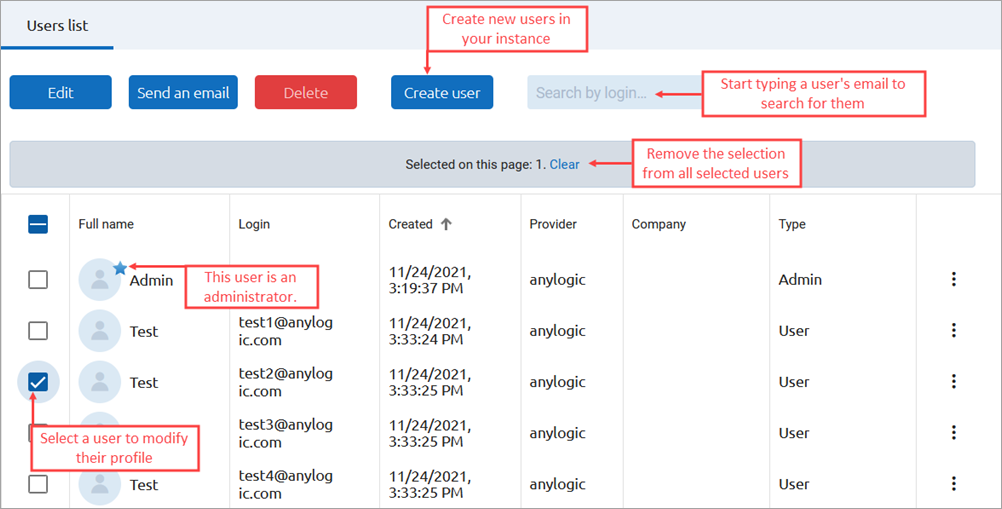
The Users tab contains the full list of users registered in your Private Cloud instance and commands that you can use to manage the user profiles.
In the right column of the table, each user record has the button. Click it to access the menu containing actions you can perform with the individual user account.
To navigate the list of users, use the pagination buttons in the bottom right corner of the screen.
To create a new user profile
- Click Create user.
-
The Create user dialog appears.
Specify the new user’s credentials in available fields:
User type Required field. The type of permissions that will be assigned to the newly created user. Users of the User type will have regular permissions, while users of the Administrator type will be able to access the administrator functionality of your Private Cloud instance, including the administrator panel. Login Required field. The login (for example, the email) of the new user. They will use it to log in to the Private Cloud instance. First name Required field. The first name of the new user. Last name The last name of the new user. New password Required field. The password of the new user. They will use it to log in to the Private Cloud instance. Passwords support Latin characters, integers, and special characters only.
To switch the password’s visibility during input on or off, click Show or Hide on the edit box’s right.Confirm password Required field. In this field, repeat the password for the new user. Passwords support Latin characters, integers, and special characters only.
To switch the password’s visibility during input on or off, click Show or Hide on the edit box’s right.Company The company the new user belongs to. LinkedIn profile The link that refers to the LinkedIn profile of the new user. Personal page The link that refers to the new user’s personal page at any other domain name. About The optional description of the new user. - Upon completing the form, click Save.
The successful creation of the new user profile will be confirmed in the notification dialog that will appear in the top right corner of the screen.
To search for a specific user profile
- Start typing the user’s email address (or a part of the email address) in the search box in the top right corner of the screen. The user list will be filtered immediately.
To edit an existing user profile
-
In the left column of the user list, select the checkbox next to the user profile you want to edit, or
Click next to the needed user’s record. - Click Edit.
-
Modify the user’s information as you see fit.
Check the table above for reference.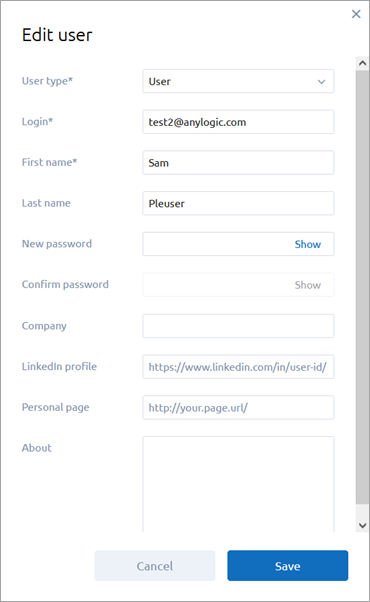
- Upon completing, click Save.
The successful modification of the user profile will be confirmed in the notification dialog that will appear in the top right corner of the screen.
To edit multiple existing user profiles
- In the left column of the user list, select the checkboxes next to the user profiles you want to edit.
- Click Edit.
-
The Edit users form appears.
Modify the users’ information as you see fit.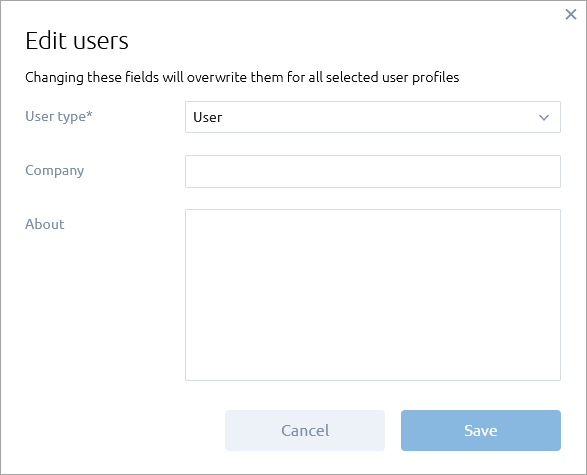 The value specified in the User type field applies to all users you have selected, that is, they will all be assigned the specified user group. Given that, we recommend making sure the users whose profiles you are trying to edit belong to the same user group.
 - Upon completing, click Save.
The successful modification of multiple profiles will be confirmed in the notification dialog that will appear in the top right corner of the screen.
To copy a user’s login
- Click next to the needed user’s record.
- Click Copy login.
or
- Move the mouse pointer over the cell in the Login column that corresponds to the needed user s record.
- Click the Copy icon that appears on the cell’s right.
To send an email to a user
-
In the left column of the user list, select the checkbox next to the user profile belonging to the user you want to message, or
Click next to the needed user’s record.By selecting multiple users with corresponding checkboxes, you can message multiple users. - Click Send an email.
-
In the resulting form, enter the text of your message.
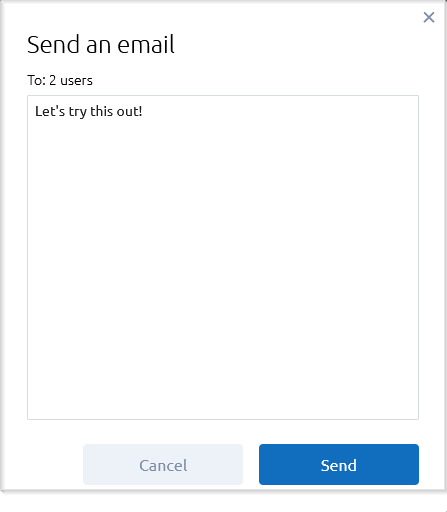
- Click Send.
Your message will be emailed to the user. In the From field of the resulting letter, the service email will be specified, so your personal information will not be revealed. You can specify the service email in the Private Cloud configuration files.
To delete a user profile
-
In the left column of the user list, select the checkbox next to the user profile you want to delete, or
Click next to the needed user’s record.By selecting multiple users with corresponding checkboxes, you can delete multiple users. - Click Delete.
- Confirm the action in the resulting dialog by clicking OK there.
This is an irreversible action. Use this functionality with caution.
The successful deletion of the user profile will be confirmed in the notification dialog that will appear in the top right corner of the screen.
On the Customization tab, adjust the look and feel of your Private Cloud instance to reflect your company’s chosen brand design:
To open the Customization tab
- While on the administrator panel, select Customization in the left navigation bar.
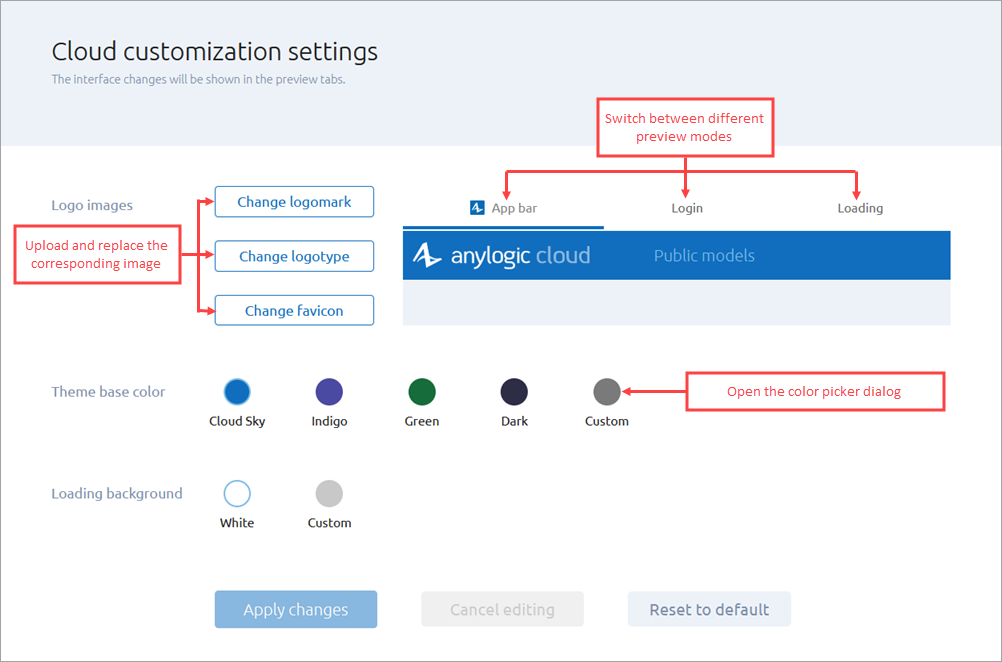
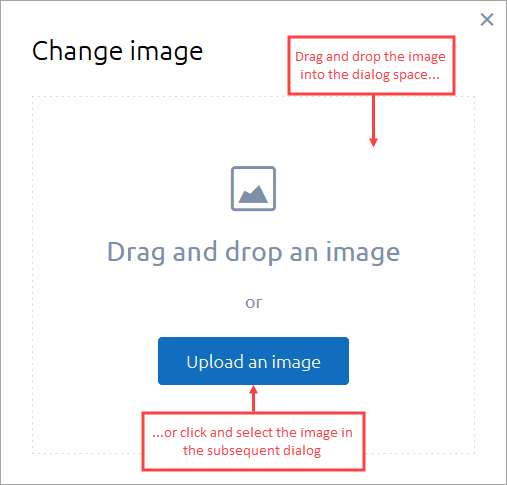
To upload custom images
-
Click one of the following buttons to replace an image:
- Change logomark — Replace the logomark: the small size image that appears in the upper left corner of the browser window in the Private Cloud workspace.
- Change logotype — Replace the logotype: the big-size image that appears, for example, on the Private Cloud login page.
- Change favicon — Replace the favicon: the small-size image displayed in the browser next to the page’s title on the Private Cloud tab.
-
In the subsequent dialog, select an image file. To do that, you can either drag and drop the desired file directly into the dialog space, or click Upload an image, locate the desired file, then double-click the file or select it and click Open.
The following image formats are supported: GIF, PNG, and JPG.
-
On the next page of the dialog, specify which region of the image you want to use. To move the selection area, click
 and move the area while holding the left mouse button. To resize the selection area, use the rectangular handles in the area’s corners.
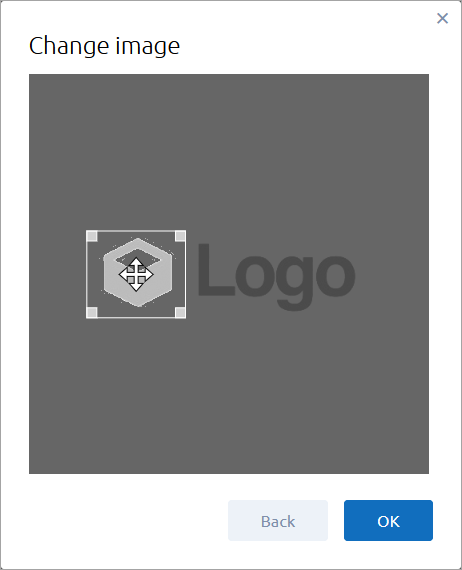
- Click OK to complete the uploading process. The image you have added will replace the default image of the chosen type in the preview area. Use tabs above the preview area to switch between different display modes: App bar, Login, or Loading.
- Click Apply changes to save the changes you have made.
You can discard your changes at any time before applying them by clicking Cancel editing.
To select a custom base color
In Theme base color, select a primary UI color for your Private Cloud environment.
You can either select one of the suggested default colors or pick a custom color.
To pick a custom color:
- Click Custom.
- In the subsequent color picker dialog, use the available controls to specify the desired color. The layout and functionality of the color picker dialog may vary in different browsers and operating systems.
- Confirm your choice by clicking OK. The color you have chosen will replace the primary UI color in the preview area, as well as on the Cloud customization settings screen toolbar. The default color of the font used in the UI may be adjusted slightly to improve readability. Use tabs above the preview area to switch between different display modes: App bar, Login, or Loading.
- Click Apply changes to save the changes you have made.
You can discard your changes at any time before applying them by clicking Cancel editing.
To select a custom background color for the loading screen
In Loading background, select a background color for the environment’s loading screen.
To pick a custom color:
- Click Custom.
- In the subsequent color picker dialog, use the available controls to specify the desired color. The layout and functionality of the color picker dialog may vary in different browsers and operating systems.
- Confirm your choice by clicking OK. The color you have chosen will replace the background color of the environment's loading screen. You can check the result on the Loading tab.
- Click Apply changes to save the changes you have made.
To discard your changes at any time before applying them, click Cancel editing.
To restore default images and colors
- On the Cloud customization settings screen, click Reset to default.
- Click OK in the confirmation dialog.
To change the page title of the instance in a web browser
Manually edit the frontend.json configuration file.
- Open the frontend.json configuration file, located in /home/alcadm/alc/controller/conf on the machine hosting the Cloud instance.
-
Enter your custom text in the documentTitle field:
"documentTitle": "new tab text"
Make sure that the resulting file is valid JSON. -
Save the file and restart the controller and frontend components by executing the following command:
sudo docker restart controller && sudo docker stop frontend
To open the Nodes, Services & Tasks tab
- While on the administrator panel, select Nodes, Services & Tasks in the left navigation bar.
The Nodes, Services & Tasks tab consists of three sections:
- Services — Contains the list of currently running service components of your Private Cloud instance.
- Running tasks — Contains the list of tasks currently executed within the instance.
- Nodes — Contains the list of nodes — the server machines that run your Private Cloud instance, with each machine having a list of service components associated with them.
In the Services section, you can check the list of service components of your Private Cloud instance, as well as manage them.
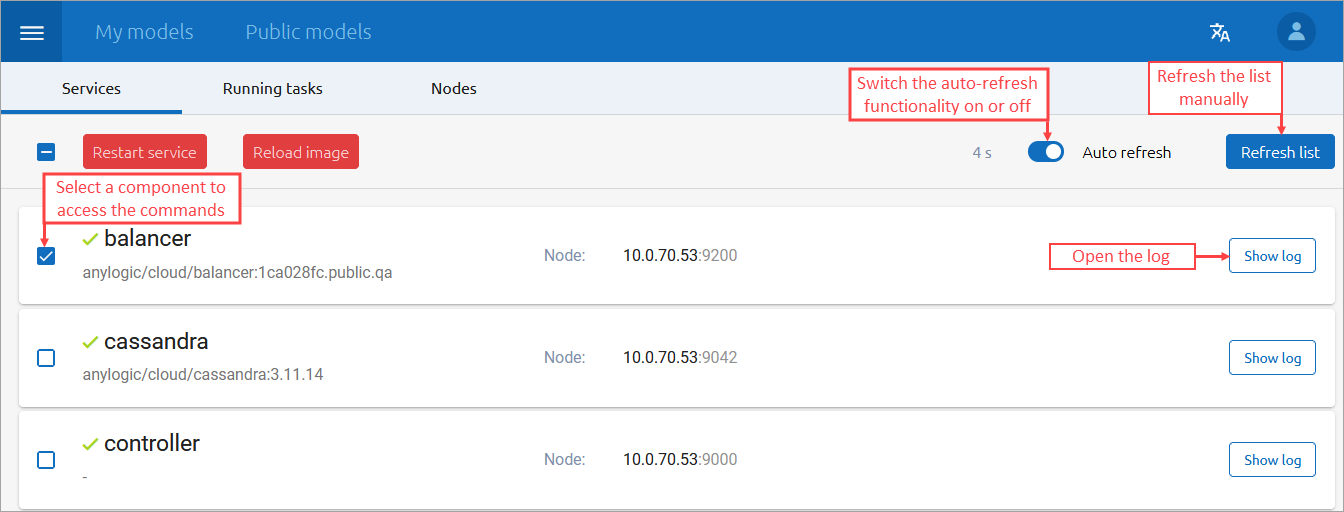
Each service has its separate tile, containing the following information:
- The name of the service
- The node the service is located on
- The service log (hidden by default)
The state of the services is updated every 15 seconds. You can disable the auto-refresh functionality by switching Auto refresh off in the top right corner of the screen or manually update the state of services by clicking Refresh list.
To view the service log
- Click the Show log button located on the tile’s right.
While the log is in the expanded state, you can specify how many lines of the log you want to view, in the Show log’s last lines edit box.
To restart the service
- Select the checkbox on the left side of the tile of the service you want to restart. You can select multiple services.
- Click Restart service.
- Confirm the action in the subsequent dialog by clicking OK.
The services you have restarted will become unavailable for some time. The functionality they control will become unavailable, as well.
To reload the service from an image
An image is a snapshot of the properly working state of the service. You may want to reload a service from an image upon encountering an issue that causes the Private Cloud instance to behave incorrectly. Reloading the service from the image may resolve the issue, though this must be used with caution.
- Select the checkbox on the left side of the tile of the service you want to restart. You can select multiple services.
- Click Reload image.
- Confirm the action in the subsequent dialog by clicking OK.
The services which you have reloaded will become unavailable for some time. The functionality they control will become unavailable, as well.
In the Running tasks section, you can check how executors handle the model runs they’ve been assigned to process.
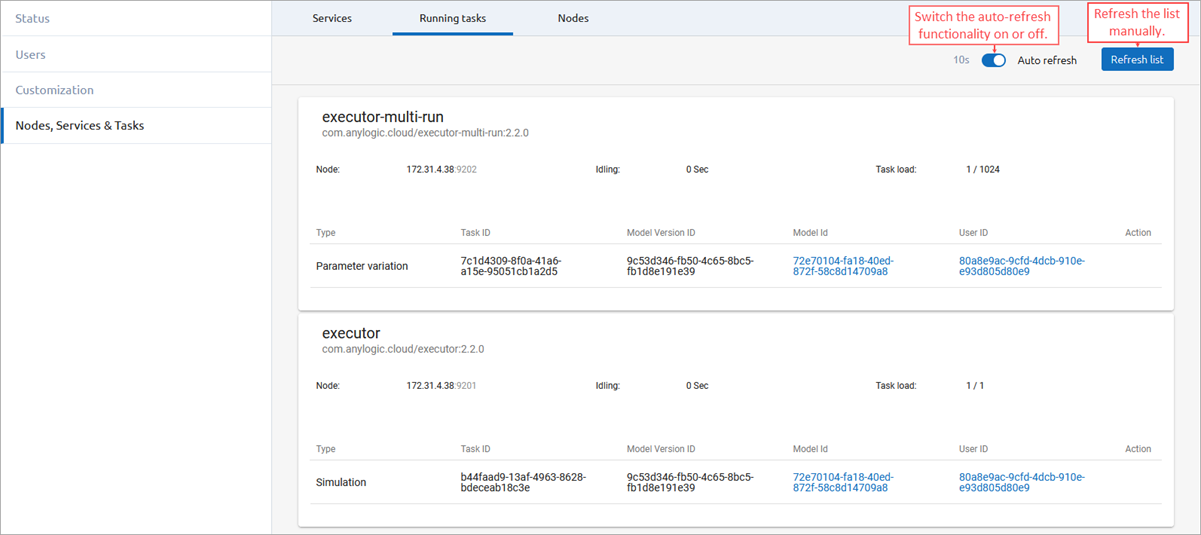
- executor-multi-run processes experiments that require multiple runs and splits them into single runs
- executor processes the single-run experiments and SVG animations
For each experiment being run, its information is shown in a table row. Each row consists of the following columns:
| Type | The type of experiment being run. |
| Task ID | The unique ID of the task associated with the experiment run. |
| Model Version ID | The unique ID of the model version that is used in the experiment run. |
| Model ID | The unique ID of the model whose version is used in the experiment run. Click to open the model screen. |
| User ID | The unique ID of the user who requested the experiment run. Click to open the user profile. |
| Action |
This column contains the Cancel button which you can use to stop the task’s execution. |
In the Nodes section, you can check which server machines are used to run your Private Cloud instance, and which components are associated with each of them.
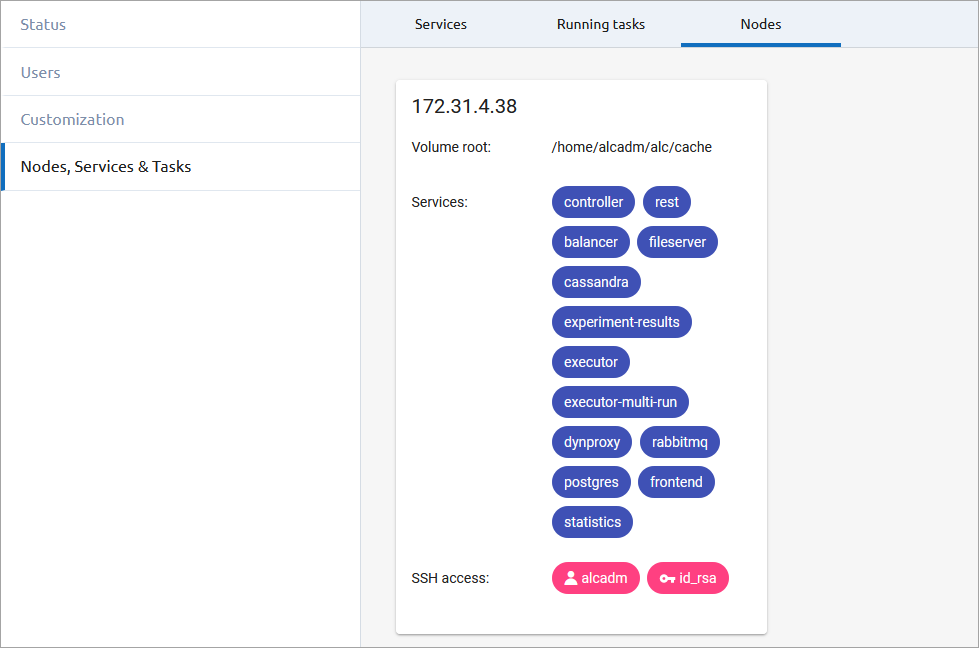
Each machine has its own tile in the interface, containing the following information:
| Address | The IP address of the server machine. |
| Volume root | The location of the Private Cloud components within the server machine’s file structure. |
| Services | The service components that are installed on the machine. |
| SSH access | The IDs of the SSH keys which you can use to access the server machine. |
-
How can we improve this article?
-