


The AnyLogic model editor includes a built-in Database element that allows you to import tables from external sources and use the data directly in your simulations.
You can use the database to read parameter values and configure models and create parameterized agent populations.
You can import a database into your AnyLogic project from an external database or spreadsheet. You can also export database data into an Excel file.
If your project’s data is defined in an external database, you can import it into the built-in model database. Then, you can use this data by querying the AnyLogic database tables.
Click one of the links in the right sidebar (In this section) to learn more about settings specific to your database type.
If the data in the external database changes, you can update the data in the imported database. If you expect the data to change frequently, you can configure your database to update automatically each time you start the model.
To import data from a Microsoft Excel or Microsoft Access file:
-
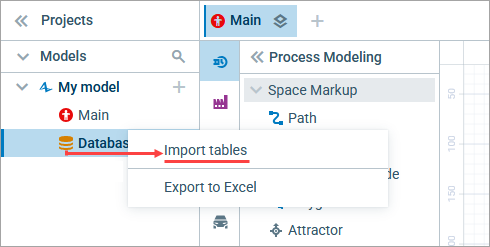
In the Projects view, right-click the model’s
 Database item.
-
Select Import tables from the context menu.
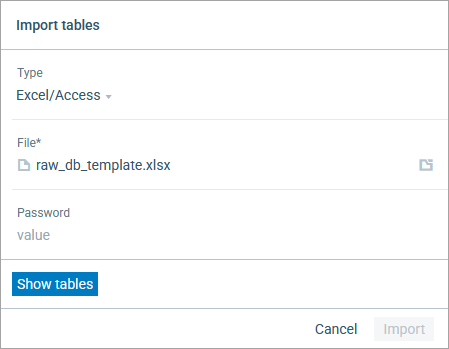
- You will see the Import tables dialog. First, select the database type. In our case, we will use the default setting: Excel/Access.
-
By clicking in the File edit box, you select the database file from those already attached to the model.
Alternatively, click the Upload file button to the right to open the browsing dialog. Browse for the Microsoft Excel or Microsoft Access file that stores the data you want to import on your computer. Double-click the file or select it and click the Open button to select the file.
 Once you select a file, it is uploaded immediately and added to the model’s file resources. Even if you cancel the import process, the file will already be attached to the model.
 - (Optional) If the file is password-protected, enter the password in the Password edit box.
-
Click Show tables to open the list of tables in the source file. Their names in the built-in database will be generated automatically.
By default, the check boxes for all the source database tables are selected. Clear the check boxes for tables you do not need, or use the control in the upper left corner to clear them all at once.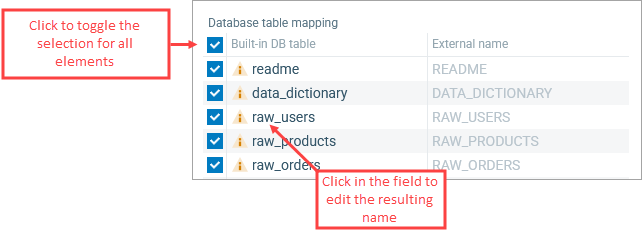
At least one database table must be selected to proceed.You can change the name of a table by clicking on a row in the left-hand column and editing it. -
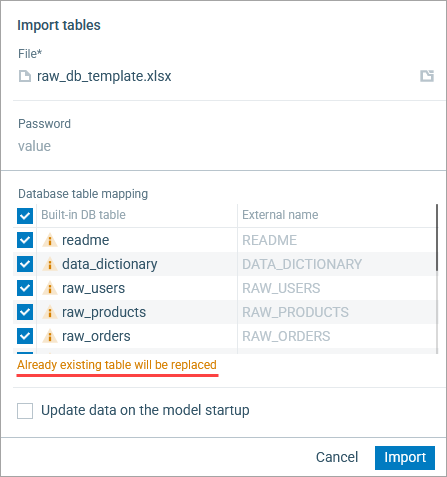
If you expect the data in the external database to be updated and want to always have the up-to-date data in your model, select the Update data on the model startup check box. By selecting this option, you tell AnyLogic to update the data from the external database each time the user starts running the model. You can switch the auto-update off in the import properties.
In future, to update the database, reupload the source XLSX or ACCDB file with the same name and make sure the check box is selected in the properties. -
If tables with the same names already exist in AnyLogic database, the existing tables will be replaced. You will see a warning, as shown at the bottom of the figure below. You can replace the existing tables with the tables from the external database or set different names for the imported tables.
-
Click the Import button.
Once the import is complete, select the Database element in the projects view to open its properties. In the Elements view, expand the Database item branch to see the list of tables added to the AnyLogic database.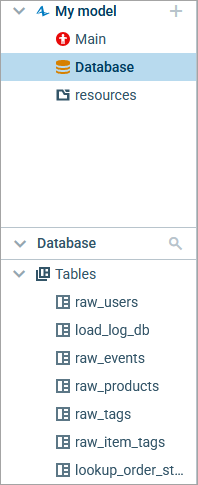
To connect AnyLogic to the database:
- Right-click the
 Database element you want to associate with Microsoft SQL Server database.
 - Select Import tables from the context menu.
- In the dialog that appears, select Microsoft SQL Server from the Type drop-down list.
- Specify the host computer in the Host field.
- In the Database name field, specify the name of the database you want to access.
- Enter Login and Password if required by the database.
-
Click Show tables to open the list of tables in the source file. Their names in the built-in database will be generated automatically.
By default, check boxes for all source database tables are selected. Clear the check boxes for tables you do not need or use the upper left control to clear them all at once.
At least one database table should be selected to proceed.You can change the table name by clicking a row in the column to the left and editing it. - If you expect the data in external database to be updated and want to always have the up-to-date data in your model, select the Update data on the model startup check box. Having set this option, you tell AnyLogic to update data from the external database every time the user starts running the model. You can switch the auto-update off in the database properties.
- If tables with the same names already exist in AnyLogic database, the existing tables will be replaced. You can replace the existing tables with the tables from the external database or set different names for the imported tables.
-
Click the Import button.
After the import finishes, select the Database element in the projects view to open its properties. In the Elements view, expand the Database item branch to see the list of tables added into the AnyLogic database.
To connect AnyLogic to the database:
- Right-click the Database element you want to associate with PostgreSQL database.
- Select Import tables from the context menu.
- In the dialog that appears, select PostgreSQL from the Type drop-down list.
- Specify the host computer in the Host field.
- In the Database name field, specify the name of the database you want to access.
- Enter Login and Password if required by the database.
-
Click Show tables to open the list of tables in the source file. Their names in the built-in database will be generated automatically.
By default, check boxes for all source database tables are selected. Clear the check boxes for tables you do not need or use the upper left control to clear them all at once.
At least one database table should be selected to proceed.You can change the table name by clicking a row in the column to the left and editing it. - If you expect the data in external database to be updated and want to always have the up-to-date data in your model, select the Update data on the model startup check box. Having set this option, you tell AnyLogic to update data from the external database every time the user starts running the model. You can switch the auto-update off in the database properties.
- If tables with the same names already exist in AnyLogic database, the existing tables will be replaced. You can replace the existing tables with the tables from the external database or set different names for the imported tables.
-
Click the Import button.
After the import finishes, select the Database element in the projects view to open its properties. In the Elements view, expand the Database item branch to see the list of tables added into the AnyLogic database.
To connect AnyLogic to the database:
- Right-click the Database element you want to associate with Oracle database.
- Select Import tables from the context menu.
- In the dialog that appears, select Oracle from the Type drop-down list.
- Specify the host computer in the Host field.
- In the Database name field, specify the name of the database you want to access.
- Enter Login and Password if required by the database.
-
Click Show tables to open the list of tables in the source file. Their names in the built-in database will be generated automatically.
By default, check boxes for all source database tables are selected. Clear the check boxes for tables you do not need or use the upper left control to clear them all at once.
At least one database table should be selected to proceed.You can change the table name by clicking a row in the column to the left and editing it. - If you expect the data in external database to be updated and want to always have the up-to-date data in your model, select the Update data on the model startup check box. Having set this option, you tell AnyLogic to update data from the external database every time the user starts running the model. You can switch the auto-update off in the database properties.
- If tables with the same names already exist in AnyLogic database, the existing tables will be replaced. You can replace the existing tables with the tables from the external database or set different names for the imported tables.
-
Click the Import button.
After the import finishes, select the Database element in the projects view to open its properties. In the Elements view, expand the Database item branch to see the list of tables added into the AnyLogic database.
To connect AnyLogic to the database:
- Right-click the Database element you want to associate with MySQL database.
- Select Import tables from the context menu.
- In the dialog that appears, select MySQL from the Type drop-down list.
- Specify the host computer in the Host field.
- In the Database name field, specify the name of the database you want to access.
- Enter Login and Password if required by the database.
-
Click Show tables to open the list of tables in the source file. Their names in the built-in database will be generated automatically.
By default, check boxes for all source database tables are selected. Clear the check boxes for tables you do not need or use the upper left control to clear them all at once.
At least one database table should be selected to proceed.You can change the table name by clicking a row in the column to the left and editing it. - If you expect the data in external database to be updated and want to always have the up-to-date data in your model, select the Update data on the model startup check box. Having set this option, you tell AnyLogic to update data from the external database every time the user starts running the model. You can switch the auto-update off in the database properties.
- If tables with the same names already exist in AnyLogic database, the existing tables will be replaced. You can replace the existing tables with the tables from the external database or set different names for the imported tables.
-
Click the Import button.
After the import finishes, select the Database element in the projects view to open its properties. In the Elements view, expand the Database item branch to see the list of tables added into the AnyLogic database.
To connect AnyLogic to the database:
- Right-click the Database element you want to associate with the other database.
- Select Import tables from the context menu.
- In the dialog that appears, select Other from the Type drop-down list.
- Specify the host computer in the Host field.
- In the Database name field, specify the name of the database you want to access.
- Enter Login and Password if required by the database.
-
Click Show tables to open the list of tables in the source file. Their names in the built-in database will be generated automatically.
By default, check boxes for all source database tables are selected. Clear the check boxes for tables you do not need or use the upper left control to clear them all at once.
At least one database table should be selected to proceed.You can change the table name by clicking a row in the column to the left and editing it. - If you expect the data in external database to be updated and want to always have the up-to-date data in your model, select the Update data on the model startup check box. Having set this option, you tell AnyLogic to update data from the external database every time the user starts running the model. You can switch the auto-update off in the database properties.
- If tables with the same names already exist in AnyLogic database, the existing tables will be replaced. You can replace the existing tables with the tables from the external database or set different names for the imported tables.
-
Click the Import button.
After the import finishes, select the Database element in the projects view to open its properties. In the Elements view, expand the Database item branch to see the list of tables added into the AnyLogic database.
If the data in the external database have been changed, you can update data in the built-in database.
To make AnyLogic database update on model startup
- In the Projects view, click the model’s Database item.
- In the Properties view, open the Import section and select the Update before simulation run check box.
The database properties are displayed when you select the Database element in the Projects view, provided the tables have been already imported.
- Import
-
Update before simulation run — If selected, data in all imported tables will be automatically updated from the external database on each startup of this model. The XLSX and ACCDB files should be reimported and updated manually beforehand.
Imported database tables — Contains a table of matches between AnyLogic database tables and external database tables, including the paths to all external sources of data for the imported AnyLogic database tables. If the external database is located elsewhere, a path is displayed. If the file is located in the model folder (usually the case with the XLSX and ACCDB files), only the name of the file is displayed.
- Export
-
This section contains properties related to database export to Excel files. To learn how to export the AnyLogic database, please see Exporting data to MS Excel workbook.
Export to Excel after simulation run — Select to automatically export the data when model execution is finished.
Excel file — [Visible if Export to Excel after simulation run is selected] The Excel file for data export. Click in the box to select one of the files already attached to the model, or click the Create new file option that appears to create a new XLSX file and specify its name.
Export tables — [Visible if Export to Excel after simulation run is selected] The list of AnyLogic database tables to export. Select a check box next to a database table you want to export, or click the control in the upper left corner to select them all.
To view these properties, select a database table in the Elements view.
Currently, they are displayed in the read-only mode only.
- General
-
Name — The name of the database table.
- Columns
-
Lists a number of properties for each database table column.
Column name — The name of the column.
Indexed — Marks the column as indexed to speed up searches and lookups.
Unique — Ensures that all values in the column are unique across the table.
Type — The type of values stored in the column.
Default value — The default value of an individual cell.
Foreign key — Links the column to a primary key in another table.
- Expert
-
Optimize performance for — Switch between two ways of storing table data in the memory:
- faster access time (better if less than 50000 rows) — The table data is entirely held in memory while you are working with this model in AnyLogic (the table is stored in RAM). Select this if the data set is relatively small (less than 50 000 entries).
- handling large amount of data — Default choice. If this option is selected, only part of table data or indexes is held in memory, allowing to work with large tables which would otherwise take up a lot of memory (the table is cached). Another advantage of cached tables is that the database engine takes less time to start up when a cached table is used for large amounts of data. The disadvantage of cached tables is a reduction in speed. Do not use cached tables if your data set is relatively small.
-
How can we improve this article?
-