|
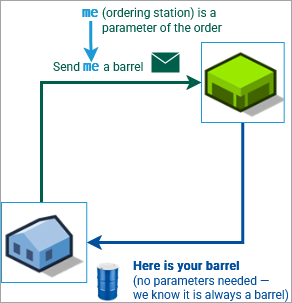
Communication is a part of the agent-based modeling approach. This is probably the most difficult part of the model. Although motor oil is consumed continuously as a liquid substance (fluid), it is ordered and delivered in discrete items (barrels). Therefore, we will need discrete communication between the stations and the retailer: a station sends an order to the retailer, and the retailer sends back a barrel of oil. While there is only one retailer in the model, there are many stations, and the order should somehow identify the station to which the oil is to be delivered. We will use references, or “addresses”, to deliver orders and shipments directly to the entry points of the retailer and the station. |
|
In AnyLogic, everything is an agent: a representation of a system with complex behavior, such as a warehouse or a workstation, as well as something as simple as an entity moving through a process, such as a document, a patient, a part, or a shipment. In this case, our new agent will represent an order, with a single parameter “shipping address” and no other behavior.
To create an “order” agent
- In the same manner as earlier, create a new agent type and name it StationOrder.
-
From the
Basic Elements palette, drag and drop the
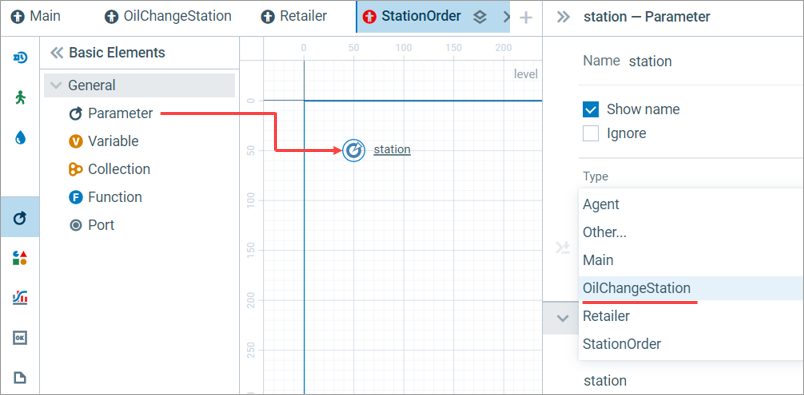
Parameter element onto the graphical diagram of the
StationOrder agent.
-
In the parameter’s Properties view, set the Type to OilChangeStation: an agent type that exists in our model. You can select it from the drop-down list.
In order for the retailer to accept orders, it must have some sort of “port” that can notify the retailer of incoming requests.
For this purpose, we will use the 

To set up the entry point
-
Switch to the
Retailer agent type.
-
Open the
Process Modeling Library palette.
-
Drag and drop the
Enter block onto the graphical diagram of the
Retailer agent type.
-
Set the following properties:
Name: stationOrders
Agent type: StationOrder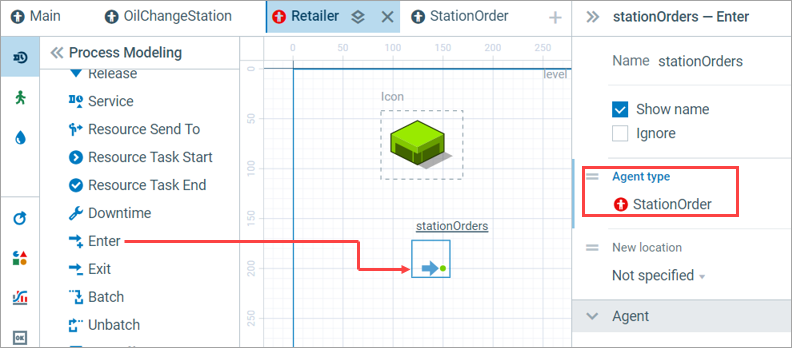
We need to make the station to somehow communicate its request for more oil to the retailer. We’ll model this it using Java.
To model the order generation
-
Switch to the
OilChangeStation agent type.
-
From the
Basic Elements palette, drag and drop the
Parameter element onto the graphical diagram.
-
Set its name and type to the following:
Name: retailer
Type: Retailer
This way, we will use it as the “retailer’s address” known to the station. -
Select the
Tank block and configure its properties:
Select Action on below
Amount: 5 — The station will order more oil when the oil level is 5
On below: : retailer.stationOrders.take(new StationOrder( this ));
retailer.stationOrders is the retailer’s “order entry point” we created earlier, and new StationOrder( this ) is a command to send an order of oil to the address specified as “this station”.
Since we assume that a single delivery is always a barrel of oil, we do not need to create a separate agent type to model it. Let us continue to build the flowchart.
To create a delivery flowchart
- Staying on the diagram of the OilChangeStation agent, open the
Process Modeling Library palette.
-
Drag and drop the
Enter block onto the diagram and name it delivery.
As we said earlier, there is no need to specify an agent type: the default one, Agent, will do. -
Open the
Fluid palette.
-
Drag and drop the
Agent to Fluid block as shown in the figure below: between the
Enter and
Tank blocks.
Set its properties to the following:
Name: refill
Fluid in agent: 15 — This is the capacity of the barrel.
Rate: 10 — This is the assumed rate of emptying the barrel into the tank.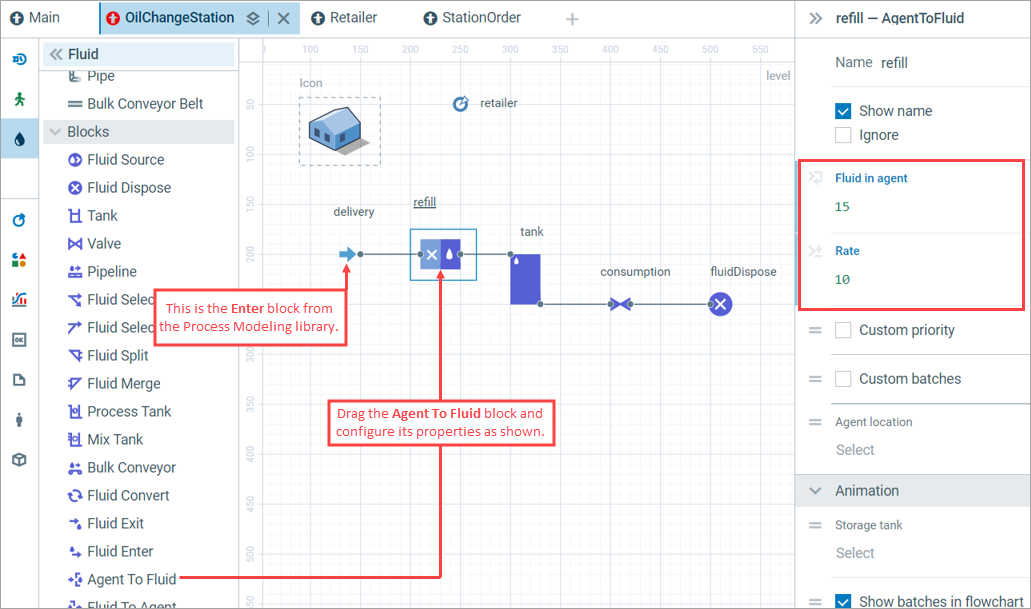
To make the oil change stations aware of the position (or “address”) of the retailer, we need to pass it to them as a parameter.
- Switch to the top-level agent of the model:
Main.
- Select the oilChangeStations, a population of agents we added earlier.
-
Set the value of its retailer parameter to retailer.

By doing this, we create a reference to the retailer agent. The value of the parameter now points to the retailer agent, which is also embedded in Main, so each station now knows where its retailer is.
For the next step, we need to add a shipping flowchart to the retailer. This will be done using the 
To set up the shipping flowchart
- Switch to the
Retailer agent type.
-
From the
Basic Elements palette, drag and drop a
Variable element onto the graphical diagram.
Name this variable stock. -
The
Enter block from the
Process Modeling Library palette is already on the diagram. In the succeeding order, drag and drop the following three blocks and name them according to the following list:
Queue — backlog
Hold — ship
Sink — done
See the figure for reference.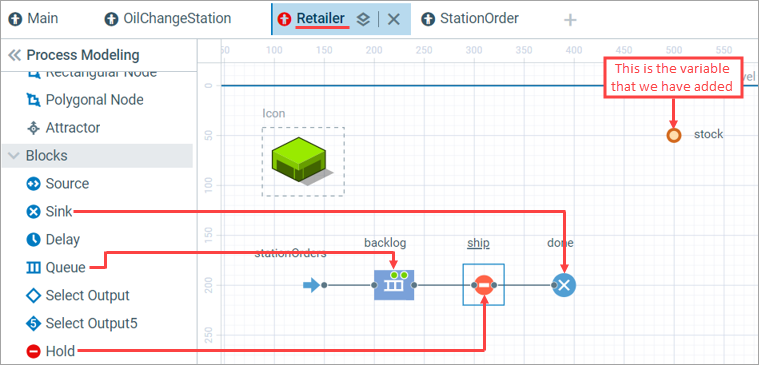
-
Next, let’s set up the properties for the variable and these blocks.
-
Variable:
Name: stock
Type: int
Initial value: 500 — For now, let us assume maximum stock at the beginning -
Queue:
Name: backlog
Maximum capacity: enabled -
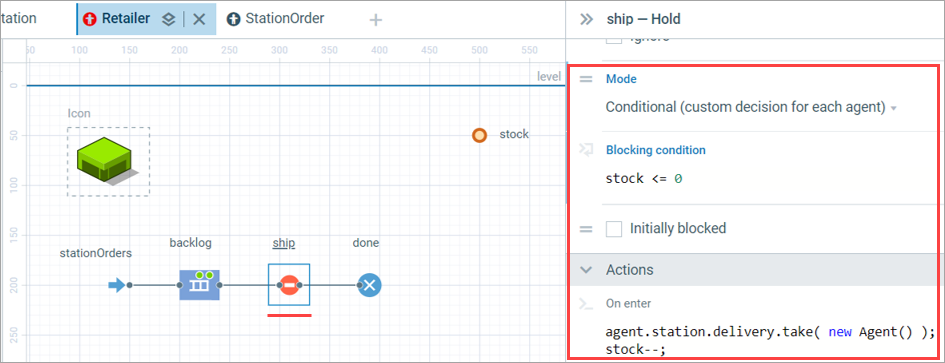
Hold:
Name: ship
Mode: Conditional
Blocking condition: stock <= 0
On enter:
agent is the station’s order, station is the station’s address, delivery is the entry point. Agent stays for barrel, which we have assumed to be the abstract agent in this model.agent.station.delivery.take ( new Agent() ); stock--;
-
Variable:
Before we run the model again, let’s add some means of visual representation of the retailer’s stock.
To create a time plot
- Switch to the
Main agent type.
- From the
Analysis palette, drag and drop the
Time Plot element onto the graphical diagram and arrange its position and size.
-
In the Data section, set the properties of the Time Plot to the following:
Title: Retailer stock
Value: retailer.stock
Style: orange with width 1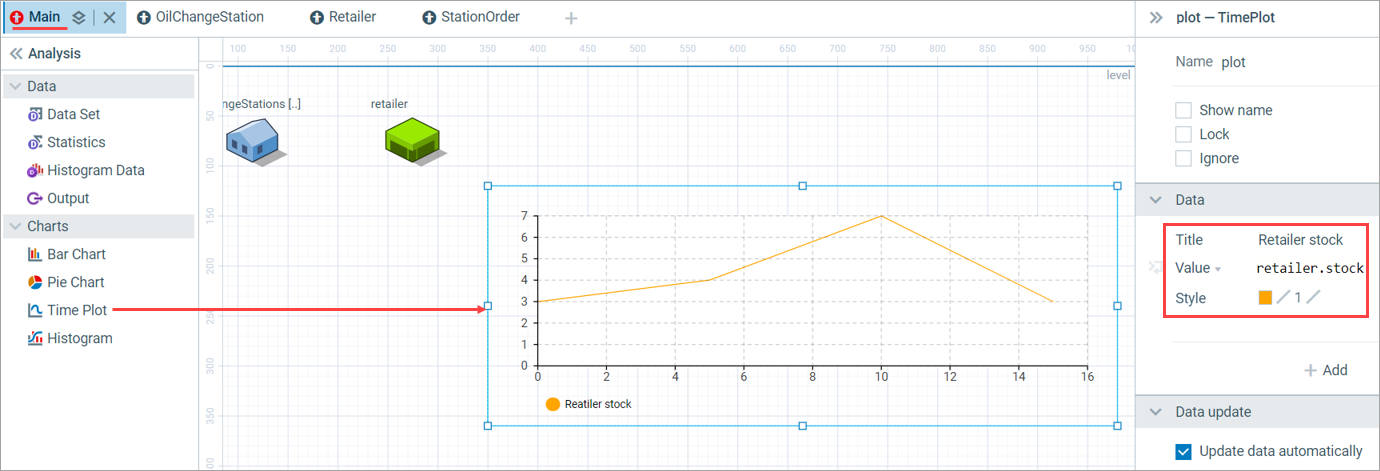
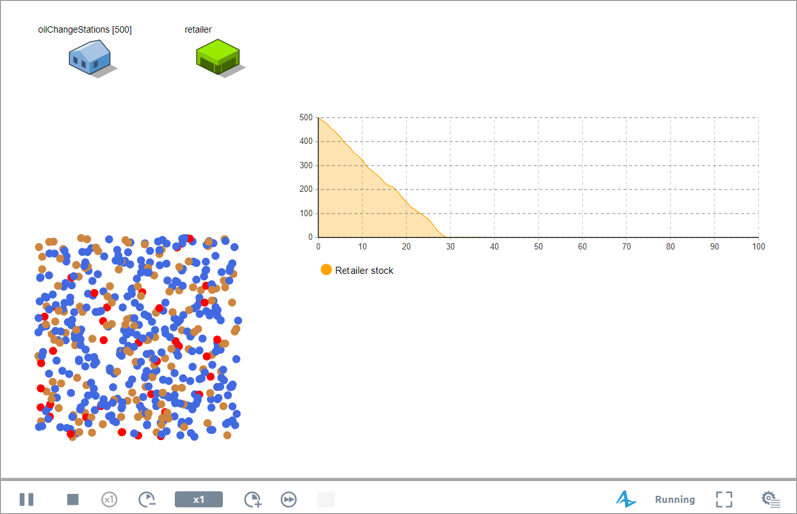
- Set the Vertical scale of the plot to be Fixed with the From / To range of 0 to 500.
- Enable the Fill area under the Line option in the Style property pop-up, in the Appearance section.
Run the model and see how the retailer’s stock drops over time, on the time plot.
-
How can we improve this article?
-


