


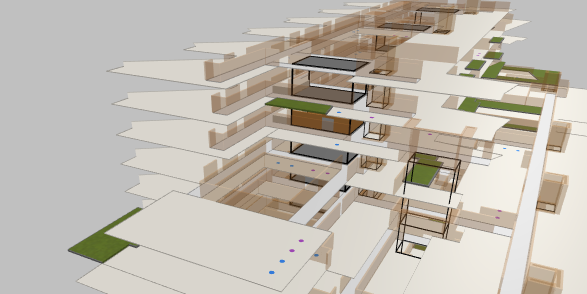
AnyLogic allows you to create multi-level models, such as multi-story buildings for pedestrian simulation. Switch between different levels in design time and use the space markup elements to organize and define the modeled environment on each level separately.
Each model uses at least one level, which is created automatically and named level. At any given time only, one level can be active, meaning that elements can be added to it.
All elements: shapes, controls, charts, 3D objects, and 3D animation tools (3D window, Camera, Light) in the model belong to a certain level. The only exceptions are the Scale element and the view area.
Each level has an absolute Z-coordinate. The elements situated on the level will have a relative Z value which is calculated from the level’s absolute Z-coordinate. If the element is a part of a group (presentation shapes) or a network (paths, nodes, and so on), the Z value is calculated for the whole group or network.
To create a level
- Open the tab of the needed agent by clicking its name in the models view.
- On the tab header’s right, click the
 button.
 - Click Create new level.
- Name your new level.
- Press Enter.
After this, a new level will be added to the model.
Alternatively, you can create a new level from any element (say, a shape or chart) in the graphical editor.
- Click the needed element in the graphical editor to open its properties.
- Locate the Level property (usually in the Position and size section).
- Click the value of that property.
- In the menu that appears, click Create new.
- Name your new level.
- Press Enter.
To switch between levels
- Open the tab of the needed agent by clicking its name in the models view.
- On the tab header’s right, click the button.
- Click the name of the level you want to edit.
To modify the level’s properties
- Open the elements view.
-
Expand the Presentation group.
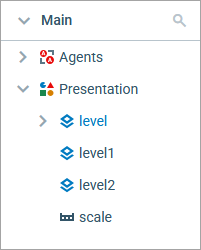
- Click the needed level.
The properties of the selected level will appear in the Properties view. You can also expand the underlying contents of each level to select individual elements present on this level.
To delete the level
- Open the elements view.
- Expand the Presentation group.
-
Click the needed level and press Delete, or
Right-click the level and select Delete from the context menu.
You can change the visibility of the level’s elements in design time. To do that:
- Open the tab of the needed agent by clicking its name in the models view.
- On the tab header’s right, click the button.
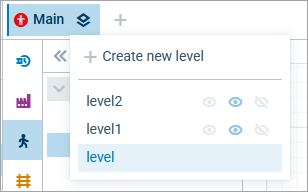
The levels menu displays a list of all the levels in your model. The currently active level is highlighted in light blue.
Hover the mouse pointer over the name of the currently inactive level name and click one of the icons to change its visibility:
- Show — The content of the level will be always fully displayed in design time in addition to the currently selected level.
- Dim — If the level is not active at design time, its contents will be grayed out.
- Hide — If the level is not active at design time, its contents will be completely hidden from view.
A level (including all the elements that belong to it) can be either visible or invisible during the model run. This behavior is set by the Visible parameter of the level’s properties.
To change the visibility of the level programmatically during the runtime, use the setVisible() function of the level.
The movement of pedestrians between levels is modeled with the help of target lines and the PedChangeLevel block.
- General
-
Name — The name of the level. The name is used to identify and access the level from code and blocks.
When inactive — Sets the visibility of the level during the design time.
Show — The content of the level will be always fully displayed in design time in addition to the currently selected level.
Dim — If the level is not active in design time at the moment, its contents will be greyed out.
Hide — If the level is not active in design time at the moment, its contents will be completely hidden from view. - Position and size
-
Z — Defines the Z-coordinate of this level.
- Visibility and presentation
-
Visible at runtime — Specifies whether the level with all its elements is visible on animation at model runtime or not.
Show in — Select whether the level is displayed in both 2D and 3D animation, 2D only, or 3D only.
You can dynamically modify the properties of the level at model runtime using the API.
- Z-coordinate
-
Function Description double getZ() Returns the Z-coordinate of this level. - Level’s elements
-
Function Description List<AreaNode> getAreas() Returns a list of all areas on this level, including the service areas. List<BulkConveyorbelt> getBulkConveyorBelts() Returns a list of all bulk conveyor belts on this level. List<ConveyorNetwork> getConveyorNetworks() Returns a list of all conveyor networks on this level. List<Crane> getCranes() Returns a list of all cranes on this level. List<DensityMap> getDensityMaps() Returns a list of all density maps on this level. DensityMap getDensityMap(DensityMapType type) Returns the density map of a particular type from this level.
type — the type of the density map: either pedestrian or transporter.List<EscalatorGroup> getEscalators() Returns a list of all escalator groups on this level. List<Lift> getLifts() Returns a list of all lifts on this level. List<Network> getNetworks() Returns a list of all networks on this level. List<Node> getNodes() Returns a list of all nodes on this level. List<Pathway> getPathways() Returns a list of all pathways on this level. List<PedFlowStatistics> getPedFlowStatistics() Returns a list of all elements that collect pedestrian statistics on this level. List<Pipe> getPipes() Returns a list of all pipes on this level. List<RailwayNetwork> getRailwayNetworks() Returns a list of all railway networks on this level. List<RoadNetwork> getRoadNetworks() Returns a list of all road networks on this level. List<Storage> getStorages() Returns a list of all storages on this level. List<StorageTank> getStorageTanks() Returns a list of all storage tanks on this level. List<TargetLine> getTargetLines() Returns a list of all target lines on this level. List<AbstractWall> getWalls() Returns a list of all walls on this level. - Pedestrians
-
Function Description Collection<Agent> getPeds() Returns an unmodifiable list of all pedestrians on this level. int pedestriansCount() Returns the total number of pedestrians which are currently located on this level. - Obstacles
-
Function Description List<Obstacle> getObstacles() Returns a list of all space markup elements on this level which are specified as obstacles. - Visibility
-
Function Description boolean isVisible() Returns true, if the level is visible; returns false otherwise. void setVisible(boolean v) Sets the visibility of the level.
v — the visibility. If v is true, the level is set to be visible, if it is false — the level is not visible.
-
How can we improve this article?
-