


The toolbar of AnyLogic 9 provides you with quick access to various functions handy during model development.
This menu contains various editing options:
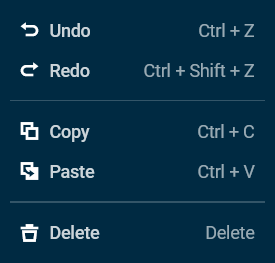
-
Undo — Reverse the last action done in the editor.
Press Ctrl + Z to use Undo without opening the menu. -
Redo — Repeat the action reversed by the last Undo command.
Press Ctrl + Y to use Redo without opening the menu. -
Copy — Copy the element or elements selected in the editor to the clipboard.
Press Ctrl + C to use Copy without opening the menu. -
Paste — Copy the element or elements from the clipboard to the editor.
Press Ctrl + V to use Paste without opening the menu. -
Cut — Remove the element or elements from the editor while adding them to the clipboard.
Press Ctrl + X to use Paste without opening the menu. -
Delete — Delete the selected element from the editor.
Press Delete to use Delete without opening the menu.
Click to reverse the last action done in the editor.
Press Ctrl + Z to use Undo without clicking the button.
Click to repeat the action reversed by the last Undo command.
Press Ctrl + Shift + Z to use Redo without clicking the button.
Click to go to the My models screen of AnyLogic Cloud.
The name of the model you are currently editing.
Click to go to the model screen in AnyLogic Cloud.
Click to immediately save all changes done after the last auto- or manual save.
The text on the toolbar may change depending on whether the model was successfully built or saved.
Click to build a model.
When building a model, AnyLogic will try to identify any errors that may be present within it. These will be shown in the Errors view.
This action also triggers a save. The model is not saved if there are any errors in it.
The icon on the toolbar may change depending on whether any errors or warnings were encountered during the last attempt to build the model.
Click to start playing the model’s animation in AnyLogic 9.
Before the playback, the model is built and saved.
By clicking the down arrow icon, you will open a menu with additional commands:
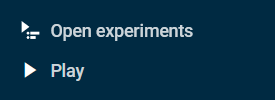
- Scenario manager — Save the model and open the experiment screen in AnyLogic Cloud with the simulation experiment being created automatically.
- Play — Save and build the model, then play the model’s animation.
Shows the current scale of the graphical editor and its elements.
To modify the scale, move the mouse pointer anywhere in the graphical editor, then press Ctrl and scroll the mouse wheel up or down.
Click the value on the toolbar to set the scale to the default value (100%).
By clicking the down arrow icon, you will open a menu with additional commands:

- Zoom to 100% — Set the default scale (100%).
- Zoom out — Reduce the scale.
- Zoom in — Increase the scale.
- Show grid — Enable or disable the squared grid in the graphical editor (enabled by default).
- Snap to grid — Enable or disable the automatic snapping of elements to the grid edges (enabled by default).
Click to access the following commands:
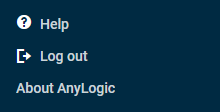
- Help — Open the documentation for AnyLogic 9.
- Log out — Log out of AnyLogic 9 and AnyLogic Cloud.
- About AnyLogic — Open the popup window with the information about the current version of AnyLogic 9.
-
How can we improve this article?
-