To start managing your products’ licenses with Team License Server:
- Navigate to <host machine name>:8080 in your preferred web browser.
-
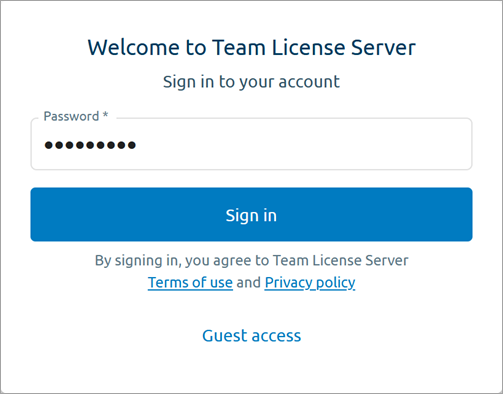
You will see the authentication form:
-
Enter the server administrator’s password (admin by default) and click Sign in to authenticate, or
Click Guest access to view Team License Server as a guest.Guest users have access to the full information about products added to Team License Server and the current state of team licenses, but they cannot modify any settings.
This is how the main page of Team License Server looks when you log in as an administrator:
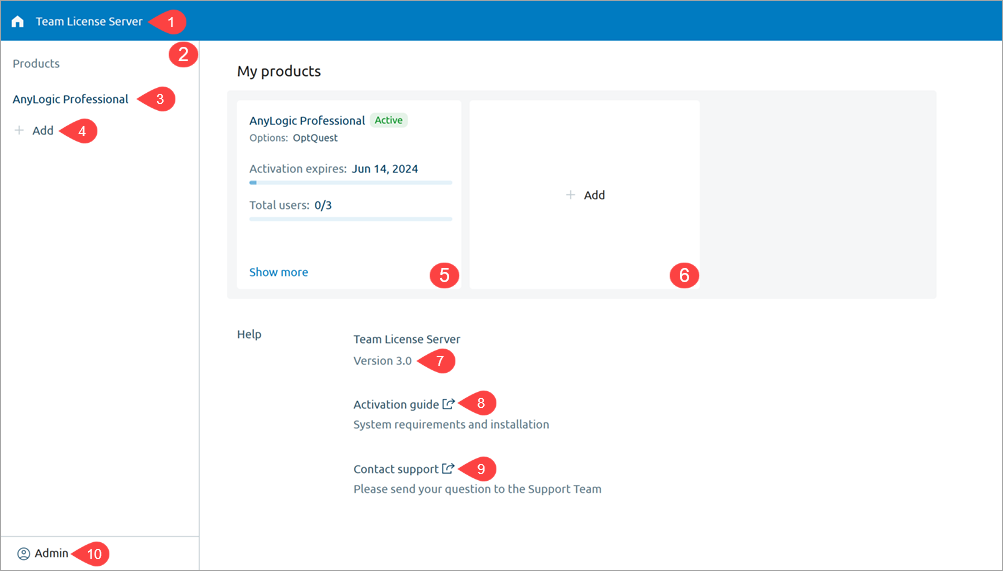
The page consists of the following elements:
-
Team License Server logo — Click
 to return to the main page from anywhere in Team License Server.
- The sidebar — Lists your products, allowing for managing them.
-
The product name — Click the product name to open its page, or
Move the mouse pointer over the product, then click to access additional commands:
- Request a key — Opens the key request form for the specified product.
- Enter a key — Opens the form which allows you to enter the key you already have.
- Remove — Removes the product from Team License Server.
- Add — Click to start adding a new product to Team License Server.
-
The product tile — Provides an overview of the product license already added to Team License Server.
The following information is available:- Activation expires — Product activation expiration date.
- Total users — Shows how many seats of your license are currently in use, and how many are available in total (not shown for the Private Cloud family of products).
- Instances — (Private Cloud only) Shows how many Private Cloud instances have been activated using the product key.
- Add tile — Click to start adding a new product to Team License Server.
- Version — Shows the version number of your shipment of Team License Server.
- Activation guide — Open the offline documentation for Team License Server.
- Contact support — Open the form for contacting the AnyLogic support service.
-
User menu — Click to access additional commands:
- Change password — Opens the form for changing the password.
- Sign out — Signs you out and redirects to the authentication form.
Navigate to <host machine name>:8080 in your preferred web browser and log in as the administrator.
To add and activate a new product to your Team License Server instance, you need an appropriate license key or use the USB dongle.
To activate the product with the key, you must request it and enter it in Team License Server. You can do both with the Team License Server UI.
To request the product key
-
On the main page of Team License Server, click the Add tile, or
Click Add in the sidebar.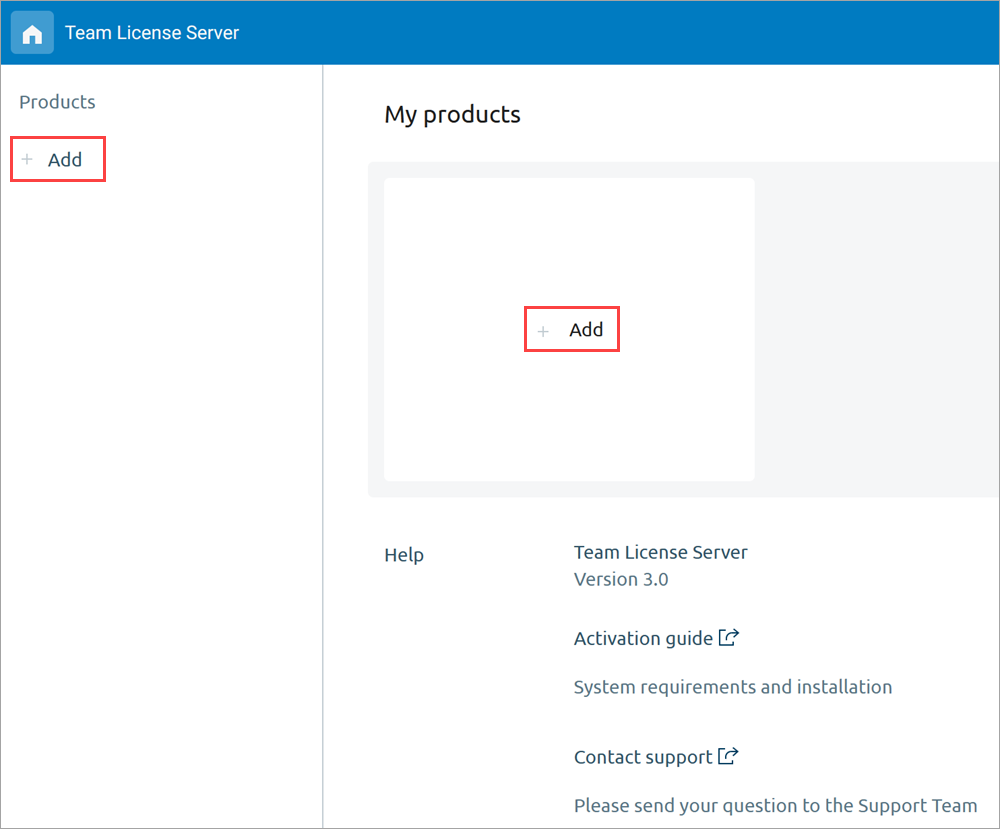
-
The product selection dialog appears:
Select the product you want to add.
- In the drop-down menu, select Request a key.
-
In the subsequent form, fill all the fields in:
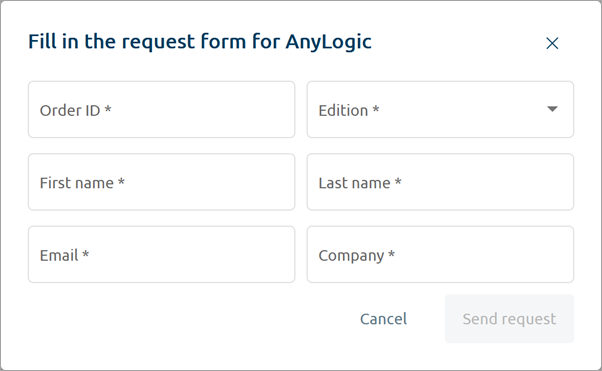
- Order ID — The 16-character order number which you received from the AnyLogic Company license department or from a distributor.
- Edition — The product edition that you have purchased.
- First name — The first name of the administrator.
- Last name — The last name of the administrator.
- Email — The work email of the administrator.
- Company — The name of your company.
It is very important that the data you provide in the key request form, as well as the selected edition, are the same that are specified in the purchase confirmation email. Otherwise, errors may occur during the product activation. - Once done, click Send request.
- The confirmation window will appear.
After that, the email containing the activation key proper will arrive at the server administrator’s email account within 24 hours. If the email is missing, check your spam folder, or reach out to us at support@anylogic.com to solve the issue.
To activate the product with the key
-
On the main page of Team License Server, click the Add tile, or
Click Add in the sidebar.
-
The product selection dialog appears:
Select the product you want to activate.
- In the drop-down menu, select Enter a key.
-
In the subsequent form, enter the key you received in the email from AnyLogic:
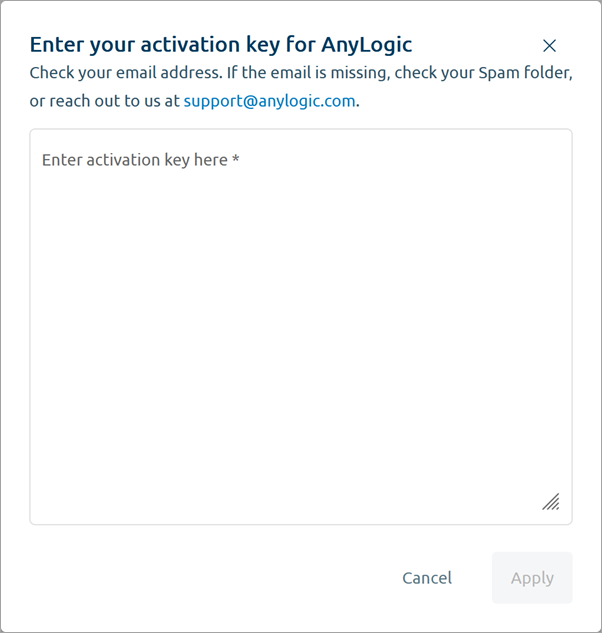
- Once done, click Apply.
If the key you specified was correct, the page for managing the product will appear automatically.
Before attempting to activate the product, insert the USB dongle into the computer hosting Team License Server.
To activate the product using the USB dongle
-
On the main page of Team License Server, click the Add tile, or
Click Add in the sidebar.
-
The product selection dialog appears:
Only the AnyLogic product can be activated with the USB key, so select it.
- In the drop-down menu, select Use the USB key.
-
If the dongle has already been used for the activation, the PIN code check will be skipped.
If this is the first time you are activating the product, Team License Server will prompt you to enter a PIN code for the key:
The PIN code should be available in the confirmation letter provided for your USB key license.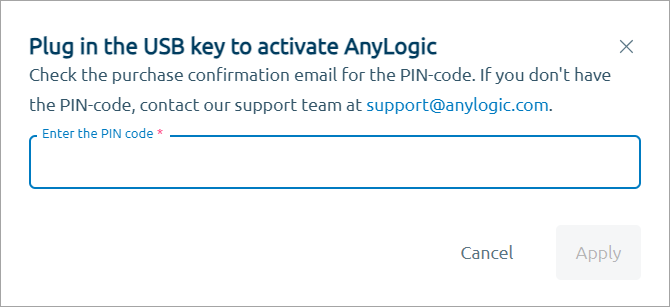
- Click Apply.
If the activation was successful, the page for managing the product will appear automatically.
Subscription-based products can be added to Team License Server. There is no particular difference between how products with the regular licenses and the products with the subscription licenses are activated.
If you are using a subscription, you will see a label about it in the Options section of the product’s page.
To activate a product subscription
- Request a key as usual.
- Activate the product with the subscription key you received.
The main difference between how subscription and regular licenses behave in Team License Server is how the lease period limits are calculated.
To manage a product’s license, open this product’s page in Team License Server.
To open the product’s page
- Navigate to <host machine name>:8080 in your preferred web browser.
-
Click Show more on the tile corresponding to the needed product, or
Click the product’s name in the left sidebar.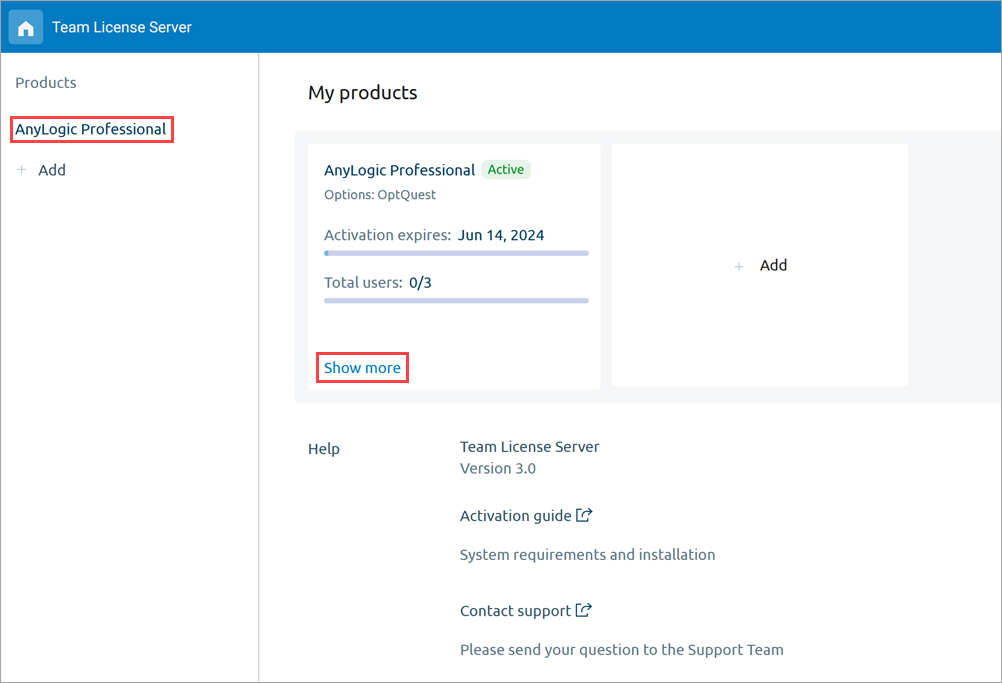
This is the page of an individual product in Team License Server:
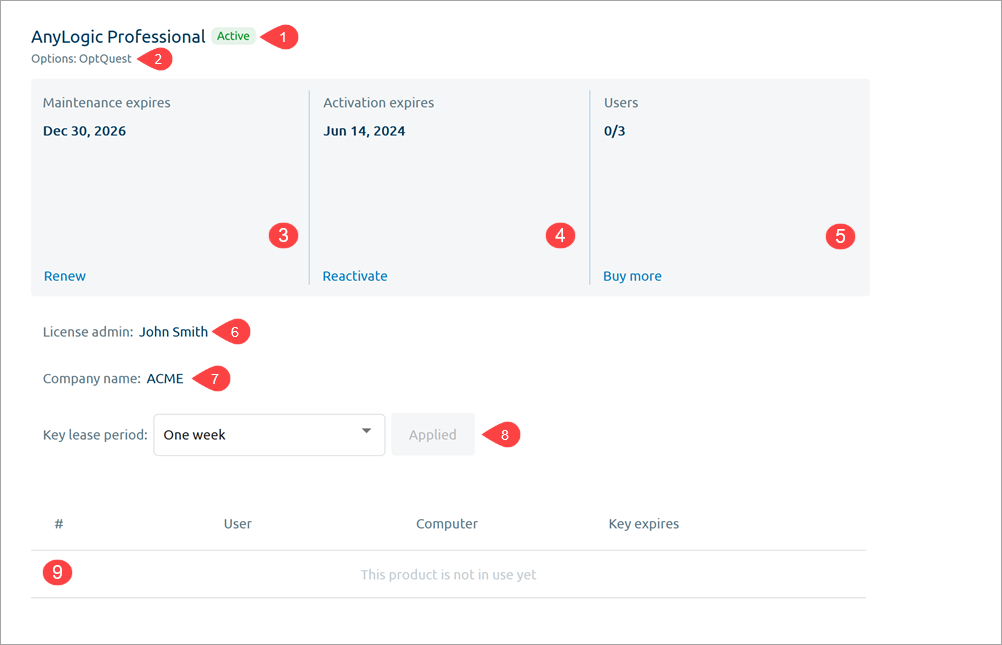
The page consists of the following elements:
-
Status — One of the following:
For servers using the USB dongle, there are two additional statuses:Status Description 
The team license for this product is valid. This product has been added to Team License Server with the appropriate license key. 
The product has been added to Team License Server, but you still need to provide an appropriate license key (see the section on the activation). 
The license for this product will expire soon. To continue using the product, consider license renewal. You will be provided with the new key, which will prolong the Team License Server service.
This status becomes visible two weeks prior to the license expiration.
The license for this product has expired. To use the product again, renew the license. - USB Key found — This status means that the key is currently connected to the Team License Server machine and working.
- USB Key not found — There is a problem with the key. See Troubleshooting for more information.
- Options — Additional features supported by your shipment of the product.
-
Maintenance — The date when your maintenance license expires. Until this date, you receive updates for your product and have access to the support services.
For subscription users, their subscription also ends on this date.
By clicking the Renew button on the Maintenance tile, you initiate the process of maintenance or subscription renewal. -
Activation — The date when the Team License Server key expires.
For subscription users, this date is always equal to the maintenance expiration date.
By clicking the Reactivate button on the Activation tile, you initiate the reactivation process. -
Users or Instances — The number of seats or Private Cloud instances that are currently in use, as well as the maximum number available under the terms of your license.
By clicking the Buy more button, you initiate the process of purchasing additional seats or instances. -
License admin — The name of the Team License Server administrator.
This information is taken from your license agreement and cannot be modified.
-
Company name — The name of the company owning the team license.
This information is taken from your license agreement and cannot be modified.
-
Key lease period — How long the users can use their instance of the product after leasing the key from Team License Server (see Changing the lease period).
This feature isn’t available for the Private Cloud family of products.
-
Users table — Shows information about users of your team license.
When a user leases a license seat from the server, the record about them appears automatically.The table isn’t shown for the Private Cloud family of products.Column Description # The serial number of the user. User The name of the user who leased the key (taken from their computer username). Computer The name of the machine, on which the license has been leased. Key expires The date when the key will expire. -
Instances table — (Private Cloud only) Shows information about Private Cloud instances activated with your key. When an instance is activated via Team License Server, the information about it appears automatically.
Column Description # The serial number of the instance. Hostname The IP address or the hostname of the Private Cloud server to which the license has been leased. Key expires The date when the key will expire.
The three tiles in the topmost part of the product page allow you to track the status of your licenses, as well as the current and total number of users available to you.
From there, you can also prolong the licenses and extend the available number of users.
- To purchase the license extension, contact our sales team at support@anylogic.com or our partner in your country.
- Open the corresponding product page in Team License Server.
- Click Renew on the Maintenance tile.
- Switch to the Request a key tab.
-
Fill in the form:
- Order ID — The 16-character order number which you received from the AnyLogic Company license department or from a distributor.
- Edition — The product edition that you have purchased.
- First name — The first name of the administrator.
- Last name — The last name of the administrator.
- Email — The work email of the administrator.
- Company — The name of your company.
- Once done, click Send request.
- The confirmation window will appear. After that, the email containing the prolongation key proper will arrive at the server administrator’s email account within 24 hours. If the email is missing, check your spam folder, or reach out to us at support@anylogic.com to solve the issue.
- Having obtained the key, click Renew on the Maintenance tile of the product page once again.
- Switch to the Activate tab.
- Enter the key you received.
- Click Apply.
After that, the maintenance should be upgraded. You will see the change on the product page and on the product tile of the main page of Team License Server.
- Open the corresponding product page in Team License Server.
- Click Reactivate on the Activation tile.
- Switch to the Request a key tab.
-
Fill in the form:
- Order ID — The 16-character order number which you received from the AnyLogic Company license department or from a distributor.
- Edition — The product edition that you have purchased.
- First name — The first name of the administrator.
- Last name — The last name of the administrator.
- Email — The work email of the administrator.
- Company — The name of your company.
- Once done, click Send request.
- The confirmation window will appear. After that, the email containing the prolongation key proper will arrive at the server administrator’s email account within 24 hours. If the email is missing, check your spam folder, or reach out to us at support@anylogic.com to solve the issue.
- Having obtained the key, click Reactivate on the Activation tile of the product page once again.
- Switch to the Activate tab.
- Enter the key you received.
- Click Apply.
After that, the product license should be upgraded. You will see the change on the product page and on the product tile of the main page of Team License Server.
- To purchase the additional seats for your users, contact our sales team at support@anylogic.com or our partner in your country.
- Open the corresponding product page in Team License Server.
- Click Buy more on the Users tile.
- Switch to the Request a key tab.
-
Fill in the form:
- Order ID — The 16-character order number which you received from the AnyLogic Company license department or from a distributor.
- Edition — The product edition that you have purchased.
- First name — The first name of the administrator.
- Last name — The last name of the administrator.
- Email — The work email of the administrator.
- Company — The name of your company.
- Once done, click Send request.
- The confirmation window will appear. After that, the email containing the prolongation key proper will arrive at the server administrator’s email account within 24 hours. If the email is missing, check your spam folder, or reach out to us at support@anylogic.com to solve the issue.
- Having obtained the key, click Buy more on the Users tile of the product page once again.
- Switch to the Activate tab.
- Enter the key you received.
- Click Apply.
After that, the available number of users should be upgraded. You will see the change on the product page and on the product tile of the main page of Team License Server.
- If your Team License Server uses the USB key, it requires the hardware update. Thus, to purchase the license extension or additional seats for your users, contact our sales team at support@anylogic.com or our partner in your country.
- Open the AnyLogic page in Team License Server.
- Click Renew on the Maintenance tile.
- Switch to the Update the USB key tab.
- Enter the update code you received.
- Click Apply.
After that, the USB key should be upgraded. You will see the change on the product page and on the product tile of the main page of Team License Server.
To remove the product
- Navigate to <host machine name>:8080 in your preferred web browser and log in as the administrator.
- Locate the product you want to delete in the left sidebar.
-
Move the mouse pointer over the product’s name, then click the
 icon that appears on the right.
- In the drop-down menu, click Remove.
- In the confirmation dialog, click OK
After that, the product will be removed from Team License Server. It will disappear from the sidebar, and its tile will be removed from the main page of Team License Server.
To let Team License Server manage its license again, re-enter the product key.
-
How can we improve this article?
-


